Part 6 - Securing Web Services with Single Sign-On
Web Services are arguably the most heterogenous distributed technology ever. A typical Web services setup will make use of many different technologies, object models and programming languages, which might include simple Perl scripts and standalone Web services implemented in C++ or Java, through to sophisticated applications build on top of J2EE application servers. Being able to interact across such diverse environments is one of the strengths of Web services, but it has a price: it becomes difficult to secure such systems. It is hard to find a common security standard for all involved technologies. Today we will talk about single sign-on, the security architecture that brings a flexible an interoperable way of securing heterogenous systems.
Web Services are arguably the most heterogenous distributed technology ever. A typical Web services setup will make use of many different technologies, object models and programming languages, which might include simple Perl scripts and standalone Web services implemented in C++ or Java, through to sophisticated applications build on top of J2EE application servers. Being able to interact across such diverse environments is one of the strengths of Web services, but it has a price: it becomes difficult to secure such systems. It is hard to find a common security standard for all involved technologies. Today we will talk about single sign-on, the security architecture that brings a flexible an interoperable way of securing heterogenous systems.
Single Sign-On - The Basic Concept
The main problem with using most common security architectures with Web services is that the security infrastructure is very distributed and these architectures usually require that key security features and algorithms are implemented by all parts of the system. The unfortunate truism of all security systems is that the level of security of the whole system is the same as the level of the security of its weakest part. This obviously leads to inflexibility because we have to either avoid certain technologies or compromise the security of a whole system. Avoiding technologies is generally impractical and negates the very reason Web services are so popular: they are able to bridge between any technology. One possible solution to this problem is the single sign-on (SSO) architecture.
Modern web service development in Java
Looking for a more modern approach to web service development? Here are some of the latest RESTful tutorials and SOAP web services examples that we’ve published on TheServerSide.
- Modern SOAP web services development in Java with Eclipse
- How to build SOAP components using WSDL and a top-down web services approach
- The simple bottom-up web service approach to creating SOAP based SOA components
- The RESTful APIs tutorial: The ins and outs of effective RESTful web services
- A step-by-step RESTful web services example with Spring Boot
- What is JAX-WS? What is REST?
- SOAP vs REST: Which one to choose?
I highly recommend these articles as a compliment to this slightly older tutorial. In fact, reading through these articles on modern SOAP and RESTful web service development, it's amazing to see just how far software development in Java has come.
The basic idea of the single sign-on security architecture is to shift the complexity of the security architecture to the so-called SSO service and thus release other parts of the system from certain security obligations. In the SSO architecture, all security algorithms are found in the single SSO server which acts as the single and only authentication point for a defined domain. Thus, there is a second benefit to an SSO approach to authentication/registration: a user has to sign-on only once, even though he may be interacting with many different secure elements within a given domain. The SSO server, which can itself be a Web service, acts as the wrapper around the existing security infrastructure that exports various security features like authentication and authorization. We will concentrate mainly on authentication in the SSO environment in this article. Actually, there are two scenarios of the SSO. We will start with the simplest first.
The simple SSO scenario
In the simple SSO scenario, the authenticated party first calls the SSO server and requests the authentication token that identifies it in the particular domain. In order to get the token, it must first provide the correct authentication credentials. There are various forms for those credentials: it might be, for example, a simple username/password or certificate, but other methods can be implemented. The SSO server performs a validation of the users' credentials using the underlying security infrastructure, and only then issues a ticket that the calling application uses for authentication against other applications. In the simple scenario, the token doesn't impose any specific information, it is simply the unique identification of the user in some defined scope and time. After the invoked application receives the token, it validates it by passing it to the SSO server that then performs the actual checks. The following picture illustrates the concept:
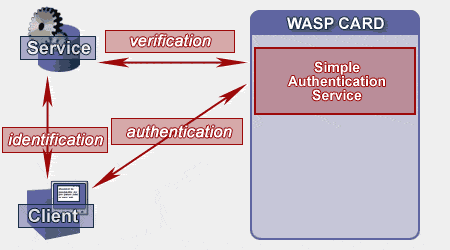
Figure 1: The Simple SSO Scenario
The main advantages of the SSO approach are evident:
- Encapsulation of the underlying security infrastructure in the SSO server. Implementation, deployment and maintenance are much easier as all communicating parties in the distributed system don't need to individually implement all of the security features and mechanisms.
- The SOAP interface to the SSO server makes the SSO architecture universal. As we mentioned earlier, the SSO is itself a Web service. If the SSO server exposes the WSDL of its interface, the SSO API can be instantly generated and made available.
- The SSO server enhances security of the whole system as the security credentials don't need to be passed around. The only point that accepts security credentials is the SSO server itself. Moreover, the SSO solution often allows federation, so the authentication can be performed in a broad scope (outside of the particular security domain) while the security credentials stay within the particular security domain.
Advanced SSO - using SAML
SSO server invocations were necessary in the previous simple SSO scenario each time the user was challenged for identity verification. A more advanced approach permits the token itself to contain some valuable security information that allows validation without having to call the SSO server each time. The token contains the authentication or authorization information. This information is 'signed' by the SSO server, so provided the token recipient trusts this server, it doesn't have to do any further verification. The described scenario is outlined in the following diagram:
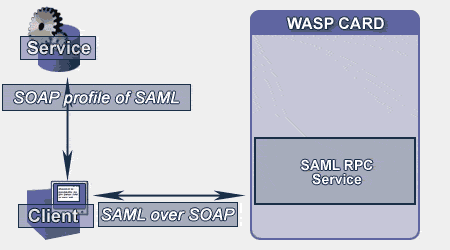
Figure 2: The enhanced SSO Scenario
There is a new standard for exchanging security-related information in XML called Security Assertions Markup Language (SAML). This is currently being completed at OASIS and its first release is expected at the time of this article's publishing. Basically, the security information described by SAML is expressed in the form of assertion statements about security subjects (e.g. users, machines or services). SAML defines the protocol by which the service consumer issues the SAML request and the so-called SAML authority returns the SAML response with assertions. There are three kinds of assertions:
The Authentication statement informs about the authentication of a particular subject in a specific time and scope.
The Authorization decision allows or denies a subject access to a specific resource.
The Attributes further qualify the subject (e.g. credit line info, citizenship etc.).
The use of SAML isn't limited to the SSO scenario. It can be used in a much broader sense. If our Web services applications understand SAML it shouldn't be difficult to flexibly reconfigure the security architecture without lenghty re-coding.
You can take a look at a the SAML authorization request below. Notice that it contains the user credentials (username and encrypted password in our case) and some descriptions like response requirements, credentials types, etc.
<samlp:Request MajorVersion="1" MinorVersion="0"
  RequestID="1fgtTGzMXSqpN++/LcFpBmZWrQg=">
  <samlp:RespondWith>AuthenticationStatement</samlp:RespondWith>
    <samlp:AuthenticationQuery>
      <saml:Subject>
        <saml:NameIdentifier Name="test"/>
        <saml:SubjectConfirmation>
          <saml:ConfirmationMethod>
            http://www.oasis-open.org/committies/security/docs/draft-sstc-core-25/password
          </saml:ConfirmationMethod>
          <saml:SubjectConfirmationData>
            cGFzc3dvcmQ=
          </saml:SubjectConfirmationData>
        </saml:SubjectConfirmation>
      </saml:Subject>
    </samlp:AuthenticationQuery>
</samlp:Request>
The response to this request contains the authentication assertion with one attribute/condition that specifies the time period when the authentication is valid:
<samlp:Response InResponseTo="1fgtTGzMXSqpN++/LcFpBmZWrQg="
  MajorVersion="1" MinorVersion="0"
  ResponseID="upuSGdmqx7ov01mExYlt+6bDCWE=">
  <samlp:Status>
    <samlp:StatusCode Value="samlp:Success"/>
  </samlp:Status>
  <saml:Assertion AssertionID="+1UyxJDBUza+ao+LqMrE98wmhAI="
    IssueInstant="2002-03-03T14:33:58.456" Issuer="WASPCard"
    MajorVersion="1" MinorVersion="0">
    <saml:Conditions NotBefore="2002-03-03T14:33:58.466"
      NotOnOrAfter="2002-03-03T15:03:58.466"/>
      <saml:AuthenticationStatement
        AuthenticationInstant="2002-03-03T14:33:55.201"
        AuthenticationMethod="http://www.oasis-open.org/committies/security/docs/draft-sstc-core-25/password">
          <saml:Subject>
            <saml:NameIdentifier Name="test" SecurityDomain="card:SQLDatabase"/>
            <saml:SubjectConfirmation>
              <saml:ConfirmationMethod>
                http://www.oasis-open.org/committies/security/docs/draft-sstc-core-25/password
              </saml:ConfirmationMethod>
            </saml:SubjectConfirmation>
          </saml:Subject>
        </saml:AuthenticationStatement>
  </saml:Assertion>
</samlp:Response>
NOTE: The SAML authentication assertion is signed, so the receiving party can easily do the proof-of-origin check and decide if it trusts the SAML assertion issuer.
Installation
We will need to install Systinet WASP Server Advanced and WASP Card in order to successfully run the following demos. This chapter outlines only basic steps of the installation process. if you want to know further details, please follow links marked Detailed info in the text.
NOTE: You'll need to download the latest (3.0.3 final) release of the WASP Server in order to successfully run the demos.
- Make sure that the Sun Java SDK 1.3.x is installed on your machine.
- Copy the jaas.jar archive from the Sun JAAS 1.0 package (you can download it from http://java.sun.com/products/jaas/index-10.html) to the libext subdirectory of all installations of your Java Runtime Environment.
- Copy the jce1_2_1.jar, local_policy.jar, sunjce_provider.jar and US_export_policy.jar archives from the Sun JCE 1.2.1 package (you can download it from http://java.sun.com/products/jce/index-121.html) to the libext subdirectory of all installations of your Java Runtime Environment.
- Change the following section in the java.security file in all installations of your Java Runtime Environment from:
security.provider.1=sun.security.provider.Sun
security.provider.2=com.sun.rsajca.Provider
to
security.provider.1=com.sun.crypto.provider.SunJCE
security.provider.2=au.net.aba.crypto.provider.ABAProvider
security.provider.3=sun.security.provider.Sun
security.provider.4=com.sun.rsajca.Provider
NOTE: There are usually at least two installations of the Java Runtime Environment (JRE) on your computer. One is in the Java SDK in its jre subfolder and the other is in the JavaSoftJRE subdirectory of the main Program Files directory (e.g. C:Program FilesJavaSoftJRE. You have to install JAAS 1.0, JCE 1.2.1 and change the java.security file in both JREs. See more details about the security installation requirements here. - Download and install the Sun J2EE. You will find the software here.
- Download and install WASP Server Advanced for Java version 3.0.3. You can download it from http://www.systinet.com/products/wasp_advanced/download/license.html. Then you will need to unzip it and run the install.bat script from its bin subdirectory. The more detailed description of the WASP Server installation is.
- Install the WASP Server security by running the install-security.bat script from the WASP bin subdirectory. Enter all default values except the server host name (the first entry) where you should specify your hostname (I recommend you use 'localhost'). You can get more details about the WASP security installation at http://www.systinet.com/products/wasp_advanced/doc/htmldata/installation_guide_body.html#security_install.
- Download the WASP Card from http://www.systinet.com/eap/wasp_card/download/license.html. Copy the cloudclient.jar and RmiJdbc.jar archives from the libcloudscape subdirectory of your J2EE installation to the etclib subdirectory of your WASP Card installation directory.
- Download the demo files. Unzip them to the c: drive, so they reside in the c:wasp_demo directory. Then change environment variables to point to directories with your Java, J2EE, WASP Server and WASP Card installations in the env.bat in the bin subdirectory of the demo sources. Then start the Cloudscape database using the startDB.bat script from the bin subdir of the demo sources installation.
- Install the WASP Card by running the install.bat script from the bin subdirectory of the WASP Card installation. Accept all default values that the script offers. See more details about the WASP Card installation here.
- Stop the WASP Server using the stopserver.bat script from the bin subdir of the demo sources installation. DON'T STOP THE SERVER OTHER WAY THAN with the stopserver.bat script or all the changes done by the WASP Card installation will be lost.
- Start the WASP Server again using the startserver.bat script.
- Run the WASP Card HTTP browser console by pointing your browser to http://localhost:6060/waspcard/console and use the Register link on the left to register a user with username 'test' and password 'password'. You'll also need to specify some other attributes like e-mail address, full name etc.
NOTE: Depending on the Cloudscape version, you may get an error when issuing the first command in the WASP Card console because the database upgrade might take place. The subsequent commands should work without any problem.
Now we're ready to run the demos.
Simple SSO scenario - the hands-on example
We're still trying to make money in a bear market: the simple stock quote example we've used in past tutorials demonstrates the first, simple SSO approach. All SSO functionality is implemented in the client and server header processors (com.systinet.demos.simple.ClientAuthenticator and com.systinet.demos.simple.ServerAuthenticator). The client header processor takes the username and password from the call context where it was stored by the client application (com.systinet.demos.simple.StockClient), binds to the SSO server web service and then obtains the authentication token by calling its generateAuthenticationToken method providing it with the passed username and password. The token is attached to the SOAP message that is traveling to the stock quote web service. There, it is extracted from the SOAP message by the server header processor (com.systinet.demos.simple.ServerAuthenticator) that binds to the SSO web service and calls its verifyAuthenticationToken method for the token authentication. The authentication result and the username are passed through the call context to the server-side web service. Note that there are some simple token caching alghorithms implemented on both client and the server. Also, the secure SOAP communication is used for talking to the SSO web service as the passed token must obviously be kept private.
NOTE: All scripts used in the following steps are located in the bin subdirectory of the demo files.
Follow those steps to run the demo:
- Run the Cloudscape DB server using the startDB.bat script.
- Run the WASP Server with the startserver.bat script.
- Deploy the simple SSO demo web service using the deploy_simple.bat script.
- Run the client application with the run_simple.bat script and look at the client and server consoles.
- Undeploy the simple SSO demo web service with the undeploy_simple.bat script.
NOTE: You'll need to specify the WASP admin username and password (username 'admin' / password 'changeit') when deploying/undeploying. You can simply accept all default values by pressing Enter.
Learn Git - Master distributed source code management
New to Git and distributed version control? Here are some Git examples and Jenkins-Git integration tutorials designed to help you master the popular source code versioning tool.
- The five basic Git commands beginners need to master
- Undo a commit and manipulate commit history with this git reset --hard example
- Learn to git revert a commit with the bash shell
- Use the git cherry-pick command across Git branches
- Change the Git editor to Notepad++
- Where the Windows Git configuration files are stored
- 10 Git quiz questions to test your knowledge
Exploring SAML
The next demo shows authentication using SAML. You can run the GUI and issue the SAML request by clicking the Get Token button. Then you can check out the SAML request and response. The Call Service button sends the SOAP message with the SAML authentication assertion appended as a SOAP header to the simple authorization web service that accepts the request, extracts it from the SOAP message and then performs the verification. Note that verification is performed by verifying the SSO server digital signature: no call to the SSO server is neccessary.
The All SAML-related code is in the com.systinet.demos.saml.AuthenticatedService and com.systinet.demos.saml.AuthenticatedServiceFrame Java sources.
You'll need to run those commands to run the SAML demo:
- Run the Cloudscape DB server using the startDB.bat script.
- Run the WASP Server with the startserver.bat script.
- Deploy the simple SSO demo web service using the deploy_saml.bat script.
- Run the client application with the run_saml.bat script and check out SAML Request, SAML response and the server verification description.
- Undeploy the SAML SSO demo web service with the undeploy_saml.bat script.
You can use the WASP Console (point the HTTP browser to http://localhost:6060/admin/console) for showing all the SOAP messages exchanged between AuthenticatedService and the GUI client. Authenticate yourself to the WASP Console (use admin/changeit username/password) and expand the SAMLSSO package and the SAMLSSO service in it. Then enable the debugging, re-run the example and then check out the SOAP conversation. You should see that the SAML token that is sent from the GUI client to the AuthenticatedService web service in the SOAP message header is digitally signed. We can't see the digital signature displayed in the GUI as it is transparently verified and removed by the WASP framework.
NOTE: All communication in this example isn't encrypted in order to allow the transport spoofing. Obviously, in real-life example encryption must be employed
Review
In this part of the Web services tutorial we learned how to secure applications with a single sign-on utlility. We introduced the simple scenario where the client gets the authentication token from the SSO service and appends it to the outcoming request. The receiving party can validate the incoming token by calling the SSO service. We've also shown how SAML, the standard format for the security information exchange, can enhance the SSO architecture. In the next article we'll begin to explore how to use UDDI.