Using OpenID
Learn more about OpenID, a decentralized, open source framework for user-centric digital identity. With OpenID, rather than managing all online accounts individually, users can manage their identity in one place via an authentication server.
What is OpenID?
OpenID is an open, decentralized, open-source framework for user-centric digital identity.
Think about all the accounts you have online: blogs, wikis, to-do lists, photo galleries. The list is endless. Even simple tasks such as leaving comments on someone else's blog may require you to register an account with that particular blogging system. This leaves you, as an end user, to set up and manage numerous accounts on each of these sites. With OpenID, rather than managing all these disparate accounts individually, users can manage their identity in one place via an authentication server.
The scenario: a user wants to log in to an external site. Instead of submitting a username and password, he submits a URL that he owns, e.g.:
http://johnsmith.example.com/
This URL either points to, or is, the user's OpenID authentication server. So the external site uses this URL to find the user's authentication server and asks it, "This user claims he owns this URL. The URL says you are in charge of authenticating this fact, so tell me, can he access my site?". The authentication server will prompt the user to log in, and will then ask the user whether he wishes to allow authentication with the external site. If the user confirms that yes he does, then the authentication server will notify the external site that the user is authenticated.
A user can use that same URL as identification for any external site that supports OpenID authentication. This will let external sites know the location of the authentication server responsible for authenticating your URL. It's that simple! The only application that would require a password to authenticate that you are who you say you are, would be your authentication server. Every other site wanting to verify that you own the URL, will simply ask your authentication server. If you currently use a portal site, like AOL, you will already have this configured for you and are able to use your existing AOL instant message login. It is reasonable to suppose that Google and Yahoo will build these services in to their user account profiles in the near future.
You might be wondering, how is this decentralized? You as a user are in control of who you choose to be your OpenID provider. So you may initially want AOL to be your OpenID provider, and if you later feel like switching to another OpenID server all you need to do is set a few HTML tags:
<link rel="openid.server" href="http://openid.example.com/">
A common place to store this link metadata would be on the root page of your personal site, such as a blog.
How will I use OpenID?
OpenID solves the multiple accounts syndrome, but OpenID can do much more. For example, you could achieve cross-application and cross-domain single sign-on (SSO). If you log in to your blog and photo gallery using the same OpenID, you only need to authenticate once with your authentication server. For each application that you need to log in to after that (during the same session), you only need to provide your OpenID instead of your username and password.
Most OpenID providers also include functionality to support multiple profiles. This allows you to present yourself as "Bob Smith" to your personal blogging system and "Robert J Smith" to your enterprise wiki. As the OpenID providers mature and become stacked with functionality, we could see businesses allow authentication of users from partner companies based on the hostname of the partner company's OpenID authentication server.
Who supports OpenID?
OpenID is quickly gaining adoption amongst public consumption sites like Digg, Six Apart, Zoomr, and AOL. With AOL's support as an OpenID provider for their existing user base, an additional 65 million logins became OpenID-friendly in one day. It is estimated that there are now over 95 million OpenID-enabled logins, and 25-50 new sites a day supporting the specification. In addition, OpenID support is being added to Firefox 3 and Microsoft is working on implementing OpenID 2.0 in Windows Vista.
To help get all this implemented, there is no shortage of libraries for the following languages:
- C#
- C++
- Java
- Perl
- Python
- Ruby
- PHP
- Coldfusion
The OpenID community maintains a list of these libraries here: http://openid.net/wiki/index.php/Libraries. Later in this article, an implementation with the OpenID 4 Java (http://www.openid4java.org) API is discussed.
OpenID Protocol Overview
The OpenID Protocol is fairly extensive. This sequence diagram is designed to give a basic overview of the workflow of the OpenID 2.0 Draft specification. It shows the interaction between the End User, Relying Party and the OpenID Provider for the most-common authentication flow.
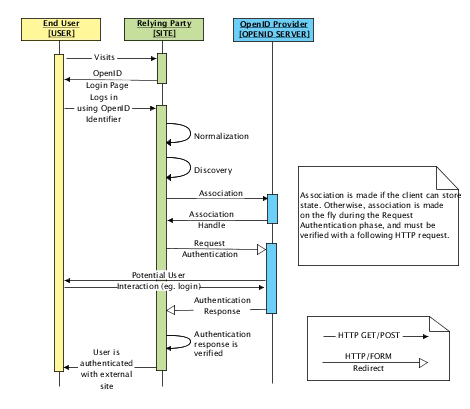
The process of logging a user into an external site has seven key steps:
1. Relying Party acquires Identifier from the User
This is a simple process where the user supplies a string (URL/XRI) so that the external site (the 'Relying Party') can identify the user. This is the URL/XRI that the user claims to own.
- External SITE asks for an IDENTIFIER from the user. This usually takes the form of a text box with an OpenID icon, and a button to start the authentication. By convention, the name attribute of the text box should be openid_identifier, so that browsers automatically recognize this as an OpenID login form.
- USER enters an IDENTIFIER. This Identifier can be a:
- URI/URL (http or https)
- XRI — basically, XRI is a generalized and decentralized URI. XRIs can be used wherever URIs are used. An XRI is of the form: xri://authority/path?query#fragment. See the XRI Syntax Spec for more information.
An IDENTIFIER will look like the following:
http://myname.myhost.com/
External sites often place the OpenID logo on their login form to quickly identify that you should use your OpenID provider.
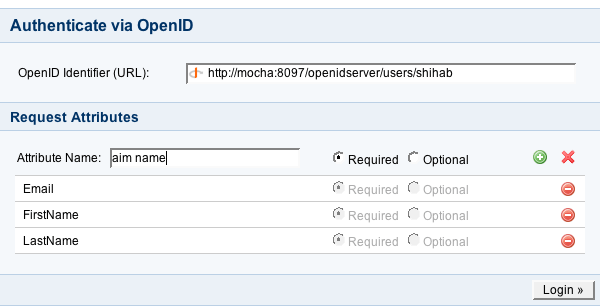
The user then clicks the 'Login' button on the external SITE to begin the authentication.
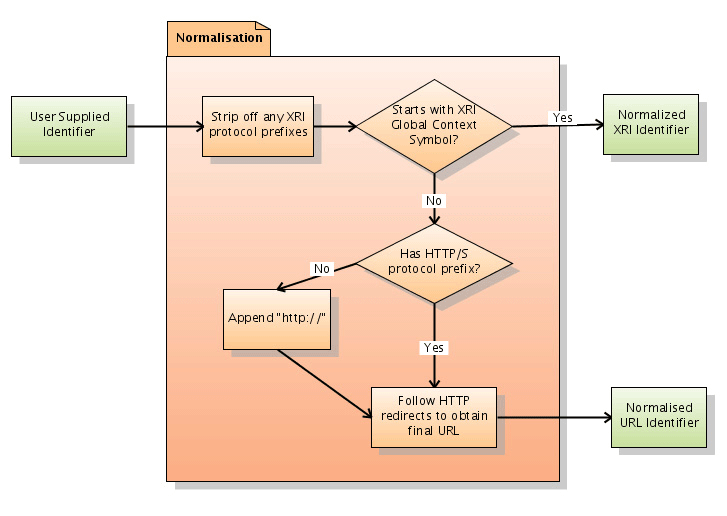
2. 'Normalization': Relying Party cleans up the Identifier
The USER could enter in a number of things as the IDENTIFIER. It is up to the SITE to clean up (normalize) it. This is a complicated process because the IDENTIFIER could be an XRI or URI.
- If the IDENTIFIER starts with xri://, xri://$ip, or xri://$dns* prefixes, strip them off.
- If the first character of the resulting string is an XRI Global Context Symbol (=, @, +, $, !) then the string is the NORMALISED IDENTIFIER XRI.
Otherwise, the input is treated as an HTTP URL (if http/https prefix isn't defined, prefix it with http://). The SITE must follow this URL (and all associated redirects) until it gets to the final document. The final URL is the NORMALISED IDENTIFIER URL.
Some examples of normalization include:
| User Input Identifier | Normalized Identifier | Identifier Type |
|---|---|---|
| =example1 | =example1 | XRI |
| xri://=example2 | =example2 | XRI |
| xri://$dns*example3.com | http://example3.com | URL |
| xri://$ip*1.2.3.4 | http://1.2.3.4 | URL |
| http://example4.com/ | http://example4.com/ | URL |
| https://example5.com/ | https://example5.com/ | URL |
| example6.com | http://example6.com | URL |
The flowchart below summarizes the normalization process:
3. 'Discovery': Relying Party looks up how to communicate with OpenID Provider
The SITE uses the NORMALISED IDENTIFIER to look up the necessary information for initiating requests. The protocol and resultant documents for the discovery phase depend on the identifier type determined in the normalization phase. This is specific to the OpenID 2.0 specifications.
| Identifier Type | Resolution Protocol | Resultant Document |
|---|---|---|
| XRI | XRI Resolution | XRDS |
| URL | Yadis Protocol | XRDS |
| URL (Yadis fails to retrieve useable XRDS) | HTML Discovery | HTML |
Quick Summaries:
- XRI Resolution : much like DNS for hostname resolution to an IP via UDP; XRI resolution resolves an XRI into an XRDS via HTTP/S. The goal is to provide a way to resolve the heavily generalized XRI format to real/usable descriptors.
- YADIS Protocol : links a URL to an XRDS. Very simple protocol, relies on current HTTP/S to point directly to the XRDS rather than using XRI-resolution.
- XRDS: XML-based XRI Resource Descriptor. Designed to provide usable/descriptive information about the XRI. In the case of OpenID, the XRDS specifies the OpenID server(s) that can be used for authenticating the NORMALISED IDENTIFIER, with the 'priority' parameter indicating the user's order of preference. In the example below, taken from Wikipedia Yadis article, 'http://www.livejournal.com/users/frank' has the highest priority (i.e. the lowest number):
<?xml version="1.0" encoding="UTF-8"?>
<xrds:XRDS xmlns:xrds="xri://$xrds" xmlns="xri://$xrd*($v*2.0)"
xmlns:openid="http://openid.net/xmlns/1.0">
  <XRD>
    <Service priority="50">
      <Type>http://openid.net/signon/1.0</Type>
      <URI>http://www.myopenid.com/server</URI>
      <openid:Delegate>http://smoker.myopenid.com/</openid:Delegate>
    </Service>
    <Service priority="10">
      <Type>http://openid.net/signon/1.0</Type>
      <URI>http://www.livejournal.com/openid/server.bml</URI>
      <openid:Delegate>http://www.livejournal.com/users/frank/</openid:Delegate>
    </Service>
    <Service priority="20">
      <Type>http://lid.netmesh.org/sso/2.0</Type>
      <URI>http://mylid.net/liddemouser</URI>
    </Service>
  </XRD>
</xrds:XRDS>
- HTML Discovery : the URL points to a HTML document. In the <head> section of the HTML, the following tag must be present:
<link rel="openid2.provider" href="http://openid.com/server/endpoint/url"/>
Optionally, the following tag should be present if the user is using delegation:
<link rel="openid2.local_id" href="http://openid.com/server/endpoint/url"/>
(eg. if someone is using openidprovider.com to verify that they own usersite.com, then their local identifier could be something like user.openidprovider.com).
Basically, the process of "Discovery" allows the SITE to know the following two things, which then enables the SITE to communicate with the OPENID SERVER:
- OpenID provider endpoint URL : the final URL of the OpenID Provider (server URL).
- Protocol Version : the version of OpenID authentication to use.
Optionally, if the USER is using delegation (ie. claiming to own an IDENTIFIER that isn't the LOCAL IDENTIFIER the USER owns at the OPENID SERVER), the SITE would also need to know:
- Claimed Identifier : the IDENTIFIER that the USER claims to own. This is already known as this is the IDENTIFIER supplied by the user during the login process.
- OP-Local Identifier : the LOCAL IDENTIFIER the OPENID SERVER will know the USER owns.
For example, for a USER to use "http://www.example.com/" as their IDENTIFIER, but have the external SITE actually verify "https://exampleuser.exampleprovider.com/" with the OPENID SERVER "https://www.exampleprovider.com/endpoint/", the following XML snippet should be present in the final XRD element in the XRDS file when discovery is performed on "http://www.example.com/":
<Service xmlns="xri://$xrd*($v*2.0)">
  <Type>http://specs.openid.net/auth/2.0/signon</Type>
  <URI>https://www.exampleprovider.com/endpoint/</URI>
  <LocalID>https://exampleuser.exampleprovider.com/</LocalID>
</Service>
4. Relying Party establishes association with OpenID Server (Optional)
An association between the SITE and the OPENID SERVER establishes a shared secret between them, which is used to verify subsequent protocol messages and reduce round trips. The actual process of creating an association is discussed in detail in the OpenID specifications. It's simply a Diffie-Hellman key exchange to generate a shared secret-key. The key is used to sign messages.
Basically, this allows the SITE and the OPENID SERVER to communicate securely. The security can be implemented either via the transport layer (using SSL), or via HMAC SHA1 or HMAC SHA256. The result of a successful association request is an assoc_handle that the SITE and OPENID SERVER can use as a key to refer to this association in subsequent messages.
The association phase is marked 'optional', as one of the alternate flows of the OpenID protocol allows the SITE to request authentication directly (without association) and subsequently request verification of the authentication (in a following request). This allows the SITE to be stateless, as it would not need to keep track of association handles. It is recommended to perform association with the OpenID Server, but if that's not possible, then this method must be used.
5. Relying Party requests authentication
An authentication request is established using redirects. See the specification for details of the message format. The important values are:
| Request Parameter | Values |
|---|---|
| openid.ns | http://specs.openid.net/auth/2.0 — static version value. |
| openid.mode | checkid_setup — allows the user to interact with the OpenID server (e.g. login). checkid_immediate — doesn't allow OpenID server interaction (e.g. used in AJAX logins). |
| openid.claimed_id | (optional) the claimed identifier. This is the same as the local identifier if delegation is not used. |
| openid.identity | (optional) the local identifier by which the user is known to the OpenID server. |
| openid.assoc_handle | (optional) assoc_handle as determined from the association phase. |
| openid.return_to | (optional) the URL the OpenID server will redirect to once the authentication is processed. |
| openid.realm | (optional) the URL pattern that the OpenID server will ask the user to trust. |
Basically, this is where the SITE asks the OPENID SERVER to verify authentication of the IDENTIFIER. Note that the SITE does not directly send a HTTP request to the OPENID SERVER; rather, it redirects the USER to make the request to the OPENID SERVER. This has security advantages as it allows the OPENID SERVER to read cookies from the USER and doesn't leak authentication details to the SITE.
6. OpenID server responds to authentication request
After receiving the OpenID request, the OPENID SERVER must decide whether to allow or reject the user's authentication. This could be based on whether the USER has previously authenticated with the OPENID SERVER.
It's important to note that the OPENID SERVER has control when it receives the authentication request message from the SITE via the USER. This means it asynchronously responds to the authentication request message and can have an entire sequence of interactions with the USER before it responds to the authentication request. Most authentication servers make use of this by presenting the USER with a screen to allow or deny the authentication request from the SITE.
Once the OPENID SERVER is ready to respond to the authentication request, it builds an authentication response message as described below. See the OpenID Protocol for more information on the low-level messages.
A positive assertion will have the following values:
| Response Parameter | Values |
|---|---|
| openid.ns | http://specs.openid.net/auth/2.0 — A static version value. |
| openid.mode | id_res — The response to an authentication request. |
| openid.op_endpoint | The OpenID provider endpoint URL. |
| openid.claimed_id | (optional) The claimed identifier. |
| openid.identity | (optional) The same as the openid.claimed_id. |
| openid.return_to | A verbatim copy of the return_to URL parameter sent in the request. |
| openid.response_nonce | A string 255, characters or less in length, that MUST be unique to this particular successful authentication response. |
| openid.invalidate_handle | (optional) If the Relying Party sent an invalid association handle with the request, it SHOULD be included here. |
| openid.assoc_handle | The handle for the association that was used to sign this assertion. |
| openid.signed | A comma-separated list of signed fields requested by the SITE. |
| openid.sig | The base 64 encoded signature. |
The response is sent via a redirect through the USER to the SITE, ensuring that the SITE and OPENID SERVER do not communicate directly in the authentication request/response process.
7. Validate the indirect response
The final step of the protocol is for the SITE to validate the indirect authentication response message from the OPENID SERVER.
When the SITE receives a positive assertion, it MUST verify the following before accepting the assertion:
- The value of "openid.return_to" matches the URL of the current request. This ensures that the OPENID SERVER redirected the USER to send the response message to the correct URL.
- The discovered information matches the information in the assertion.
- An assertion has not yet been accepted from this OPENID SERVER with the same value for "openid.response_nonce". This prevents reply attacks.
- The signature on the assertion is valid and all fields that are required to be signed are signed. This authenticates the message is from the OPENID PROVIDER and has not been tampered with.
If all four of these conditions are met, assertion is now verified.
Extensions to the Protocol
The OpenID protocol is for basic authentication. Additionally, there are some useful protocols which can piggy-back off OpenID:
- Attribute Exchange — OpenID Attribute Exchange is an OpenID service extension for exchanging identity information between endpoints. Messages for retrieval and storage of identity information are provided.
- Simple Registration — OpenID Simple Registation is an extension to the OpenID Authentication protocol that allows for very light-weight profile exchange. It is designed to pass eight commonly requested pieces of information when an End User goes to register a new account with a web service.
Implementing the OpenID Protocol with OpenID4Java

OpenID4Java is an OpenID 1.1 and 2.0 specification implementation that is maintained through the code.google.com system. The initial code for the project was donated by Sxip and since then companies like Atlassian have started contributing chunks of work to the project to bring the API into alignment with the 2.0 attributes exchange specification.
To OpenID-enable your web-application, you need to do the following:
- Download and install the libraries to your project (note that a new Maven 2 pom is now available).
- Change your authentication prompt to ask users for their OpenID identifier rather than their username and password.
- Create an authentication request for this identifier, and redirect the user to their OpenID Provider.
- Receive the OpenID Provider's authentication response at your web-application's ReturnURL, and verify the response.
That is, your web-application will function as the 'Relying Party' as shown in the sequence diagram above (see 'Protocol Overview').
The first step is to create a consumer object that will do the grunt work of the authentication with the server. You will want the consumer object to be a singleton throughout your application so that the relevant association keys are in the one place. Storing the keys between requests will give a small performance increase between the two endpoints when there are multiple authentication requests.
/**
 * Sample Consumer (Relying Party) implementation.
 */
public class SampleConsumer
{
    public ConsumerManager manager;

    public SampleConsumer() throws ConsumerException
    {
        // instantiate a ConsumerManager object
        manager = new ConsumerManager();
    }

    ...
}
Once the user has supplied their OpenID URL, you need to make a request to the URL and obtain the OpenID authentication server's endpoint URL. Once the server's endpoint is determined, you create an association (shared-secret) with the server.
// discover the OpenID authentication server's endpoint URL
List discoveries = manager.discover(userSuppliedOpenID);

// attempt to associate with the OpenID provider
// and retrieve one service endpoint for authentication
DiscoveryInformation discovered = manager.associate(discoveries);

// store the discovery information in the user's session for later use
session.setAttribute("discovered", discovered);
The calls above will:
- download a list of OpenID providers (generally just one). The results will be returned in order of preference for authentication.
- establish a shared-secret with the OpenID provider, through association.
- store the association ('DiscoveryInformation') for later use.
We now need to redirect the user to their OpenID Provider for authentication. We also need to tell the provider the address ('return URL') of the Relying Party site (i.e. your web-application), so that the provider knows where to send the user after performing the authentication.
// define the return path
String returnURL = "http://company.com/openidresponse.jsp";

// generate an AuthRequest message to be sent to the OpenID provider
AuthRequest authReq = manager.authenticate(discovered, returnURL);

// redirect the user to their provider for authentication
httpResp.sendRedirect(authReq.getDestinationUrl(true));
The code above will redirect the user to their OpenID provider, where the user will be asked if they want to approve the authentication with your web-application. (Note: The accepted practice for OpenID providers is to store a preference indicating whether the user wants to approve the authentication with your web-application 'temporarily', 'always' or 'not at all'. When the user accesses your web-application again, if they are already authenticated with their OpenID provider and have previously selected 'always', they will be able to access your web-application without having to authenticate.)
After authenticating the user, the OpenID Provider will redirect the user back to the Relying Party site (i.e. your web-application), using the return URL you provided, and send an authentication response message to your web-application. Your web-application will need to receive and process this response. Depending on your workflow, you can then display an error message or send the user to the 'success' page.
The simplest way to process the OpenID Provider's authentication message response is with a JSP or Servlet, e.g.:
// extract the parameters from the authentication response
// (which comes in as a HTTP request from the OpenID provider)
ParameterList openidResp = new ParameterList(request.getParameterMap());

// retrieve the previously stored discovery information
DiscoveryInformation discovered = (DiscoveryInformation) session.getAttribute("discovered");

// extract the receiving URL from the HTTP request
StringBuffer receivingURL = request.getRequestURL();
String queryString = request.getQueryString();

if (queryString != null && queryString.length() > 0)
   receivingURL.append("?").append(request.getQueryString());

// verify the response
VerificationResult verification = manager.verify(receivingURL.toString(), openidResp, discovered);

// examine the verification result and extract the verified identifier
Identifier verified = verification.getVerifiedId();

if (verified != null)
    // success, use the verified identifier to identify the user
else
    // OpenID authentication failed
The user can now be processed as usual through your web-application.
Conclusion
OpenID is a collaborative effort by the Internet community to standardize on an authentication approach that users can actually use. It does the same things as existing protocols such as SAML, but is easier to install, deploy and maintain. Anyone with basic programming skills can understand and deploy the OpenID technology within their new or existing web-applications.
OpenID is already experiencing wide-scale adoption. In the near future it is reasonable to expect companies and portal sites like Google and Yahoo to support the technology, giving it the tipping point it needs to become the de-facto authentication method for Internet sites.
More information about the OpenID Foundation can be found here: http://openid.net/
Authors
Justen Stepka is the project manager of Atlassian's Crowd single sign-on security server. The Crowd team is currently developing an OpenID provider implementation of the OpenID 2.0 specification. Previously Justen was the CEO of Authentisoft, which was acquired by Atlassian in the fall of 2006. Justen is also a committer on the OpenID4Java project.
Shihab Hamid is an engineer at Atlassian, leading the design and development of OpenID integration for Crowd. Shihab is also a committer on the OpenID4Java project.