Building Java Web services with NetBeans 7
In this tutorial, I'll walk through building a simple Web service with NetBeans 7. Let's see just how far the Java specification and the tools that support the spec have come.

The days of J2EE are behind us and—as of March 15, 2011—the Java EE 7 specification has full JSR support. That makes it about time to see just how far the Java specification and the tools that support the spec have come with regards to the development of Web services.
Since the new NetBeans 7 is currently available for download, I figured I’d give it a download and do a quick install. I should also mention that I have almost no experience with NetBeans, being an Eclipse and Rational Application Developer aficionado for the past five or six years, so I’m definitely not expecting any smooth sailing.
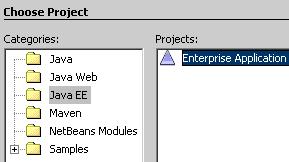
Once installed, the File > New Project option just screamed out to me, and it was pretty obvious that I wanted to create a new "Enterprise Application."
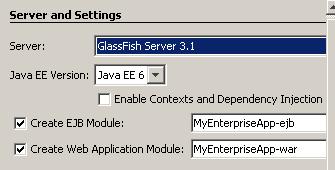
When prompted for a name, I used the incredibly uncreative name of MyEnterpriseApp, which caused a correspondingly named EJB and Web module to be created. The other nice thing about this particular stage in the development process was the fact that NetBeans automatically associated the project with GlassFish 3.1 which was automatically installed with the installation of the development tool.
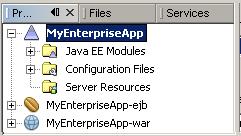
The projects window that appears is a tad intimidating, as it really doesn’t provide too much insight into exactly where you would create a Web service.
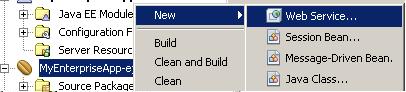
However, my experience with J2EE Web services is that they were nothing more than EJBs wrapped up in all sorts of special Web service decorations, so digging into the EJB folder of the projects tree seemed like a good place to start. Sure enough, by following the context menu of the EJB module, I was led directly to an option to create a Web service.
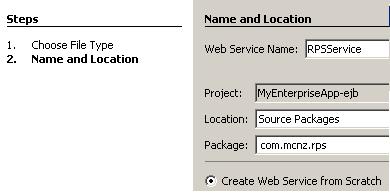
Whenever I’m testing a new technology, I always like to use the good old rock-paper-scissors scenario to test things out. In this case, I’m going to create a Web service that accepts a String as an argument, and the Web service will tell the user whether they have won, lost, or tied. I’m going to call the Web service the RPSService, and choose the NetBeans option to create the service from scratch:
When you finish the wizard, a basic hello world type of method is provided for your perusal. It looks innocuous enough, and I’m assuming that if the tool generates it for me, it should work, so I’m going to leave it in there as an insurance policy for when I get around to testing my new Web service.
/** This is a sample Web service operation */
@WebMethod(operationName = "hello")
public String hello(@WebParam(name = "name") String txt) {
return "Hello " + txt + " !";
}
What I really want to do is add in a new method that can be used by any Rock-Paper-Scissors type of application. Basically, I need a service that when provided a String such as “Rock”, “Paper” or “Scissors” that a result of win, loss or tie, and perhaps even failure, will be returned to the calling program. That means adding a new method to the Web service.
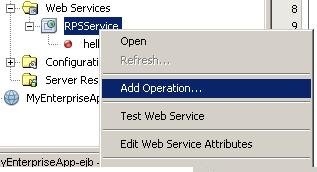
I actually tried a few different ways of adding methods to the NetBeans generated Web service, but I don’t think the various steps I tried created the proper entries in various WSDL files or whatever. To properly add a new method to a Web service, the best option is to use the Add Operation wizard that is available from the context menu when you right-click on the Web service in question:
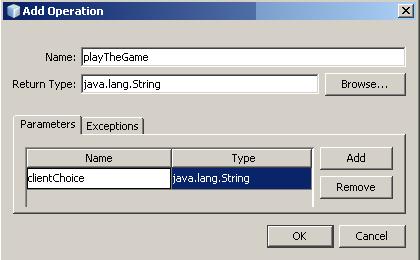
With the Add Operation wizard invoked, you are given the opportunity to provide a method name, a return type, and any arguments the method might require.
Completing this wizard adds a basic method stub into your Web service class, but the real coding is left up to you:
@WebMethod(operationName = "playTheGame")
public String playTheGame(@WebParam(name = "clientChoice")
String clientChoice) {
//TODO write your implementation code here:
return null;
}
So, here’s the improved and updated playTheGame method with the required logic to play a simple Rock-Paper-Scissors game. Notice that for the sake of simplicity, the server always chooses Rock.
@WebMethod(operationName = "playTheGame")
public String playTheGame(@WebParam(name = "clientChoice") String clientChoice) {
String result = "failure";
String serverChoice = "rock";
try {
if (clientChoice.equalsIgnoreCase("scissors")) {
result = "loss";
}
if (clientChoice.equalsIgnoreCase("paper")) {
result = "win";
}
if (clientChoice.equalsIgnoreCase("rock")) {
result = "draw";
}
} catch (RuntimeException e) {
System.out.println("Excetion");
}
return result;
}
So, the basic Web service has been created. However, the question that is begging to be asked is "will it work?" Which brings us to the point of testing it.
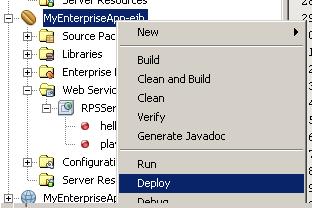
Since the Web service is in the EJB module, it just makes sense to deploy the EJB module first. That’s a simple right click.
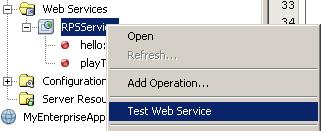
With a little “Build Successful” message cheering me on from the console window of NetBeans, I simply right-click on the Web service and select “Test Web service.”
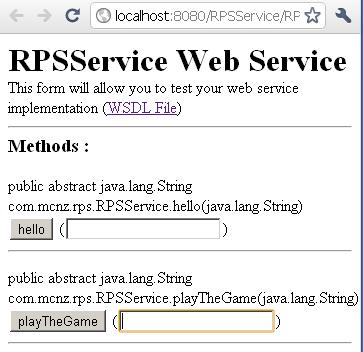
Within seconds, a new Chrome browser window pops up asking me to test either of the two methods that are associated with the Web service, which includes the simple method that the tool generated for us by default, and the playTheGame method we coded ourselves.
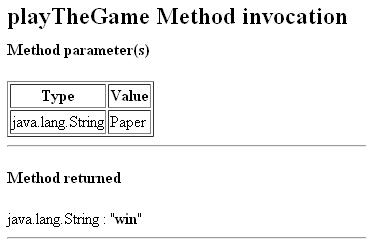
When we play the game, with say Paper, we get the expected result, which is a win for us and a loss for the server. Here’s how the response is formatted in the browser by the test engine:
And what’s also interesting is the fact that both the SOAP request and response packages are displayed for our viewing pleasure, just so we know exactly what’s going on during the Web service interaction:
SOAP Request-
<?xml version="1.0" encoding="UTF-8"?>
<S:Envelope xmlns:S="http://schemas.xmlsoap.org/soap/envelope/">
<S:Header/>
<S:Body>
<ns2:playTheGame xmlns:ns2="http://rps.mcnz.com/">
<clientChoice>Paper</clientChoice>
</ns2:playTheGame>
</S:Body>
</S:Envelope>
SOAP Response-
<?xml version="1.0" encoding="UTF-8"?>
<S:Envelope xmlns:S="http://schemas.xmlsoap.org/soap/envelope/">
<S:Body>
<ns2:playTheGameResponse xmlns:ns2="http://rps.mcnz.com/">
<return>win</return>
</ns2:playTheGameResponse>
</S:Body>
</S:Envelope>
That’s it. That’s how simple and easy it is to create and test a basic Web service using the next generation of NetBeans, version 7.