Vibe coding a responsive website with Bootstrap and Cursor AI
One of the biggest challenges design teams and web developers face is turning Figma designs into responsive, professional-looking web pages that remain faithful to the original vision.
Fortunately, there are numerous AI development tools that make the process much faster and easier. Three leading AI-powered IDEs include:
- GitHub Copilot
- The Windsurf Editor
- Cursor AI
Cursor AI allows you to convert Figma designs to code with simple prompts.
With a little bit of knowledge and comfort with the AI-powered IDEs, graphic artists can now easily convert their Figma designs into code and create fully functional websites without in-depth knowledge of HTML, CSS or JavaScript.
Converting Figma designs to code
Curious how to turn a Figma design into production-ready HTML, CSS, and JavaScript?
That’s exactly what you’ll learn to do in this Figma to code with Cursor AI tutorial.
For this tutorial, I asked a graphic artist to create a Figma design for a website promoting my Scrum certification book. Without writing a single line of code, I’ll show you how to use Cursor AI to bring these designs to life.
The animated GIF below shows the designs the UX team delivered.
Both mobile and desktop Figma designs will be converted into HTML, CSS and JavaScript code with Cursor AI.
Before you start
Before converting your Figma design into a webpage, make sure you have the following at the ready:
- The specific font families, colors, and gradients used in the Figma design.
- All required image assets, SVGs and icons.
- Any preferred libraries or frameworks, such as LineIcons, Bootstrap or React.
- Cursor AI installed and configured.
Step 1: Set up your Figma-to-code project
Your first prompt to Cursor will set up the HTML and JavaScript project and generate a basic webpage with a responsive navigation bar. A working navbar ensures the setup and libraries are functioning correctly.
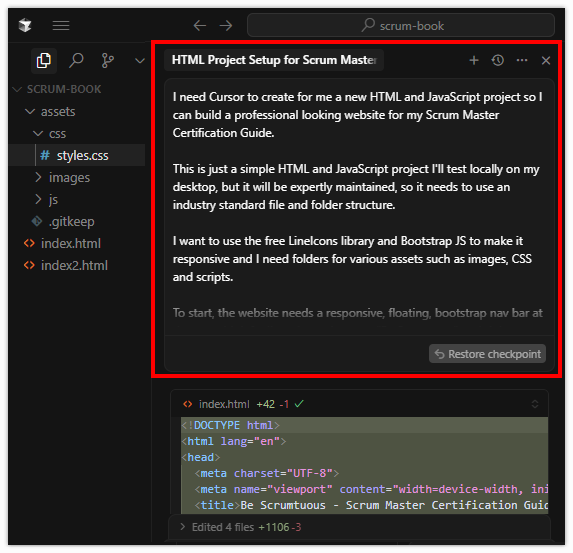
Here’s the prompt:
I need Cursor to create for me a new HTML and JavaScript project so I can build a professional looking website for my Scrum Master Certification Guide.
This is just a simple HTML and JavaScript project I’ll test locally on my desktop, but it will be expertly maintained, so it needs to use an industry standard file and folder structure.
I want to use the free LineIcons library and Bootstrap JS to make it responsive and I need folders for various assets such as images, CSS and scripts.
To start, the website needs a responsive, floating, bootstrap nav bar at the top with left-aligned text that says “Be Scrumtous” and right-aligned links for Home, Twitter, YouTube, TSS (that’s www.theserverside.com) and Xennial ( that’s www.xennial.com). The text “Be Scrumtuous” should randomly animate itself every 10-15 seconds in a way that’s mildly annoying.
I will provide instructions on how to design the rest of the page next.
Cursor will take a minute or two to create the project and design the page. When it’s done, simply click Accept All and view the generated webpage. Specifically check to see if the navigation bar renders appropriately in both desktop and mobile modes.
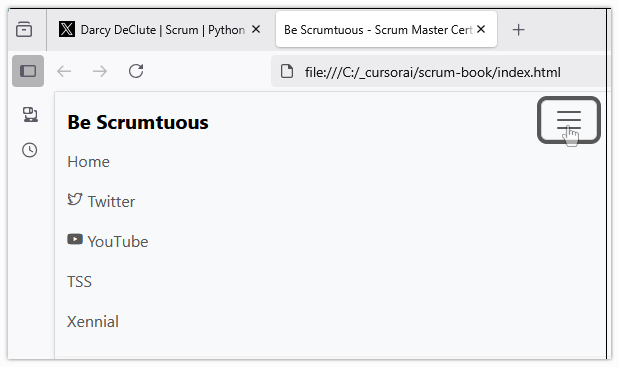
A working navigation bar that turns into a hamburger on mobile proves the project is configured correctly.
Step 2: Build the overall layout
The Figma design includes seven distinct sections, plus a footer and the navigation bar we just created. In this next prompt, we’ll generate all of these sections while specifying the font family, colors and gradients to apply site-wide.
We’ll also provide basic instructions for how the gradient across the hero section should look.
Under the nav bar I’d like separate sections named hero, testimonials, about, stats, video, pricing and authors. Add a footer with a copyright notice as well.
The hero, stats and footer sections should all use a linear, 45-degree gradient that goes from BlueViolet to DeepPink for the background.
The about, video and authors section should have a SnowWhite background. The other sections should be solid white.
Also, the hero section should only take up 75% of the viewport when the page loads.
I want to use Poppins as the font. On a light-colored background, the font colors should be DeepPurple for headings and MidnightBlue for smaller text.
On a gradient background, the font colors should be White for headings and MidnightBlue for smaller text.
Also, create a fun and simple page loading animation to spice things up a bit.
Notice how I’m having a bit of fun with the prompts — asking for page load effects and even mildly annoying animations? Cursor AI handles these creatively, adding JavaScript to make elements like images or text bounce or fade at random. It’s a playful way to liven up an otherwise static page.
Step 3: Organize your resources
As mentioned earlier, you’ll need your images, SVGs and other assets ready. In this step, we’ll organize them into an images folder, with subfolders like authors, heroes and testimonials for better structure.
Next, we’ll prompt Cursor AI to build a hero section carousel that uses the images from the heroes folder.
Here’s the prompt:
Update the hero section so it is split into two halves on a large screen.
On the left it says in dark, regular-sized text “Level up your Agile game”
Under that in big white letters it says:
-
- Learn to be Agile
- Master Scrum
- Get Certified Fast
Under that, in small dark text say “Advance your career with PSM and PSPO certifications.”
Under the text, add icons that link to Twitter, YouTube, GitHub and Amazon.
The first and third icons should be white with a square white border and a transparent background. The second and fourth icons should be DeepPurple on a white background and with a square white border.
When the user hovers over an icon, the background transitions to DeepPurple and the icon is white. Use a top-to-bottom slider effect to make the change when the user hovers over an icon.
On the right side, add a bootstrap carousel that loops through all of the images that have just been placed in the heroes folder under images. The images all have a 500×513 ratio.
The carousel background should be transparent, and the carousel should move to a new picture every 4 seconds. Make the photos in the carousel occupy as much of the space on the right-hand side as possible.
When Cursor AI code generation is complete, we can see the hero section looks very similar to the Figma designs, right down to the fonts, colors and gradients.

We have prompted the conversion of all fonts, colors and gradients from the Figma designs into the webpage’s hero section.
Step 4: The Testimonials section
The testimonials section simply displays the three images placed in the images folder on the last step.
One tip to display images effectively is to tell Cursor AI their dimensions, to help the tool format them more effectively. Here’s the prompt:
Remove everything currently in the testimonials section.
Then, for the testimonials section, I want you to add the three 450×360 images from the recently updated testimonials folder so they appear evenly spaced and next to each other in desktop mode. Stack them for smaller screens.
-
- Each image should fly onto the screen when they enter into the viewport.
- Each image should have a different, fun and friendly animation that occurs when a user hovers over them.
Make sure there is some padding at the top and bottom of the testimonials section so the images are nicely spaced between the sections above and below.
Step 5: The About section
The About section follows a classic 50/50 layout, with an image on the left and text on the right.
In this step, we’ll ask Cursor AI to generate a set of bullet points about the book. You can always edit or replace them later; you don’t need to provide all the text up front. Let the AI do the heavy lifting!
Here’s the prompt:
Completely update the About section.
Split the page into two halves. On the left, display the 500x625px file named scrum-guide-cover.jpg that is in the images directory.
Add a fun animation to the image that has it fly onto the screen when it enters the viewport, and do another animation when someone hovers over it.
On the right half add a centered title that says “Get Certified Fast!” and make the font white and put the title on a tightly wrapped background that uses the hero section’s gradient.
Then in dark text write in bold: “No other Scrum Master Certification Guide provides:”
Then add seven bullet points about what a good certification book contains.
Finally, centered under the bullet points in bold text that links to amazon.com write:
GET YOUR COPY NOW
You can see from the generated page that Cursor AI does a good job of filling in the Figma design’s Lorem Ipsum text:
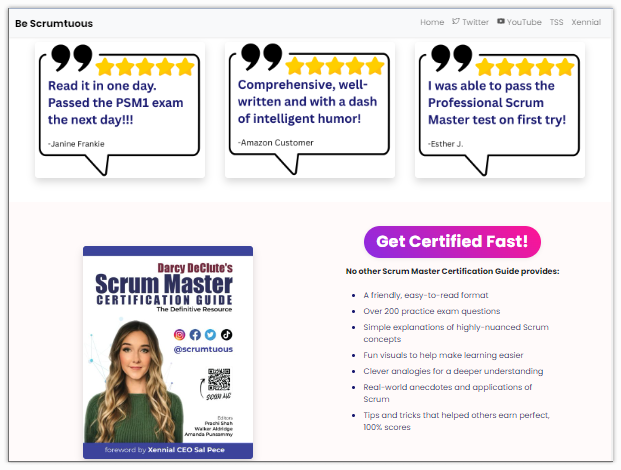
In the testimonials and about section we let Cursor AI generate its own text and bullet points.
Step 6: Animated counts
A popular web design element is the dynamically incrementing count, a set of statistics that animate from zero to their final values when they appear on screen.
While this can be a bit tricky to implement manually with JavaScript, a well-crafted prompt makes it easy for Cursor AI to generate the component for you.
Completely redesign the content of the stats section.
Inside the section, display the following four statistics:
-
- 323 Pages
- 125+ Five-Star Reviews
- 325+ Questions
- 585+ Certifications
Include the plus sign after the numbers that have them.
Each stat should include a centered LineIcons icon that makes sense, a bold number that counts up from 0 to its final value using JavaScript, and a small label underneath.
Style the icons with a white rounded background. Center all content vertically and horizontally. Use smooth animation for the counting numbers, triggered when the section enters the viewport.
Step 7: Embed a YouTube video
Next, we’ll test Cursor’s ability to embed a YouTube video on the page. This section also uses a 50/50 layout: video on one side, text on the other.
In earlier prompts, we explicitly described how the layout should adapt to desktop and mobile. From this point forward, that level of detail isn’t always necessary. Cursor AI typically generates responsive Bootstrap layouts that look great across devices without explicit prompting.
Now let’s redo the video section.
Centered at the top of the section add a title that says “Scrum Made Easy”, make the text white and put the title on a tightly wrapped background that uses the same gradient as the hero section.
Then, under the heading, split the section into halves for desktop viewing, and stack the content on mobile.
On the left half, display this YouTube video:
https://youtu.be/fu2bvCTSd9U
On the right side, add the following bolded text:
Get certified with the help of Darcy DeClute (@Scrumtuous), the industry’s foremost leader in Agile and Scrum.
Then, in regular font, add the following bullet points:
-
- Certified Scrum Master (PSM1), Product Owner(PSPO) and Scrum Developer (PSD)
- Over 250,000 followers on Twitter
- Over 1 million YouTube views
- Coaching experience in manufacturing, retail and finance
Then centered, under the bullet points add a call to action.
By the way, the video used in this section is from TheServerSide article What is Scrum? It’s worth a read.
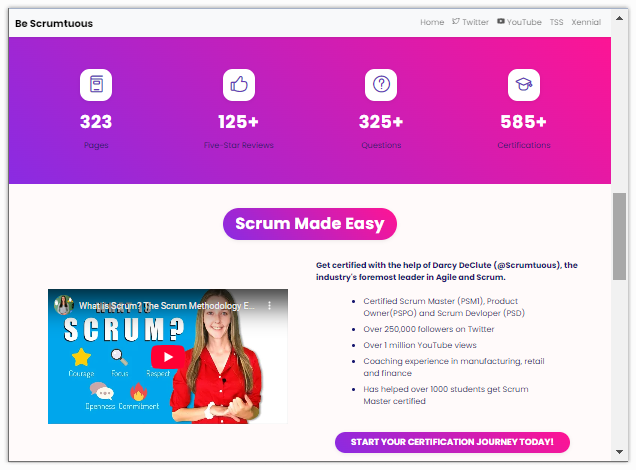
The stats and about sections render nicely both on mobile and on desktop.
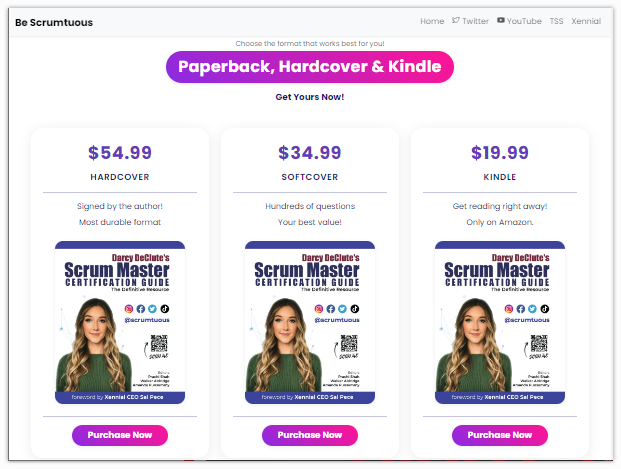
Step 8: Pricing section
The pricing section is one of the trickiest to prompt effectively.
Here, I specifically reference cards, a Bootstrap component designed for organizing structured content. This is a good example of how some familiarity with the underlying technologies can lead to better results with AI tools.
The prompt is a bit longer than usual, but the output closely matches the original Figma design.
Now update the ‘pricing’ section with a centered headline and a 3-column pricing table below it.
The headline should include:
-
- A short description in small text: ‘Choose the format that works best for you!’
- A large title: ‘Paperback, Hardcover & Kindle’ Center the title, make the font white and put the title on a tightly wrapped background that uses the same gradient as the hero section.
- A call to action in smaller, bold text: ‘Get Yours Now!’
Each pricing card should have a completely white background with a subtle shadow and rounded corners.
Display the price at the top of each card in large bold text. The prices are $54.99, $34.99 and $19.99.
Show the format HARDCOVER, SOFTCOVER, KINDLE under the price. Add a separator line after this.
Under the separator, list 2 benefits on each card, with the benefits being:
HARDCOVER:
-
- Signed by the author!
- Most durable format
SOFTCOVER:
-
- Hundreds of questions
- Your best value!
KINDLE:
-
- Get reading right away!
- Only on Amazon.
All the text on the cards should be centered.
Under the listed benefits on each card, responsively display the 500x625px file named scrum-guide-cover.jpg that is in the images directory. The image’s width should expand to the width of the card.
After the image of the book, add a separator line and then add a centered Purchase Now button at the bottom of each card that uses the same gradient as the hero and links to amazon.com.
Make sure the cards stack vertically on small screens but display 3 in a row on desktop.
Other than the fact that I should probably use a different image for each edition, I think the results look pretty good:
Step 9: The authors
This final section uses a clever trick to let Cursor generate relevant content for us.
We want to showcase the contributors to the book, using their images. Each JPG file in the images folder includes the author’s name and role in the filename. In this prompt, we ask Cursor AI to extract that information and generate names, roles and even a brief description of each contributor’s duties based solely on the filenames.
Here’s the prompt:
Update the Authors section.
For this section you will use the images placed in the images/authors folder so review the names of those files.
For the title, center it, wrap it tightly in the gradient used in the hero section and make the color white.
For the content, use a responsive grid and display the image of each team member in their own card, with the photo placed in a circular frame using Bootstrap’s rounded circle.
After the image add the author’s name and the role they played in writing the book.
Then add a separator and then write a single sentence that describes what someone in that role would do.
The naming format of the image files is loosely ‘firstname-lastname-role’, so use the name of each file to display the user’s name and the role they played.
Below each card, add social media icon buttons such as LinkedIn, Twitter, GitHub and YouTube and format them as the buttons were formatted in the hero section.
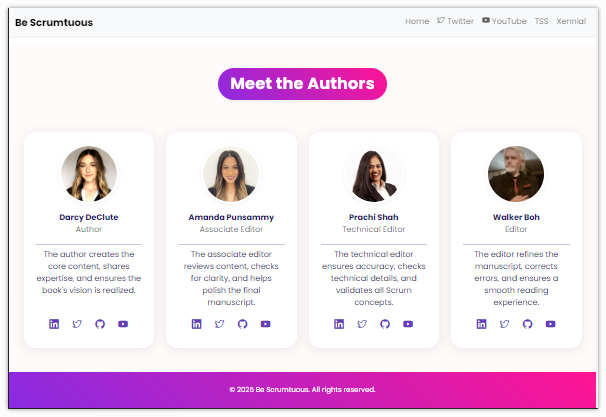
Cursor AI used info embedded in the filename to generate content for the Authors section.
Step 10: Pay for a Cursor AI subscription
The image above shows the social media icons displaying correctly, but the initial result had a flaw: every second icon was invisible due to white icons rendering on a white background.
I wrote a prompt to fix the issue, but my free tier of Cursor AI hit a usage limit, and the server decided to reserve its resources for paying users.
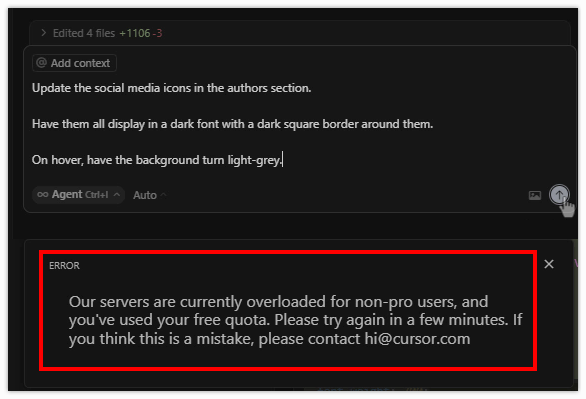
Usage limits exist on the free tier of Cursor AI.
No problem — I quickly fixed the icons manually, dragged the updated files into my GitHub Pages repository and saw the changes live after GitHub Actions deployed the site.
Comparing the final webpage to the original Figma design, I’m genuinely impressed. Cursor AI makes turning a Figma design into a live webpage remarkably easy.
The final HTML, CSS code compares well to the Figma designs.
While the webpage was created solely to drive this exercise, I did upload the results to my website. You can also view the Figma-to-Code files this tutorial created on GitHub.

Darcy DeClute is a Certified Cloud Practitioner and author of the Scrum Master Certification Guide. Popular both on Udemy and social media, Darcy’s @Scrumtuous account has well over 250K followers on Twitter/X.