How to setup a Docker Nginx reverse proxy server example

How to configure a Docker Nginx reverse proxy
To create, configure and run a Docker Nginx reverse proxy image, follow these steps:
- Download the official Nginx Docker image from Docker Hub
- Run the Nginx Docker image as a container
- Copy the Docker container’s Nginx config file to your local file system
- Add proxy_pass entries that point to your backend origin servers
- Copy the config file back into the Nginx Docker container
- Reload the Nginx configuration and test the setup
- Create a new Docker Nginx image based on the validated container
Start with the official Nginx image
To configure an Nginx reverse proxy in Docker, you must first download and run the official Nginx image from Docker Hub:
sudo docker run -d --name nginx-base -p 80:80 nginx:latest
By default, the Nginx Docker image is configured as a file server, not a reverse proxy or a load balancer:
To setup the Nginx Docker image as a reverse proxy, first you must edit the container’s default.conf file.
Copy the Nginx config file from Docker
Issue the following command to copy the Nginx configuration file in the Docker container to the Desktop folder of the host machine’s local file system:
sudo docker cp nginx-base:/etc/nginx/conf.d/default.conf ~/Desktop/default.conf
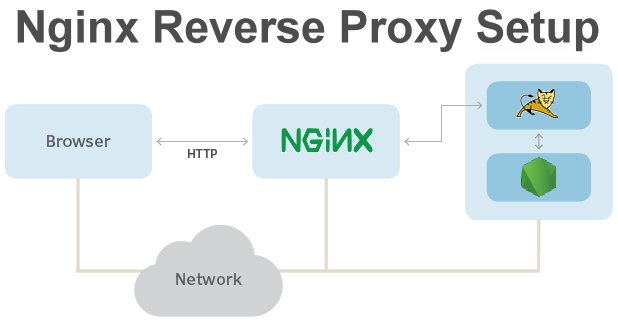
Nginx and Docker reverse proxy configuration
A reverse proxy handles client requests, and then forwards those requests to another server that runs in the backend. This backend origin server processes the request and provides a response back to Nginx, which then sends the response back to the client.
Reverse proxy example setup
For this example, an Apache Tomcat instance acts as the backend origin server. Apache Tomcat will handle requests on the following URL:
http://192.168.246.131:8080/sample
We do not want clients to connect to the backend server on port 8080. Instead, we want all requests to first go through the Nginx server on the following URL:
http://localhost/sample
Nginx will act as a reverse proxy, forwarding all requests that it receives with the context root /sample to the corresponding application running on Apache Tomcat.
This Docker Nginx reverse proxy example uses Tomcat as the origin server, but any backend server will work.
To proxy requests, Nginx must add a new location entry to the default.conf file that maps the /sample URI to the backend server through a proxy_pass setting.
The Nginx reverse proxy entry will look as follows:
# Docker nginx reverse proxy proxy_pass entry
location /sample{
  proxy_pass http://192.168.246.131:8080/sample;
}
Nginx Docker reverse proxy config file
The complete default.conf file for the Docker Nginx reverse proxy example reads as follows:
# Complete Nginx Docker reverse proxy config file
server {
  listen 80;
  listen [::]:80;
  server_name localhost;

  location / {
    root /usr/share/nginx/html;
    index index.html index.htm;
  }

  location /sample {
    proxy_pass http://192.168.246.131:8080/sample;
  }

  error_page 500 502 503 504 /50x.html;
  location = /50x.html {
    root /usr/share/nginx/html;
  }
} # End of Docker Nginx reverse proxy example file
Copy the Nginx config file back to Docker
With the config file edited locally to turn Nginx into a reverse proxy, copy the file must into the Nginx Docker container.
sudo docker cp ~/Desktop/default.conf nginx-base:/etc/nginx/conf.d/
Next, validate and reload the Docker Nginx reverse proxy configuration:
sudo docker exec nginx-base nginx -t
sudo docker exec nginx-base nginx -s reload
Now test the Docker Nginx reverse proxy example. When you access http://localhost/sample, Nginx should render the content from the Tomcat application.
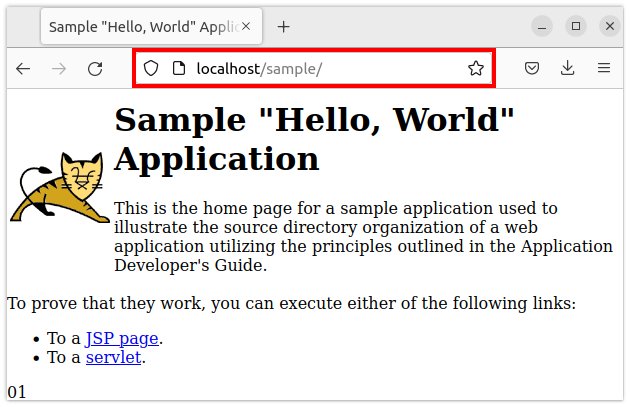
If requests first go through Nginx and are then handled by a backend server like Apache Tomcat, the Nginx reverse proxy in Docker is working correctly.
Create a new Docker Nginx reverse proxy image
Now that the Docker Nginx reverse proxy container works, create a new Docker image based on the container’s configuration:
sudo docker commit nginx-base nginx-proxy
This creates a new Docker image named nginx-proxy. To confirm the existence of this new image containing your Docker Nginx reverse proxy image, list all of the Docker images:
ubuntu@ubuntu-machine:~/Desktop$ sudo docker images
REPOSITORY TAG IMAGE ID CREATED SIZE
nginx-proxy latest d3b8cb6941b4 14 seconds ago 142MB
sample latest 32f5030ab445 26 hours ago 680MB
tomcat latest c795915cb678 8 days ago 680MB
nginx latest 0e901e68141f 8 days ago 142MB
Nginx reverse proxy server Dockerfile
An alternative way to create a new Docker Nginx reverse proxy image is to use a Dockerfile that loads the edited default.conf file every time the image is built. This can be preferable if the Nginx reverse proxy Docker image is regularly reconfigured.
The content of the Nginx reverse proxy Dockerfile is as follows:
FROM nginx:latest
COPY default.conf /etc/nginx/conf.d/default.conf
New Nginx Docker image creation
When the file is saved, run the docker build command in the same folder as the Dockerfile and the default.conf file:
sudo docker build -t nginx-reverse-proxy .
This build command creates a new Docker image named reverse-proxy:
ubuntu@ubuntu-machine:~/Desktop$ sudo docker images
REPOSITORY TAG IMAGE ID CREATED SIZE
nginx-reverse-proxy latest 25e3f852189f 36 seconds ago 142MB
nginx-proxy latest d3b8cb6941b4 7 minutes ago 142MB
sample latest 32f5030ab445 26 hours ago 680MB
tomcat latest c795915cb678 8 days ago 680MB
nginx latest 0e901e68141f 8 days ago 142MB
When the new image runs, the Docker Nginx reverse proxy will be active.
And that’s how easy it is to create a Docker Nginx reverse proxy server that can intercept client requests and pass them on to application servers that run in the backend.
 Cameron McKenzie is an AWS Certified AI Practitioner, Machine Learning Engineer, Solutions Architect and author of many popular books in the software development and Cloud Computing space. His growing YouTube channel training devs in Java, Spring, AI and ML has well over 30,000 subscribers.