Introducing Apache Wicket
This article approaches Apache Wicket by presenting the core concepts behind the framework, and moves to reinforce those concepts with an example leveraging some of Wicket's strengths.
This article approaches Apache Wicket by presenting the core concepts behind the framework, and moves to reinforce those concepts with an example leveraging some of Wicket's strengths.
Exploring Core Concepts
When you're learning a new technology or framework, it's helpful to gain an understanding of the terms and concepts, then move on to how the pieces come together. Wicket only has a few core concepts to master, but once you understand them, you'll find the framework much more accessible. Let's start with the core buzzword: components.
Components
If you're a software developer, you're familiar with the concept of components: a reusable piece of software replaceable by another component meeting the same interface. In Wicket, components are things like links, text fields and images. However, components can also repeat a chunk of markup, wrap a border around another component or present an internationalized image.
All Wicket components are designed to be extended. Extension can be simple: an anonymous class to link to another page, for instance. If you have the same component component on several pages, like a search form, you can encapsulate it into an easily reusable component.
Components are added to other components, including a special type of component called a MarkupContainer. MarkupContainers are special because, in addition to Java code, they have an associated markup file, like HTML. Pages and Panels are the two most common types of MarkupContainers you'll encounter. We'll look at both later in the example application.
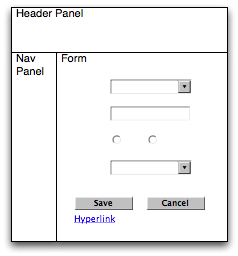
Let's look at a simple wireframe of a hypothetical page with components:

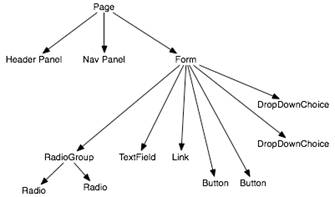
In the above illustration, our Page object has multiple components, including two Panels, a Form with multiple FormComponents (drop down, text field, radio buttons, etc.) and a Link. Child components are added to a single parent component, essentially creating an inverted tree:
Component references must appear in the markup in the same structure as the code. For example, an exception is thrown if you add one of the Buttons outside the <form> element block. (These kinds of exceptions can be difficult to track down, so Wicket provides helpful error pages when running in development mode.)
To summarize, Wicket components are Java classes with supporting HTML markup. Most Wicket components are designed to be customized for your specific needs. Components may be customized by creating anonymous classes or concrete subclasses. Components work with Models, which are the subject of the next section.
Models
Components aren't very interesting unless they have domain-specific data to display and manipulate. However, just passing a domain object to a component isn't feasible unless the component knows how to interrogate every domain object in your application. Instead, we need an abstraction between the component and the domain object. This is where models come in.
The base of Wicket's model hierarchy starts with IDetachable and IModel:
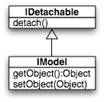
The IDetachable primarily exists to support clustering, as well as detachable models, which we'll explore later on. Most of the time you don't need to be concerned with this interface.
Models wrap objects, providing data to components using the model. The object contained by the model is called the model object. The simplest model example is
IModel nameModel = new Model("Chauncey Billups");
In the above example we create a Model object, which implements the IModel interface, and pass it a string. The org.apache.wicket.model.Model class takes any object implementing java.io.Serializable, so a String works. To use the Model, simply pass it to a component:
Label playerName = new Label("playerName", nameModel);
When the component's markup is generated, the component calls IModel's getObject() method to get the data to display.
Because of Wicket's state management (which you can find a great description of here: http://wicket.apache.org/introduction.html), IModels are stored in the user's session, which means the model object contained by the IModel is also stored in the user's session. This means our string "Chauncey Billups" takes up a bit of session storage space. For small objects this isn't a problem, but it can quickly become a problem for large object graphs. This is where detachable models come in.
Detachable models detach the model object from the model when the user's request completes, ensuring no space is used by the model object when the models and components are stored. Detachable models typically keep the minimal amount of information needed to reattach an object. If you're using a persistence solution, this might be the primary key value of the object to load. Let's rework our earlier example to use a common detachable model, LoadableDetachableModel:
IModel nameModel = new LoadableDetachableModel() {
    public Object load() {
        return playerService.getPlayerName();
    }
}
The LoadableDetachableModel implements IModel, so its usage is the same as any other model class. Let's take a look at the getObject() method for LoadableDetachableModel to see how it all comes together:
public Object getObject() {
    if (!attached) {
        attached = true;
        transientModelObject = load();

        if (log.isDebugEnabled()) {
           log.debug("...");
        }

        onAttach();
    }

    return transientModelObject;
}
The getObject() method is actually very simple. If you're using Hibernate or some other persistence solution, you'll use LoadableDetachableModels frequently to ensure your objects aren't taking up session space needlessly.
So far we've looked at two IModel implementations, but there are a few more that are very useful when starting with Wicket. You can also combine models using the familiar decorator pattern. Suppose you have a single domain object used by several components in a page. It doesn't make sense to load the object for each component. This is where the CompoundPropertyModel comes in:
IModel playerModel =
  new CompoundPropertyModel(new LoadableDetachableModel() {
    public Object load() {
        return playerService.getPlayer();
    }
});
setModel(playerModel);
Setting the model at for the Page allows components to access properties based on their Wicket component ID. Assuming we've set the model for the Page, populating components is trivial:
add(new Label("firstName"));
Label will look for a method in the model object called "getFirstName()". What if the Wicket ID doesn't correspond to the property name of the model object? You can specify another property name using the aptly named PropertyModel:
add(new Label("fname", new PropertyModel(getModel(), "firstName"));
In addition to simple property access, PropertyModels can also access collection or array elements.
Developers new to Wicket typically have difficulty grasping the model concept, particularly if they haven't spent much time developing with other frameworks leveraging models, such as Swing. Remember that models have a single purpose: to abstract how your components get data. When should you use models? You should always pass models to components, not domain objects. Don't worry if you don't have a full understanding of models. The example below will help explain the concept in more detail.
So far we've reviewed components, including pages and panels, as well as models. Next, we need to explore Wicket's Application class, the heart of every Wicket application.
Application
Unlike most web application frameworks, Wicket doesn't use XML for configuration. Other than minimal configuration in the web.xml deployment descriptor, all application configuration resides in your Application subclass. (Fans of Jetty's programmatic configuration will certainly appreciate this.) The application class configures every aspect of your application, including the application home page and error handling.
With a brief understanding of Wicket's core concepts, we're ready to build our example application.
Your First Wicket Application
It's tradition to provide a "Hello World" application when introducing a new framework or language. We're going to break with tradition to get directly to our application - a simple contact application. Our example will only have a few pages, but in those few pages we'll reinforce the concepts presented above.
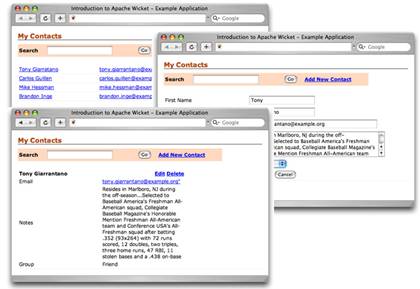
When you're building the web part of a web application, it's often easiest to start with the markup and implement down to your service layer. That's the approach we're taking. Let's take a look at the page mockups:

For this application, we're implementing three pages. The first page lists the contacts in our database. The list page also acts as the application home page. The remaining pages provide view and edit functions. Each page is different, but there are certain shared aspects we'll take advantage of when building our Wicket application:
- Each page shares the same stylesheet and header information. We'll take advantage of this by using markup inheritance.
- Each page has a search box, making it ideal to encapsulate in a reusable Panel component. (We could simply include the search components in the base page, but that's not a very interesting example.)
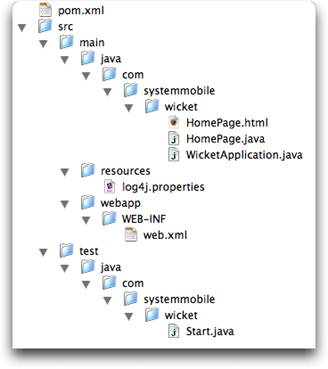
Now that we've got the page mockups and some basic implementation ideas, let's look at the application structure created by the Wicket Quickstart Maven archetype (you can learn more about the Quickstart archetype here [http://wicket.apache.org/quickstart.html]:
With the application boilerplate provided for us, we can start by updating the WicketApplication class.
I've added three methods to the WicketApplication class. The first two provide access to the ContactDao used for persistence operations. The third overrides the Application#get() method to allow for covariant return types, in this case the WicketApplication class. This example uses the WicketApplication as a form of Service Locator [http://java.sun.com/blueprints/patterns/ServiceLocator.html]. (There are various ways to provide access to your DAO and service layer objects, including annotations for Spring- or Guice-managed beans. This is the easiest for our purposes.) I've also changed the home page from HomePage.class to the nonexistent ListContacts.class.
public class WicketApplication extends WebApplication {

    public Class getHomePage() {
        return ListContacts.class;
    }

    private ApplicationContext getContext() {
        return WebApplicationContextUtils
    .getRequiredWebApplicationContext(getServletContext());
    }

    public ContactDao getContactDao() {
        return (ContactDao) getContext().getBean("jdbcContactDao");
    }

    public static WicketApplication get() {
        return (WicketApplication) WebApplication.get();
    }
}
Next we need to create a base class for our application pages. The base class allows us to take advantage of markup inheritance. Let's look at the code first, then markup:
public class BasePage extends WebPage {

    public BasePage() {
        add(new StyleSheetReference("stylesheet",
              BasePage.class, "styles.css"));
    }

}
Our BasePage class extends WebPage, a Wicket class that sets the markup type to "text/html". If we wanted to serve up XML content instead of HTML, we'd extend Page and override the getMarkupType() method like so:
public String getMarkupType() {
    return "text/xml";
}
The markup type determines the file extension loaded for markup. In our case, BasePage is looking for BasePage.html. By default, markup files are located in the same directory as the component, but this is easily configured to meet your needs.
The BasePage constructor adds a StyleSheetReference. The StyleSheetReference inserts the path to the referenced CSS into the <link> element in the markup header. Why would you want to use a StyleSheetReference instead of simply leaving the stylesheet under the web root? Suppose your application needs to present different images or styles based on the user's locale, so you have two stylesheets: styles_en.css and styles_fr.css. StyleSheetReference loads the correct locale-specific file automatically. This behavior is the same across all of Wicket's resource loading, including properties files and images.
The BasePage.html markup is pretty simple:
<html>
<head>
<title>Introduction to Apache Wicket - Example Application</title>
<link wicket:id="stylesheet"/>
</head>

<body>

<h1>
My Contacts
</h1>

<form id="search-form">
 <table>
  <tr>
   <td>Search</td>
   <td><input type="text" name="search"/></td>
   <td><input type="submit" value="Go" class="button"></td>
   <td><a href="#">Add New Contact</a></td>
  </tr>
 </table>
</form>

<wicket:child/>

</body>
</html>
There are two things that probably caught your eye in the markup. The first is the wicket:id="stylesheet" attribute on the <link> element. This is the markup portion of the StyleSheetReference added in the BasePage class. The component ID must be the same in both the code and the markup.
Second, you probably noticed the <wicket:child/> element. This tells the markup parser to include markup from subclasses where the <wicket:child/> tag occurs. You'll see this in action when the ViewContact page is created. Our next task is to create a reusable search form and add it to the BasePage.
As mentioned above in the discussion about components, Wicket has two primary types of components: components with markup and those without. We've already looked at Pages, the primary type of markup container. Now we're going to explore Panels. Unlike Pages, Panels can't live on their own - they need to live in a Page. However, Panels are very similar to Pages in that they have their own markup files and can take advantage of markup inheritance. Let's build a panel with a form.
First, we create our Panel class:
public class SearchPanel extends Panel {

    public SearchPanel(String id) {
        super(id);
        add(new SearchForm("searchForm"));
    }

    private class SearchForm extends Form {

        private String searchString;

        public SearchForm(String id) {
            super(id);

            add(new TextField("searchString",
                  new PropertyModel(this, "searchString")));
            add(new BookmarkablePageLink("addContact",
                  EditContact.class));
        }

        public void onSubmit() {
            PageParameters params = new PageParameters();
            params.add("searchString", getSearchString());
            setResponsePage(ListContacts.class, params);
        }

        public String getSearchString() {
            return searchString;
        }

        public void setSearchString(String searchString) {
            this.searchString = searchString;
        }
    }

}
This is the largest chunk of code we've examined, so let's take it one piece at a time. First, the constructor:
public SearchPanel(String id) {
    super(id);
    add(new SearchForm("searchForm"));
}
Our SeachPanel extends Panel, so it has to call the super constructor passing in the component ID. Remember that Panels can't live on their own; they have to be added to Pages. Since they have to be added, they need a component ID referenced in the Page's markup.
After calling super(id), the SearchPanel adds the SearchForm (implemented as a private class). Let's look at the form class next.
   private class SearchForm extends Form {

        private String searchString;

        public SearchForm(String id) {
            super(id);

            add(new TextField("searchString",
                  new PropertyModel(this, "searchString")));
            add(new BookmarkablePageLink("addContact",
                  EditContact.class));
            setMarkupId("search-form");
        }

        public void onSubmit() {
            PageParameters params = new PageParameters();
            params.add("q", getSearchString());
            setResponsePage(ListContacts.class, params);
        }

        public String getSearchString() {
            return searchString;
        }

        public void setSearchString(String searchString) {
            this.searchString = searchString;
        }
    }
The SearchForm extends another Wicket component: Form. Forms are components that contain other components, like TextFields, TextAreas or DropDownChoices. However, Forms aren't limited to what they can contain. You can just as easily add a Panel to a Form as you can to a Page.
In the above form object, I've added a TextField with a component ID of searchString. The TextField uses a PropertyModel to update the form's searchString property:
    add(new TextField("searchString",
        new PropertyModel(this, "searchString")))
When the search form is submitted, the TextField updates the form's searchString property with the value inserted by the user. The PropertyModel isn't limited to updating only properties in the form object - it can update object properties in POJOs or other models. We'll see more examples of PropertyModel in the following sections.
After adding the TextField, a link to the EditContact class is added to the panel. The link added is a special link called a BookmarkablePageLink. BookmarkablePageLinks are just that - able to be bookmarked by users. Bookmarkable links don't have any state, meaning they don't have to know anything about previous requests the user made or where they came from.
Once the components are added to the form, we need to tell the form what to do when its submitted. Wicket forms have a default submit listener useful when the form only has one submit button:
    public void onSubmit() {
        PageParameters params = new PageParameters();
        params.add("q", getSearchString());
        setResponsePage(ListContacts.class, params);
    }
The onSubmit listener is called after all form components are validated and model objects are updated. In the above implementation, the form submits the searchString to the ListContacts class using the PageParameters object. PageParameters is a simple object used to encapsulate URL query parameters. Finally, the setResponsePage(Class, PageParameters) method is called, setting ListContacts as the page responding to the user's request.
With the SearchPanel class created, let's look at the markup:
<wicket:panel>
<form wicket:id="searchForm">
    <table>
        <tr>
            <td>Search</td>
            <td>
                <input wicket:id="searchString" type="text" name="search"/>
            </td>
            <td><input type="submit" value="Go" class="button"></td>
            <td><a wicket:id="addContact" href="#">Add New Contact</a></td>
        </tr>
    </table>
</form>
</wicket:panel>
Our panel markup is pretty simple and has the same structure as the SearchPanel class. The form component contains the TextField and BookmarkablePageLink compoents. We didn't need to create a special component for the submit button since we're using the form's default submit behavior. We'll see an example later where we're using two submit buttons.
The next step is to update the BasePage to use the new SearchPanel:
public BasePage() {
    add(new StyleSheetReference("stylesheet",
          BasePage.class, "styles.css"));
    add(new SearchPanel("searchPanel"));
}
The markup also needs to be updated:
<html>
<head>
<title>Introduction to Apache Wicket - Example Application</title>
<link wicket:id="stylesheet"/>
</head>

<body>

<h1>
My Contacts
</h1>

<span wicket:id="searchPanel"></span>

<wicket:child/>

</body>
</html>
Instead of StyleSheetReference, we could've used Wicket's HeaderContributor class or the <wicket:link> element. Next, we'll create the ListContacts page, starting with the Java class:
public class ListContacts extends BasePage {

    public ListContacts(PageParameters params) {
        final String searchString = params.getString("searchString");
        IModel contactsModel = new LoadableDetachableModel() {
            protected Object load() {
                ContactDao dao = WicketApplication.get().getContactDao();
                return dao.find(searchString);
            }
        };

        ListView contacts = new ListView("contacts", contactsModel) {
            protected void populateItem(ListItem item) {
                Link view = new Link("view", item.getModel()) {
                    public void onClick() {
                        Contact c = (Contact) getModelObject();
                        setResponsePage(new ViewContact(c.getId()));
                    }
                };
                view.add(new Label("firstName",
                    new PropertyModel(item.getModel(), "firstName")));
                view.add(new Label("lastName",
                    new PropertyModel(item.getModel(), "lastName")));
                item.add(view);

                item.add(new SmartLinkLabel("email",
                    new PropertyModel(item.getModel(), "email")));
                item.add(new Link("edit", item.getModel()) {
                    public void onClick() {
                        Contact c = (Contact) getModelObject();
                        setResponsePage(new EditContact(c.getId()));
                    }
                });
                item.add(new Link("delete", item.getModel()) {
                    public void onClick() {
                        Contact c = (Contact) getModelObject();
                        WicketApplication.get().getContactDao().delete(c.getId());
                        setResponsePage(ListContacts.class);
                    }
                });
            }
        };
        add(contacts);
    }
}
The heart of ListContacts is a ListView, which is a type of repeater. The markup contained within the ListView's component ID is repeated for each object passed in through the model. Here's the markup for our ListView:
<div wicket:id="contacts" class="contact">
    <table>
        <tr>
            <td>
                <a wicket:id="view" href="#">
                    <span wicket:id="firstName"></span>
                    <span wicket:id="lastName"></span>
                 </a>
            </td>
            <td wicket:id="email"></td>
            <td class="manage-contact-links">
                <a wicket:id="edit" href="#">Edit</a>
                <a wicket:id="delete" href="#">Delete</a>
            </td>
        </tr>
    </table>
</div>
ListView's populateItem(ListItem) method is called for each object, which is how the rows in the contacts table are populated. The current object is available through ListItem's getModel() and getModelObject() methods, which we've used to populate various labels and links. (The SmartLinkLabel component is available in the Wicket Extensions project.) Let's take a closer look at the links added to the ListItem:
Link view = new Link("view", item.getModel()) {
    public void onClick() {
        Contact c = (Contact) getModelObject();
        setResponsePage(new ViewContact(c.getId()));
    }
};
view.add(new Label("firstName",
    new PropertyModel(item.getModel(), "firstName")));
view.add(new Label("lastName",
    new PropertyModel(item.getModel(), "lastName")));

item.add(new Link("edit", item.getModel()) {
    public void onClick() {
        Contact c = (Contact) getModelObject();
        setResponsePage(new EditContact(c.getId()));
    }
});
item.add(new Link("delete", item.getModel()) {
    public void onClick() {
         Contact c = (Contact) getModelObject();
         WicketApplication.get().getContactDao().delete(c.getId());
         setResponsePage(ListContacts.class);
    }
});
All of the links get the ListItem's model, allowing them to access properties of the contact if necessary. Each has an onClick() method, called when the user clicks the link on the web page. In the case of the "view" and "edit" links, the Contact model object is retrieved from the Link in order to get the contact's id to pass off to the respective response pages, ViewContact and EditContact. The delete link is similar, except the contact is deleted outright rather than edited and the user is sent back to the ListContacts page.
Next, let's look at the EditContact page. This is where we'll introduce the form to create a new contact as well as edit an existing contact. We'll start with the Java code:
public class EditContact extends BasePage {

    public EditContact() {
        setModel(new CompoundPropertyModel(new LoadableDetachableModel() {
            protected Object load() {
                return new Contact();
            }
        }));
        init();
    }

    public EditContact(final Long contactId) {
        setModel(new CompoundPropertyModel(new LoadableDetachableModel() {
            protected Object load() {
                return WicketApplication.get().getContactDao().get(contactId);
            }
        }));
        init();
    }

    private void init() {
        add(new FeedbackPanel("feedback"));
        add(new ContactForm("form", getModel()));
    }

    private class ContactForm extends Form {

        public ContactForm(String id, IModel m) {
            super(id, m);

            TextField firstName = new TextField("firstName");
            firstName.setRequired(true);
            firstName.add(StringValidator.maximumLength(15));
            add(firstName);

            TextField lastName = new TextField("lastName");
            lastName.setRequired(true);
            lastName.add(StringValidator.maximumLength(20));
            add(lastName);

            TextField email = new TextField("email");
            email.add(StringValidator.maximumLength(150));
            email.add(EmailAddressValidator.getInstance());
            add(email);

            TextArea notes = new TextArea("notes");
            notes.add(StringValidator.maximumLength(500));
            add(notes);

            DropDownChoice group = new DropDownChoice("group");
            group.setChoices(new AbstractReadOnlyModel() {
                public Object getObject() {
                    List<String> l = new ArrayList<String>(3);
                    l.add("Friend");
                    l.add("Co-Worker");
                    l.add("Nemesis");
                    return l;
                }
            });
            add(group);

            add(new Button("save") {
                public void onSubmit() {
                    Contact c = (Contact) getForm().getModelObject();
                    WicketApplication.get().getContactDao().save(c);
                    setResponsePage(ListContacts.class);
                }
            });
            add(new Button("cancel") {
                public void onSubmit() {
                    setResponsePage(ListContacts.class);
                }
            }.setDefaultFormProcessing(false));
        }
    }
}
The EditContact class has two constructors supporting the two use cases for the class. The first constructor doesn't take any arguments and is used to create new instances of Contact. We're still using a LoadableDetachableModel to return a new Contact even though we're not getting it from the database to ensure the CompoundPropertyModel doesn't serialize the Contact when the page is stored in the PageMap. This is also a good place to set any defaults on newly created objects, like a default group.
The second constructor takes the contact id, used to load the desired Contact for editing. Once the constructor populates the model, the init() method is called.
The init() method simply adds a FeedbackPanel and the form object. FeedbackPanels are Wicket components designed to relay messages back to the user. For instance, if the user doesn't enter a valid first name, the error message is displayed in the panel. Like other panels, we need to reflect it in the markup:
<span wicket:id="feedback"></span>
Any validation errors are presented in the body of the SPAN element. You can choose to style the feedback, but that will be the subject of a future article.
Next, the form class is defined and populated with components. Let's look at the TextField for the Contact's first name:
TextField firstName = new TextField("firstName");
firstName.setRequired(true);
firstName.add(StringValidator.maximumLength(15));
add(firstName);
Since we used a CompoundPropertyModel as the model, the TextField will populate itself with the value stored in the Contact's firstName property. Next we set the field to be required and have a maximum length of 15 characters. Finally, the component is added to the parent form. This is repeated for the various form components, sometimes with different validators, but the core pattern is the same. Where this differs is the DropDownChoice.
The DropDownChoice component is used to display the HTML Select element. In our example, the choices available in the select list are set using the setChoices(...) method:
DropDownChoice group = new DropDownChoice("group");
group.setChoices(new AbstractReadOnlyModel() {
    public Object getObject() {
        List<String> l = new ArrayList<String>(3);
        l.add("Friend");
        l.add("Co-Worker");
        l.add("Nemesis");
        return l;
    }
});
The AbstractReadOnlyModel, another implementation of IModel, returns a list of Strings used to create options for the select list. An approximation of the generated HTML is shown below:
<select>
    <option value="Friend">Friend</option>
    <option value="Co-Worker">Co-Worker</option>
    <option value="Nemesis">Nemesis</option>
</select>
We're using simple Strings in this example, but the DropDownChoice also supports rich objects with the help of the IChoiceRenderer. Suppose groups were represented as an object:
public class Group {
    private String name;

    public Group(String name) {
        setName(name);
    }

    public String getName() {
        return name;
    }

    public void setName(String name) {
        this.name = name;
    }

}
In this case, our DropDownChoice component looks like:
DropDownChoice group = new DropDownChoice("group");
group.setChoices(new AbstractReadOnlyModel() {
    public Object getObject() {
        List<Group> l = new ArrayList<Group>(3);
        l.add(new Group("Friend"));
        l.add(new Group("Co-Worker"));
        l.add(new Group("Nemesis"));
        return l;
    }
});
group.setChoiceRenderer(new IChoiceRenderer() {
    public Object getDisplayValue(Object o) {
        Group g = (Group) o;
        return g.getName();
    }
    public String getIdValue(Object o) {
        Group g = (Group) o;
        return g.getName();
    }
});
The IChoiceRenderer allows the developer to determine how the displayed value and and ID values are created for the option tags. If you've used some other web frameworks and fought with select lists, you'll find this method to be much easier to use.
The final components we add to the form are two Buttons.
add(new Button("save") {
    public void onSubmit() {
        Contact c = (Contact) getForm().getModelObject();
        WicketApplication.get().getContactDao().save(c);
        setResponsePage(ListContacts.class);
    }
});
add(new Button("cancel") {
    public void onSubmit() {
        setResponsePage(ListContacts.class);
    }
}.setDefaultFormProcessing(false));
The first button saves the contact and forwards the user to the ListContacts page. The second button cancels the edit and forwards the user to the ListContacts page. The difference between the two buttons, other than the behavior in the onSubmit() event handler, is default processing has been disabled by calling setDefaultFormProcessing(false). When a submit button is clicked in Wicket, the following process occurs:
- Input is validated.
- If input is valid, the model object is updated with the input. Any necessary conversions occur to populate the model object properties.
- The body of onSubmit() is executed.
By disabling default processing, the input isn't validated and no updates are made to the model object. This allows us to easily add a cancel button to our form with no complicated handling for the developer.
Now that we've explored the EditContact class, let's look at the markup. At this point, the markup shouldn't have any surprises:
<wicket:extend>
    <span wicket:id="feedback"></span>

    <form wicket:id="form">
        <div id="contacts">
            <div class="contact">
                <table>
                    <tr>
                        <td>
                            First Name
                        </td>
                        <td>
                            <input wicket:id="firstName" type="text"/>
                        </td>
                    </tr>
                    <tr>
                        <td>
                            Last Name
                        </td>
                        <td>
                            <input wicket:id="lastName" type="text"/>
                        </td>
                    </tr>
                    <tr>
                        <td>
                            Email
                        </td>
                        <td>
                            <input wicket:id="email" type="text" size="40"/>
                        </td>
                    </tr>
                    <tr>
                        <td>
                            Notes
                        </td>
                        <td>
                            <textarea wicket:id="notes" rows="4" cols="40"></textarea>
                        </td>
                    </tr>
                    <tr>
                        <td>
                            Group
                        </td>
                        <td>
                            <select wicket:id="group"> </select>
                        </td>
                    </tr>
                    <tr>
                        <td colspan="3" align="center">
                            <input wicket:id="save" type="submit" value="Save"/>
                            <input wicket:id="cancel" type="submit" value="Cancel"/>
                        </td>
                    </tr>
                </table>
            </div>
        </div>
    </form>
</wicket:extend>
Other than the wicket:id attributes, we're looking at standard HTML that corresponds to our Wicket components. Users can fill in the form and click the save button to create or update a contact, or cancel to easily abandon the process.
That completes our example application exploring Apache Wicket. We've covered quite a bit of ground, but all of it can be applied to developing your own web applications.
Summary
This article has introduced you to Wicket's core concepts and solidified those concepts with an example application. The concepts essential to successful Wicket development are components and models.
Components are isolated pieces of Java code with supporting markup. Most components are abstract classes designed to be subclassed with your domain-specific logic and requirements. Pages and panels are components, as well as Links, Forms and ListViews.
Models provide an abstraction between your domain object and the Wicket components. Models come in various flavors and can be combined to maximize functionality. Ideally, your components should always access your domain models using models instead of directly.
I hope you've enjoyed this article and that it's made you want to explore Wicket further. I've found it to be a very productive framework for both client and internal development projects.
About the Example
The source code for the example application can be downloaded from http://www.systemmobile.com/code/wicketintro.zip. There is a README included to get started.
About the Author
Nick Heudecker is the founder and principal of System Mobile, a Chicago-based software consulting firm specializing in Java web application development.