XWiki: A Platform for Collaborative Apps
This article demonstrates how to customize XWiki Enterprise by writing a small application with it. Specifically you'll learn how to write a Todo application for managing Todo tasks. This application will let users enter tasks using a description, assignee, target date and status.
XWiki is a generic wiki platform allowing the development of collaborative applications.
It's developed in Java under the open source LGPL license.
It allows for rapid application development by providing common runtime services such as Rights Management, Page Rendering, Transparent Storage, Page Manipulation (edit, delete, rename, view), Versioning, Authentication, Macros, Scripting (Velocity and Groovy) and more. These services are available as APIs in Java, XML/RPC and GWT. The Java APIs can be used either in Java Plugins or directly from within wiki pages using the Velocity and Groovy scripting languages.
In addition to the XWiki Platform, the XWiki project offers several applications built on top of it as shown in figure 1:
- XWiki Enterprise , an extensible Enterprise wiki,
- XWiki Enterprise Manager , an application for managing farms of wikis,
- XWiki Watch , a collaborative RSS reader with a UI built using GWT,
- Chronopolys, a project management application for managing portfolio of projects
- Nearbee, a wiki focused on work spaces with the ability to invite users to share them .
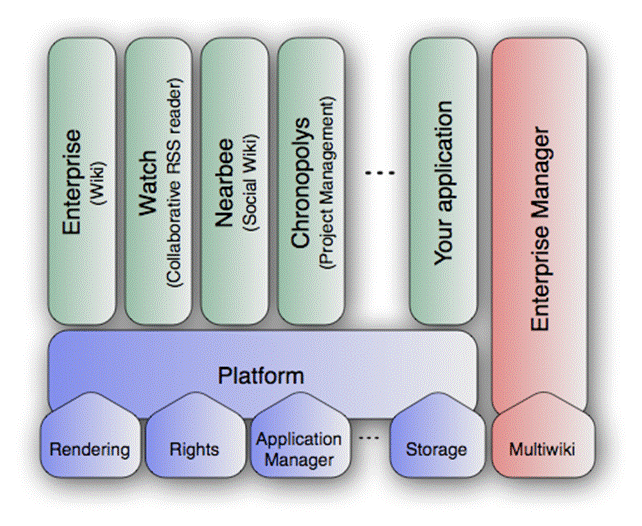
Figure 1: XWiki Platform and Products
XWiki Enterprise is a second generation wiki . While first generation wikis allow sharing content (text, documents, images, videos), second generation wikis go further and allow sharing and building applications. In essence they allow to structure the information. Wikis are great for entering unstructured information. However this has proved a limitation in Enterprise contexts where at some point the information needs to be harvested to provide more value. Second generation wikis are good at managing both unstructured and structured data.
This article demonstrates how to customize XWiki Enterprise by writing a small application with it. Specifically you'll learn how to write a Todo application for managing Todo tasks. This application will let users enter tasks using a description, assignee, target date and status. You'll then learn how to further integrate this Todo application in the wiki so that it's seamlessly integrated.
Let's get started!
Getting started with XWiki Enterprise
Start by installing XWiki Enterprise . You should get the following page in your browser after going to http://localhost:8080/xwiki/ and logging in as Admin (password: admin).
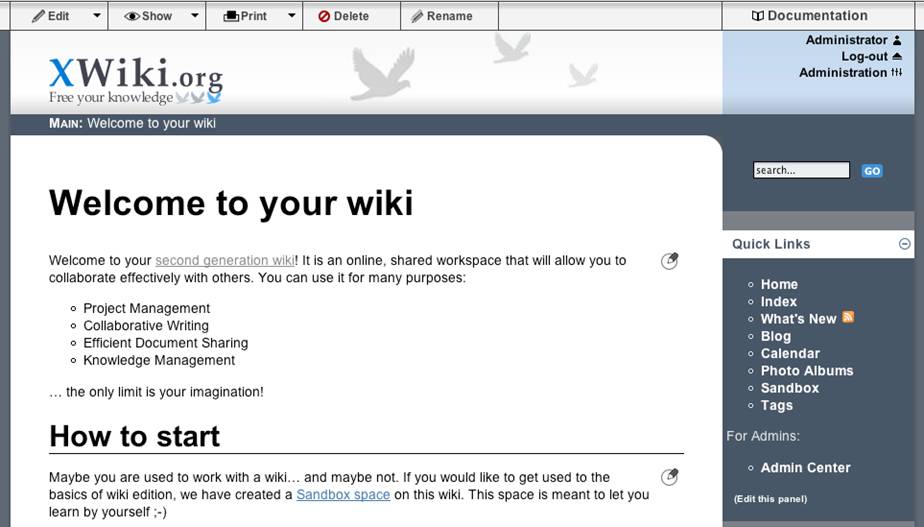
Figure 2: XWiki Enterprise home page
What you see in figure 2 is the default wiki provided when you install XWiki Enterprise. It's meant to be a starting point for your own wiki. You're free to modify everything you see and the rest of this tutorial will show how to perform some customizations. The default skin used in the default wiki is divided into 4 main zones:
- The edition tool bar at the top of the screen which allows to perform various actions on the current document (edit, rename, delete, export as PDF, export as RTF, print, etc).
- The navigation breadcrumb which allows you to navigate to the parent documents of the document you're looking at. On figure 2 the breadcrumb is showing "MAIN: Welcome to your wiki". "Welcome to your wiki" is a link to the current page (it's the title of the current document) and "MAIN" is a link to the Main space home page.
- The Panels on the rights show various information. The "Quick Links" Panel provide quick navigation to important sections of the wiki, the "My Recent Modifications" Panel show the last 5 documents you've modified and the "Create" Panel allows you to create new Blog posts, new Spaces and new Pages. There are tens of other Panels that you can add and use and you can also very easily create your own Panels as demonstrated below where you create a My Todo Panel.
As you can see in the Quick Links Panel, XWiki Enterprise comes with a number of bundled applications:
- The photo album lets you add photos and browse through them in a list or by generating a slideshow.
- The calendar provides you with the ability to schedule events and share their details with others.
- The blog application features a full-featured blog, complete with a home & article pages, categories and tags per post.
There are other applications that are less visible such as the Panels application which lets users add Panels on the side and even create new Panels, the Tag application which lets you tag XWiki documents, the RSS feeds application which generates various RSS feeds for changes or new pages, the What's New application and more. Actually in XWiki an application is a set of XWiki documents. Thus everything you see in the wiki can be considered part of an application, and as such can also be edited and customized (or even deleted or replaced).
Understanding Classes and Objects
XWiki boasts a powerful feature allowing to add any type of meta data to pages. This is done by using Objects. An Object is an entity grouping several meta data together and which can be attached to a page. This is for example the mechanism used when commenting on pages; when a comment is added, it's implemented by adding a Comment object to the page being commented. The same applies for Tags and Rights for example. Objects can be attached and viewed by using the Object editor. In order to access the Object editor the user under which you are logged in must have the advanced editing mode enabled. To enable it click on your user name link in the top right corner of the screen. Once on your profile page click on the "Switch to advanced edit mode" link as shown in figure 3.
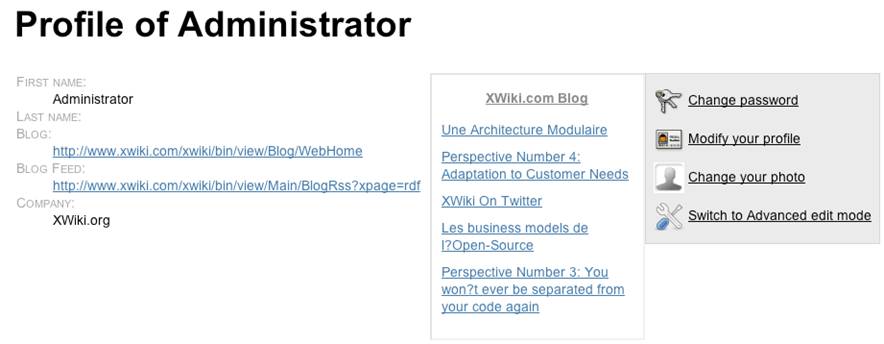
Figure 3: Profile page allowing to switch to the Advanced edit mode
Notice that once you are in Advanced edit mode the menu bar at the top of screen offers additional menu entries (figure 4).
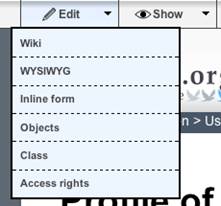
Figure 4: Edit menu in Advanced editing mode
Now navigate back to the home page and add a comment there by click on the "Comments" panel at the bottom of the page and then by clicking on "Add comment". Once you have added a comment move the mouse to the Edit menu and click on "Objects" to start the Object editor. You'll see a page similar to the one in figure 5 showing the comments that you have added as an Object. You'll also notice a Tag object which is available for all pages by default and which allows setting tags on pages.

Figure 5: Object editor showing a Comment and a Tag Objects
If you look on the right of the screen while in the Object editor you'll notice that you can add other Objects to the current page by using the Add Object Panel (figure 6).
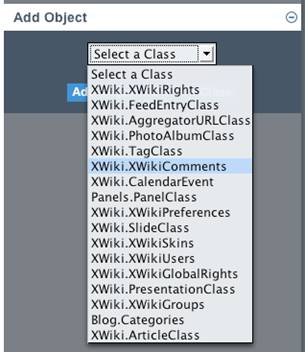
Figure 6: List of Objects on the current wiki that can be added to the current page
The list of Objects in the "Add Object" combo box shown in figure 6 is completely dynamic and represents all the Object types found in the current wiki.
Actually what's nice is that you can create your own Object types. They are called Classes. A Class is a normal page that you have marked as containing a type definition. A class groups properties together. For example, you have seen above in figure 5 that the Comment Object had 5 properties: an author, some highlighted text, a date, the comment and a reply to property. These properties are defined in the Comment Class.
Let's find out how to edit a class. You do this by using the Class Editor when you're located on the page containing the Class definition. XWiki Enterprise has a Class Wizard to help with creation and edition of Classes. It's located at http://localhost:8080/xwiki/bin/view/XWiki/XWikiClasses . Figure 7 shows the Class Editor page.
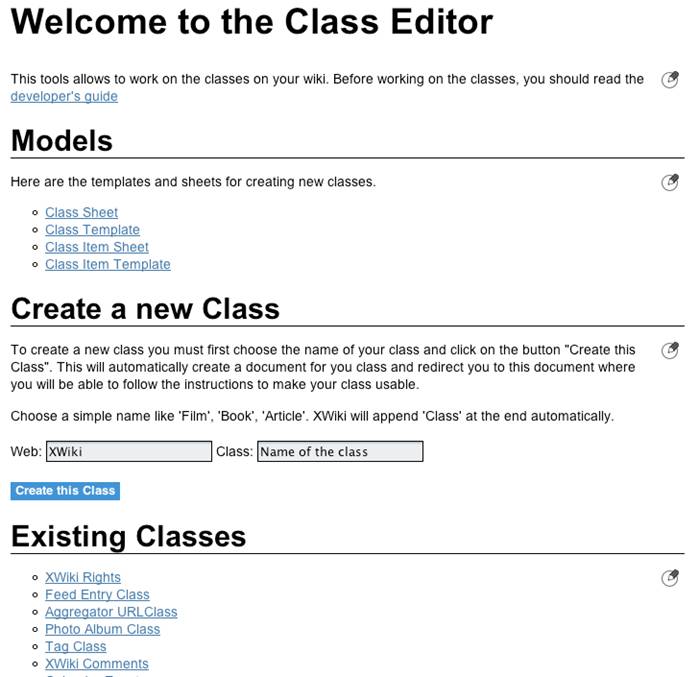
Figure 7: Class Editor page allowing to create new classes and view existing classes
Now click on the "XWiki Comments" class listed in the "Existing Classes" section. This will lead you to the http://localhost:8080/xwiki/bin/view/XWiki/XWikiComments page. Once on that page, move your mouse to the Edit menu at the top left corner of the screen and click on "Class". This calls the Class Editor on the page you're viewing. In our case at hand, this shows how the Comment Class is defined (figure 8).
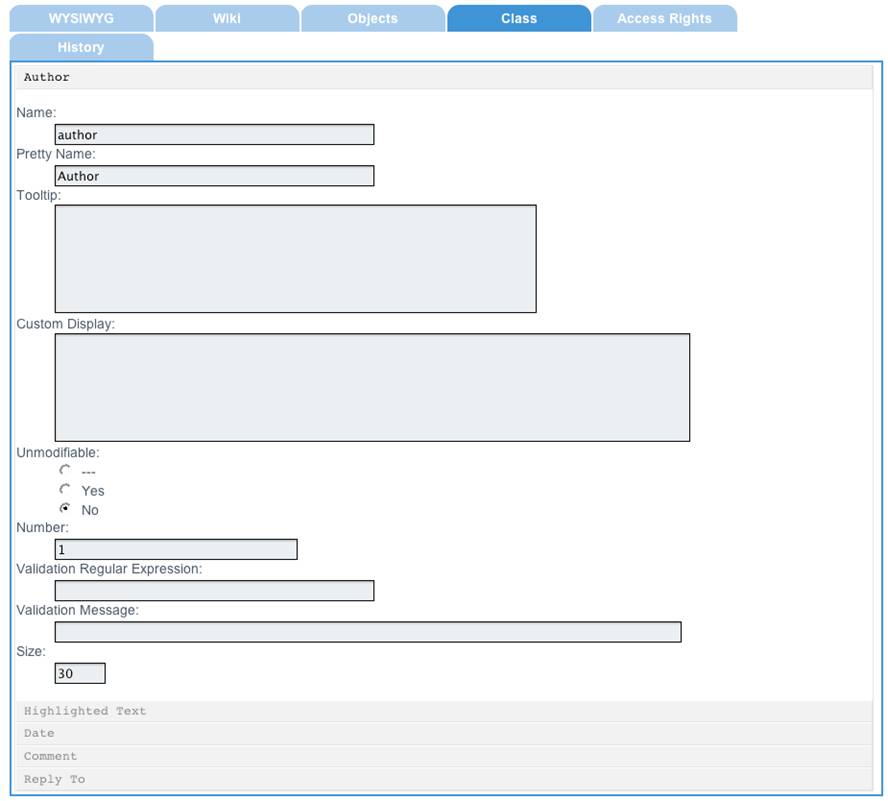
Figure 8: Comment Class definition
Each property is listed and when you click on one you can see its definition. For example figure 8 shows the definition of the Author property. It's a string of 30 characters, that has an internal name of "author" and a display name of "Author" (more on that later). There are various options like the ability to define some validation rules to verify the validity of a property value entered by the user. These advanced topics are for another tutorial and you won't use them for now.
Now that you've had a brief overview of what Classes and Objects are, let's start creating our Todo application. The first step is to create a Todo class.
Creating a Todo Class
| The code in this tutorial is available as a XWiki application (XAR file) that you can import in your XWiki installation. To do so, click on the Administration link in the top right corner of your screen and then select the Import tab. On that tab, upload the XWiki application XAR file using the available form. The XAR is now listed on the page. Click on it, select all the documents listed and click on the Import button. The Todo application is now available in your wiki. |
Our Todo class must have properties for a description, an assignee, a due date and a status. The description should be a Textarea field, the assignee should display a user picker field, the data should display a date picker field and the status should display a combo box with valid status states (In progress, Finished and Inactive).
On the Class Editor Wizard page, use the Create New Class form. Choose to create the Todo class in the XWiki space (the default) and choose "Todo" as the class name as shown on figure 9.
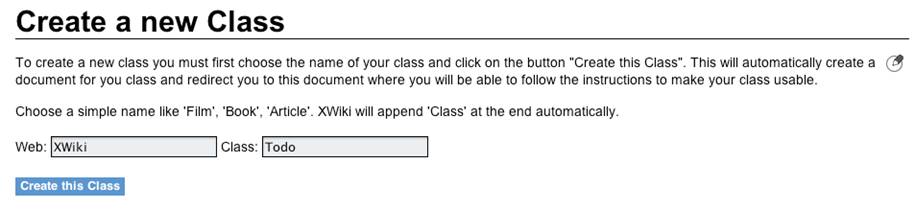
Figure 9: Creating the Todo document that will hold the Todo Class
| The XWiki space is an administrative space that the typical user don't see. It's a good location for putting classes that you create. Alternatively you could also decide to create your own space for all admin documents you need to create. |
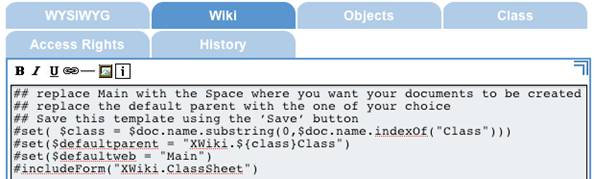
Figure 10: Default content for the Todo Class Wizard
The Todo Class Wizard is now displayed (figure 11).

Figure 11: Todo Class Wizard
This wizard lets you perform several actions that we'll explain in details. To get started, click the "Edit this Class" link to edit this document's Class definition. Note this has the same effect as moving the mouse over the Edit menu button in the top left corner of the screen and clicking on "Class". Figure 12 shows an empty Todo Class definition with a combo box that you'll use to add new Class properties of different types.
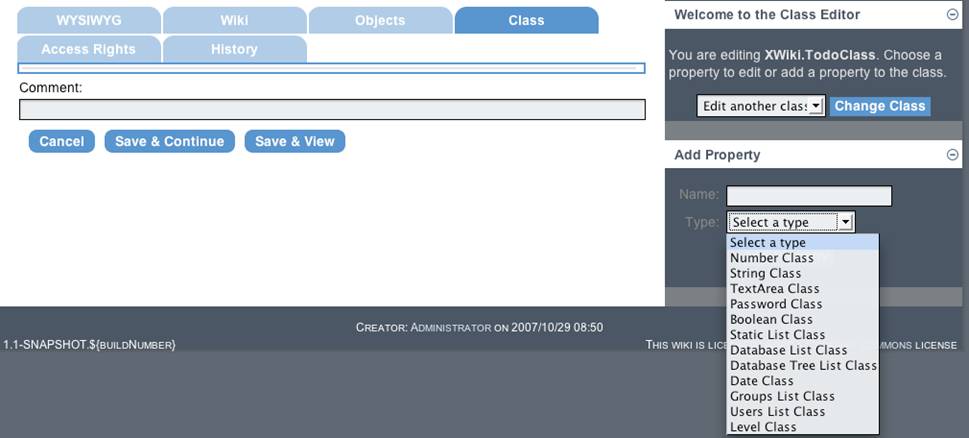
Figure 12: Empty Todo Class definition showing the combo box to use to add Class properties of different types
Start by creating a "Description" property using a "TextArea Class" property type, as in figure 13.

...
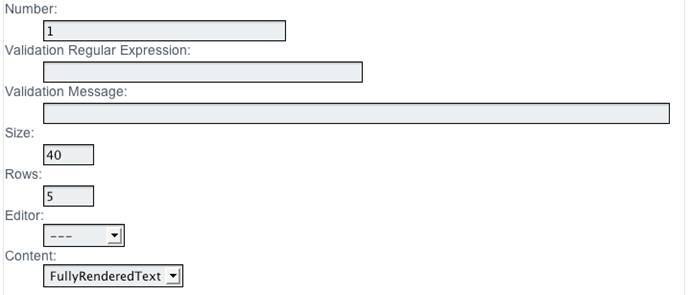
Figure 13: Description property showing some important property metadata
Let's spend some time understanding the different property metadata for a TextArea property (most of them are also available for other property types):
- Name: This is the programmatic name to use when querying this Class property using the XWiki API. You'll use it later on in this tutorial when using Velocity scripts to customize how a document with a Todo object attached should be displayed when rendered.
- Pretty Name: This is a nice user readable name that can be used for any purpose.
- Number: This is the position of this property in the Class definition and can be used to rearrange property orders. Both the Pretty Name and the Number value are used by the default generic Stylesheet proposed by the Todo Class Wizard to render any document having a Todo object attached. We'll cover that in a moment and you'll also learn how to customize that Stylesheet.
- Validation Regular Expression and Message are used to perform field validation when users enter data. We're not going to cover these in this tutorial.
- Size: Number of characters to display in the TextArea box
- Rows: Number of lines to display in the TextArea box
- Editor: The editor users will see when editing this TextArea. There are 2 editors: the wiki syntax editor and the WYSIWYG editor. If not specified (as is the case in figure 13) then the user preferred editor is used and if none has been set then the default editor defined in the Administration page is used. The default editor is the WYSIWYG editor which you can change by going to the Administration page and clicking on the "Editing" accordion as shown in figure 14.
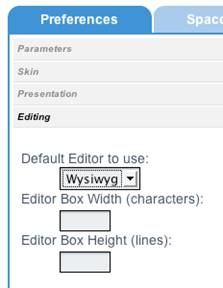
Figure 14: Changing the default editor for all users
- Content: How the content should be rendered. Valid vales are FullyRenderedText, VelocityCode and PureText. FullyRenderedText means that users can enter wiki syntax and Velocity syntax inside the TextArea. VelocityCode means that wiki syntax will not be rendered and PureText means that Velocity and wiki syntax text won't be evaluated.
Now let's create the other properties. Create the Assignee property of type "Users List Class", the Target Date of type "Date Class" (note that when you enter "Target Date" as the property name, XWiki will automatically remove the space so you'll have to add it again to the Pretty Name field if you want a more readable name). For these 2 properties use the default values.
| Due to a limitation in XWiki it's currently not possible to delete a property added to a class. The only current workaround is to recreate the class. |
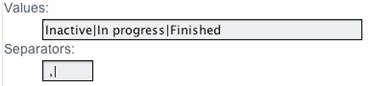
Figure 15: The Values field of a Static List Class property, used to populate the default values for the List combo box that will be displayed to users
Hit "Save & View" to save the Todo Class definition. The next step is to define how pages containing Todo Objects should be rendered.
Displaying pages containing Todo Objects
Now that you have a Todo Class defined, you can edit any document and attach Todo objects as you've seen in the "Understanding Classed and Objects" section above. However doing so will not modify the way these documents are displayed. They'll still display whatever content has been defined for them. Of course you could put some Velocity code in that document to access the attached Todo Object's data. However we can do better. What we really want is a common way to render any document which has a Todo Object attached and we don't want to have to copy/paste Velocity code in each of these documents. This can be easily achieved with what XWiki calls a Stylesheet.
A Stylesheet is simply a document like any other. Its content has some script to extract data from attached Object and to display them. Stylesheets are meant to be included from documents having attached Objects using the XWiki #includeForm("<stylesheet document name here>") Velocity macro. When XWiki renders the document, it sees this Velocity macro, includes it and evaluates it in the context of the current document. The Stylesheet runs and renders the display.
Let's create a very simply Stylesheet for our Todo Class. Go to the Todo Class Wizard and click on the "Create the document sheet" button. XWiki will create a new document named TodoClassSheet (it uses the Todo Class document named and appends Sheet) with a default and generic content that can be used to display any attached Object, as shown in figure 16.
Edit the content to replace "XWiki.MyClass" with "XWiki.TodoClass" and Click "Save & View" to use the default content for now. We'll work on an improved display later on in this tutorial.
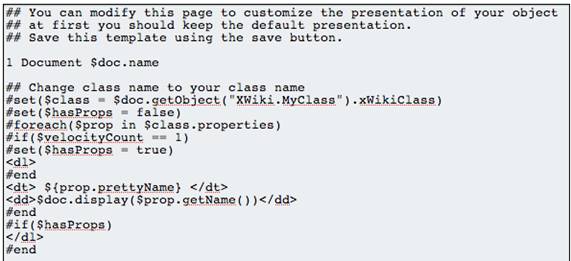
Figure 16: Default and generic Stylesheet for displaying any Object attached to a document
When you go back to the Todo Class Wizard, you'll see that the "Create the document sheet" button has now disappeared and is replaced with a link to the TodoClassSheet document you have created.
As you have probably noticed, there's also a button to create a document template on the Todo Class Wizard page. A template is a sample document using the concerned Class Object. In the case at hand it means creating a sample document using the Todo Class. Templates are generally used in forms for creating new pages where they are copied as is in the newly created document. For example you'll use it below when you implement the "add a todo" form.
To create the Todo Class Template, click the "Create the document template" button in the Todo Class Wizard. A TodoClassTemplate document is created with some default content. Modify it to replace XWiki.MyNameClassSheet with XWiki.TodoClassSheet which is the name of the Todo Class Stylesheet we have just created above, as shown on figure 17.

Figure 17: Default Template for the Todo Class
Click on "Save & View" to save the template document and go back to the Todo Class Wizard page. The button to create the template has disappeared. However there's a warning displayed mentioning that "The template does not have an object of class TodoClass.". Since a template is a sample page, it should contain a Todo Object attached to it. Click on the link to add a Todo Object to it (figure 18).
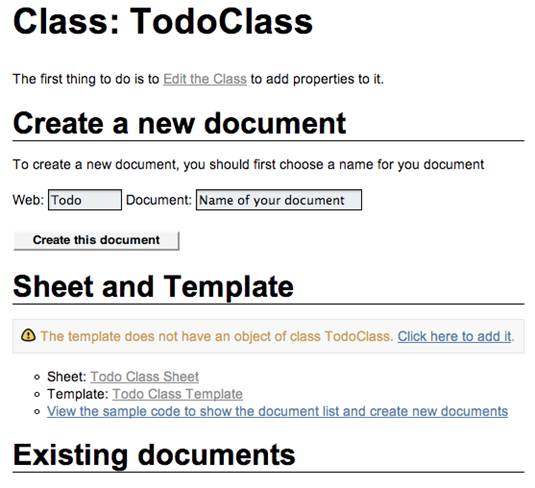
Figure 18: Todo Class Wizard when both the stylesheet and template have been created
As you can see on figure 18, you now have the ability to create new Todo documents. For example enter "ReadXWikiDocumentation" in the Document field and click on the "Create this document" button. A new document will be created and you'll be viewing it in edit mode (as if you had pressed "Edit" on it) as can be seen on figure 19.
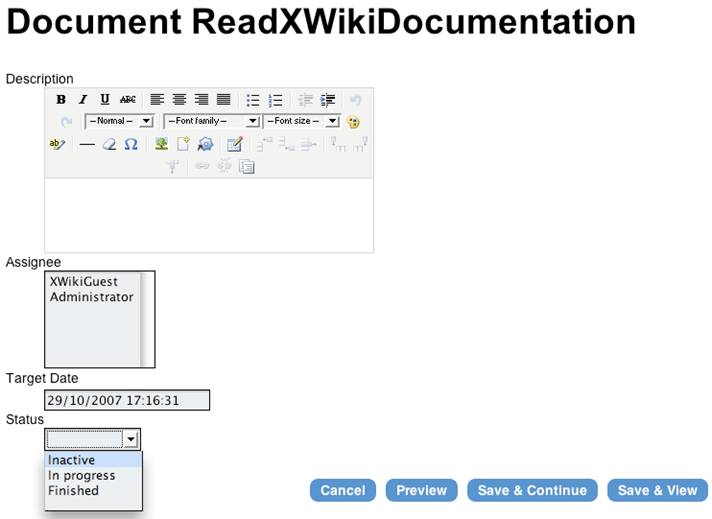
Figure 19: The new ReadXWikiDocumentation Todo document in edit mode
| XWiki doesn't yet have a date picker control for Date Class properties. One is being developed and will appear in one of the next forthcoming releases |
- The form on the Todo Class Wizard page has created the new Todo.ReadXWikiDocumentation document by copying the Todo Class Template document
- Thus the ReadXWikiDocumentation has a content of #includeForm("XWiki.TodoClassSheet") (since this is the content of the Todo Class Template document)
- XWiki automatically recognizes documents calling the #includeForm macro and when you edit such documents XWiki edit them in a special mode called the Inline mode. When in Inline mode, XWiki doesn't call the standard wiki or WYSIWYG editors but instead delegates the edition of the page to the document itself which must then provides way to edit the content. This means that the document's content needs to have some script code (in Velocity for example) to decide whether it should simply render the page in view mode or provide some edit fields (for example) if in Inline mode.
- Fortunately XWiki provides an API (display()) that automatically displays a property from an Object when in view mode and that automatically provides an edit control when in Inline mode. This API is used in the default and generic Class Sheet you've used above. Let's look at it again:
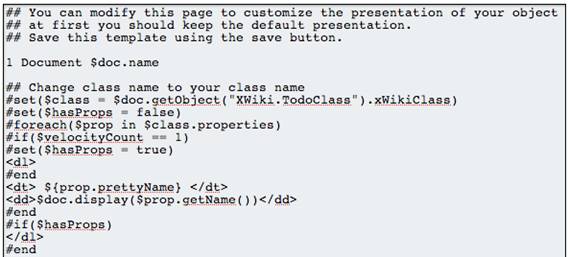
- The trick is in the "display()" API used in "$doc.display($prop.getName())". It supports all types of controls and knows how to display their value in view mode and provide edit controls for them in Inline mode
Continue by entering data for the ReadXWikiDocumentation Todo document and press "Save & View". You'll see something similar to figure 20.
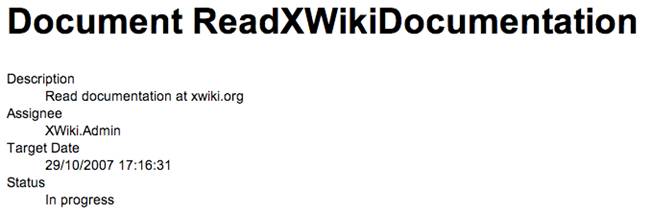
Figure 20: Example Todo document displayed in view mode
Continue to experiment by creating new Todo documents, trying to edit them in wiki mode and inline mode.
{infobbox}If you click on the edit button in the top menu XWiki will automatically edit the document in Inline mode if it contains the #includeForm() macro.
Now we'll see how to create a Todo dashboard page to manage all Todo documents.
Creating a Todo Dashboard page
Let's now create a Todo Dashboard page that lists all Todo documents found in the wiki and that allows adding new Todos.
Since we've decided to add Todo documents in the Todo space it makes sense to make the dashboard be the home page of the Todo space, i.e. Todo.WebHome. Since we'll need a way for the users to navigate to the Todo space, let's add a Todo entry in th Quick Links Panels that appears by default on the right. Make sure you're logged in as Admin (or that you have administration rights). If that's the case you should see a "Edit this Panel" link in the Quick Links Panels as shown in figure 21.
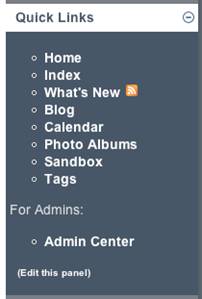
Figure 21: Quick Links Panel when the logged in user has Admin rights
Add a new Todo item as shown in figure 22 (highlighted line).
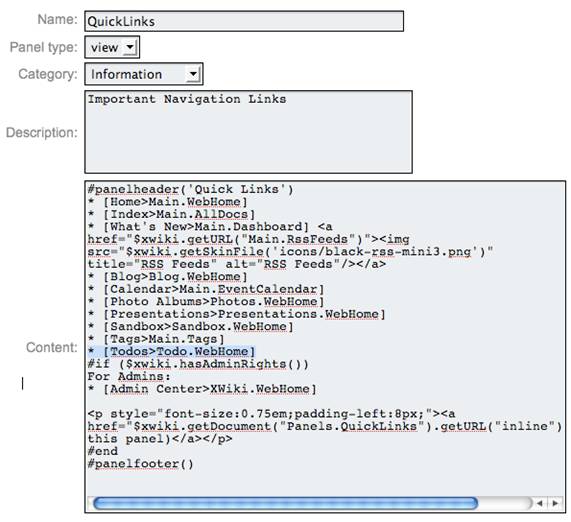
Figure 22: Adding a Todo menu item in the Quick Links Panel
Once this is done, the Quick Links Panel will display a new Todo link with a question mark (since the Todo.WebHome document doesn't exist yet). Click on the question mark to create the Todo.WebHome document.
| This method of creating the navigation before creating the page should always be preferred. The strength of the wiki concept is in the links it creates between topics. The alternative is to use the Create Panel to create new pages. However these pages won't be linked anywhere making it hard to navigate to them. |
Let's start by using XWiki's API to write a Velocity script that finds all documents having a Todo Object attached to them, as in listing 1.
| Make sure you always enter script in wiki editing mode and not in WYSIWYG mode as that won't work |
1 Todos

#set ($hql = ", BaseObject as obj where obj.name=doc.fullName
 and obj.className='XWiki.TodoClass' and obj.name<>'XWiki.TodoClassTemplate'")
#set ($todos= $xwiki.searchDocuments($hql))
#if ($todos.size() > 0)
  #foreach ($todo in $todos)
    * [$todo]
  #end
#else
  #info("There are no Todo documents in this wiki!")
#end
Listing 1: Lists all documents having a Todo Object attached, excluding the XWiki.TodoClassTemplate document
Since this is the first Velocity script we really write (the other ones above were generated by XWiki and we kept them as is) let's take some time to understand how scripting works in XWiki. There are two scripting languages available: Velocity and Groovy. In this tutorial we'll only use Velocity. Groovy scripts should be reserved for performing complex logic. Whether you're writing Groovy or Velocity scripts, XWiki makes available its full API through 4 main objects to you: $xwiki, $doc, $request and $context:
- $xwiki: offers a large range of wiki-wide APIs, such as searching for documents, get document data, get user information, get XWiki configuration preferences and many more
- $doc: represents the current document. You can extract any information attached to a document such as content, objects attached, class information, attachments, comments and versions.
- $request: represents the current request. Useful to get extract parameters from the query string for example
- $context: represents a XWiki session. You can get information such as the current logged in user, the current language and current space.
In listing 1, you're using the $xwiki variable to call the searchDocuments() method. This method accepts a string representing a portion of a database query expressed in Hibernate Query Language (HQL). Indeed XWiki uses Hibernate for implementing its data persistence. Note that the searchDocuments() API constructs part of the SELECT clause automatically. When you construct your query you have to imagine that XWiki prepends "select distinct doc.web, doc.name" to whatever you add. The reason for this is to prevent arbitrary HQL which would cause a security risk. XWiki does also offer privileged APIs to execute any HQL queries and we'll use them below when we add pagination. These APIs require some special programming rights to write.
Going back to the HQL query, BaseObject is a table containing all Objects attached to pages so we're looking for all Objects attached to documents where the attached Object Class is "XWiki.TodoClass" and we're excluding the "XWiki.TodoClassTemplate" document since this is a technical document we don't want to show. We could also have chosen to exclude all documents in the "XWiki" space for example.
Then, if there are matches, we iterate over the documents found and print them in a list. Note that the searchDocuments() method returns document names and not document Objects so $todo is a fully-qualified document name as a string, as in "Todo.ReadXWikiDocumentation".
| A full qualified document name includes the space name, as in Space.Page. When not specified the current space is automatically prefixed but it's a best practice to always use fully-qualified names since the result can very depending on which space you're in. |
When you save the Todo.WebHome you'll get the result shown in figure 23.

Figure 23: List of all documents containing a Todo Object attached
Adding the ability to add new Todo items
Let's build on this first script by extracting data from attached Objects and displaying them in a table, as shown in listing 2.
1 Todos

#set ($hql = ", BaseObject as obj where obj.name=doc.fullName
 and obj.className='XWiki.TodoClass' and obj.name<>'XWiki.TodoClassTemplate'")
#set ($todos= $xwiki.searchDocuments($hql))

{table}
Description|Assignee|Date|Status
#foreach ($todo in $todos)
  #set ($todoDoc = $xwiki.getDocument($todo))
  #set ($todoObj = $todoDoc.getObject("XWiki.TodoClass"))
[$todoObj.Description>$todo] | $todoObj.Assignee | $todoObj.TargetDate | $todoObj.Status
#end
{table}
Listing 2: Find all Todo documents and display their data in a table
We use the {table} macro to create a table. Columns are separated by the pipe symbol ("|") and the header row is the first line inside the {table} macro. We use the $xwiki.getDocument() API to retrieve a Document object for the document name passed as parameter. Then we use the getObject() API on the Document object to get the attached Todo Object. Once we have that Object we can simply access the property values. Note that this is a Velocity trick and that calling $todoObj.Description is actually equivalent to calling $todoObj.get("Description").
This results in the table shown in figure 24.

Figure 24: List of all Todo documents presented in tabular format
Let's now add a form to allow creation of new Todo documents. Listing 3 shows the code.
1 Todos

<form action="" id="newtodo">
  <input type="hidden" name="parent" value="Todo.WebHome" />
  <input type="hidden" name="template" value="XWiki.TodoClassTemplate" />
  <input type="hidden" name="name" value=""/>
  <table>
    <tr>
      <td>
        <input type="text" name="todo" value="" size="30"/>
      </td>
      <td>
        <input type="submit" value="Add this Todo" onclick='if
   (updateName(this.form.todo, this.form.name))
   { action="../../inline/Todo/" + this.form.name.value;
   this.form.submit(); }' />
      </td>
    </tr>
  </table>
</form>
...
Listing 3: Adding a form to add new Todo documents
This is a standard HTML form. XWiki supports creating new documents directly by using a URL with proper format and parameters.
| Here's another way of creating a new page. Type directly a URL like this one in your browser: http://localhost:8080/xwiki/bin/edit/SomeSpace/SomeDocument. This creates automatically a new SomeSpace.SomeDocument document. |
The URL we need to have to create a new document in Inline mode is the following:
http://localhost:8080/xwiki/bin/inline/Todo/<Page Name>?parent=Todo.WebHome&template=XWiki.TodoClassTemplate
The parent parameter will be the parent of the newly created document and the template parameter is used to make the newly created document be an exact copy of the referenced document. Thus all the HTML has to do is construct such a URL. We pass the parameters using hidden input elements. We also use a XWiki helper javascript method called updateName() which is used to remove all accents and any non alphanumeric characters from the page name entered by the user.
We now have a nice Todo home page allowing to enter new Todo items (figure 25).
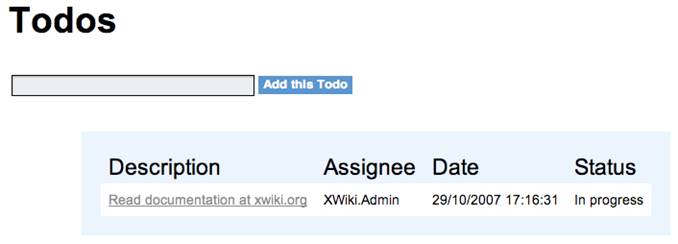
Figure 25: Todo dashboard with ability to add new Todo items
Adding Sorting/Filtering capabilities
Let's improve our Todo table even further by providing the ability to sort columns and to filter them. These sorting and filtering features are not currently implemented in the {table} macro (although there are plans to do that). However the default XWiki Enterprise installation provides some already-made Javascript library to help with this. Listing 5 show how to use an HTML <table> that provides sorting/filtering.
<table id="todoTable" class="grid sortable filterable doOddEven" cellpadding="0" cellspacing="0" border="0">
  <tr class="sortHeader">
    <th>Description</th>
    <th>Assignee</th>
    <th>Date</th>
    <th class="unsortable selectFilter">Status</th>
  </tr>
#foreach ($todo in $todos)
  <tr>
    #set ($todoDoc = $xwiki.getDocument($todo))
    #set ($todoObj = $todoDoc.getObject("XWiki.TodoClass"))
    <td>[$todoObj.Description>$todo]</td>
    <td>$todoObj.Assignee</td>
    <td>$todoObj.TargetDate</td>
    <td>$todoObj.Status</td>
  </tr>
#end
</table>
Listing 5: Adding a Sorting/Filtering HTML table for displaying Todo items
You need to use a unique table id for each table in the page. Then all the features are enabled/disabled by using HTML "class" elements. The result is shown in figure 26.
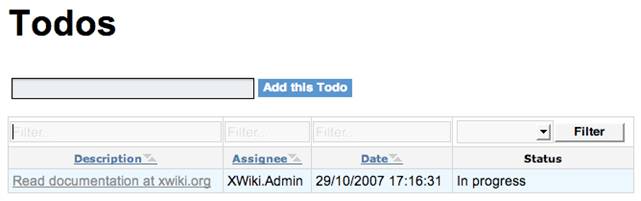
Figure 26: Todo items displayed in an HTML table with sorting/filtering support
Adding Pagination
Our Dashboard is all nice but what happens when there are lots of Todo items?
The usual solution is to use pagination. Fortunately the XWiki searchDocuments() API also accepts two parameters: the number of items to retrieve and the index of the first item to get. In addition XWiki offers a Velocity macro called #pagedViewLinks() to display page links (next, previous, first and last pages). All we have to do is provide the script to compute the number of items to display, number of items per page and start position, as done in listing 6.
1 Todos

<form...
</form>

#set($itemsPerPage = 5)
#if($request.ipp)
  #set($itemsPerPage = $xwiki.parseInt($request.ipp))
#end

#set($pageNumber = 0)
#if($request.page)
  #set($pageNumber = $xwiki.parseInt($request.page))
#end

#set($startAt = $itemsPerPage * $pageNumber)
#if($startAt < 0)
  #set($startAt = 0)
#end

#set ($hql = ", BaseObject as obj where obj.name=doc.fullName and obj.className='XWiki.TodoClass' and obj.name<>'XWiki.TodoClassTemplate'")

#set ($count = $xwiki.getXWiki().search("select count(doc) from XWikiDocument doc ${hql}", $context.context).get(0))

#set($endAt = $itemsPerPage * ($pageNumber + 1))
#if($endAt > $count)
  #set($endAt = $count)
#end
#if($startAt > $endAt)
  #set($startAt = $endAt)
#end

#set($totalPages = ($count - 1) / $itemsPerPage)
#set($crtPageNumber = $startAt / $itemsPerPage)

#set ($todos= $xwiki.searchDocuments($hql, $itemsPerPage, $startAt))

<table...
</table>

#pagedViewLinks($itemsPerPage $totalPages $crtPageNumber)
Listing 6: Adding pagination to the Todo table
Some interesting part in the code:
- We're using parameters passed to the page (items per page and page number). We extract them using the $request variable, for example: $request.ipp. This is a Velocity shorthand notation equivalent to $request.get("ipp").
- We use a privileged API to perform an arbitrary HQL query: $xwiki.getXWiki().search("select count(doc) from XWikiDocument doc ${hql}", $context.context) . The getXWiki() method returns a privileged API. You'll need to be logged in with a user having programming rights (this is the case if your logged in as an Administrator) before you save the page. If you don't have programming rights and you save the page, the privileged API won't be executed.
- We have to do 2 queries instead of one: one for computing the number of Todo items and one for retrieving the Todo items for the current page.
Now try adding more than 5 Todo items and you'll see a result similar to the one shown in figure 27.

Figure 27: Paginated Todo table allowing to navigate
Now this is starting to look nice!
Adding a My Todo Panel
So far you've learnt how to write a small application in XWiki. What you should know is that everything you see in the default XWiki Enterprise wiki is an application done in the same way as you've written the Todo application. Examples of such applications are: the administration application, the search application, the blog application, the presentation application, the photo album application, the Panels application, etc. A wiki is just a set of applications when using XWiki.
The advantage of that is that you can easily edit any existing application to customize it to your needs. For example you could very well modify the search application to offer a checkbox for searching only in Todo items.
Let's customize the Panels application by adding a new Panel that displays all the Todos assigned to the current logged in user and that are not finished. We'll call that Panel "My Todos".
Start by navigating to the Panels Space at http://localhost:8080/xwiki/bin/view/Panels/. This page lists all existing Panels and includes a form to create new Panels. Type "MyTodos" and click the "Create" button. You're then presented with an empty Panel page (figure 28). By now you should be familiar as to how this work since the Panels application is done exactly in the same manner as the Todo application you've just written...
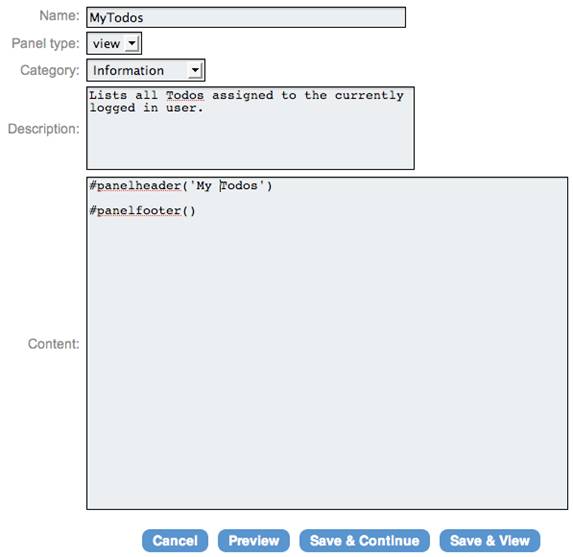
Figure 28: New empty My Todo Panel
The Panel code should be inserted within the #panelheader()/panelfooter() macros. Enter the script as shown in listing 7.
#panelheader('My Todos')

#set ($hql = ", BaseObject as obj, StringProperty as prop1,
 StringProperty as prop2 where obj.name=doc.fullName and obj.className='XWiki.TodoClass'
 and obj.name<>'XWiki.TodoClassTemplate' and obj.id=prop1.id.id and prop1.id.name='Status'
 and prop1.value <> 'Finished' and obj.id=prop2.id.id and prop2.id.name='Assignee'
 and prop2.value='$context.user' order by doc.date desc")

#foreach ($todo in $xwiki.searchDocuments($hql, 5, 0))
* [$todo]
#end
#panelfooter()
Listing 7: My Todo Panel listing all Todo documents assigned to the current logged in user and that are not finished
The hard part in creating this My Todo Panel is in finding out the correct HQL query to write. You have to know that Static List Class properties and User Class properties are stored internally using a StringProperty Object.
Save the Panel and navigate to the Panel Wizard page (it's linked from the Panels.WebHome page). The Panels Wizard is a nice looking page that allows you to drag and drop existing Panels on the left or right of the screen, and rearrange Panels already there (see figure 29).
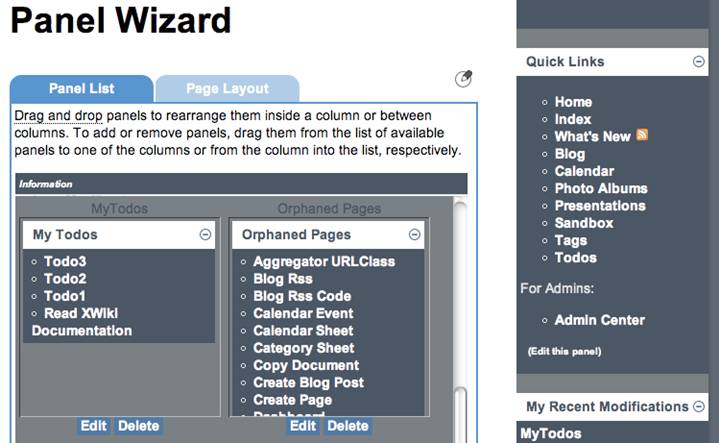
Figure 29: Panel Wizard application showing the newly created My Todo Panel
Use the Panel Wizard to drag and drop the My Todos Panel below the Quick Links Panel and above the My Modifications Panel on the right (provided you've kept the default layout in your wiki, otherwise drop it wherever you'd like to!).
Further possible improvements
Now that we have that basic Todo application working and integrated the next steps could be:
- Add some forms to modify task statuses directly from the table in Todo.WebHome page
- Add a search form in Todo.WebHome to search Todo items
- Improve the Look and Feel by modifying the XWiki.TodoClassSheet document. For example a nice-looking addition would be to add a box with round corners and a light-colored background for displaying Todo data. This would require a mix of Javascript and CSS which you could put directly in the page or in another page which you'd reference from the TodoClassSheet page.
Conclusion
In this tutorial you have learnt how to customize XWiki Enterprise by creating a small Todo application. In doing so, you have discovered how Objects, Classes and Templates work in XWiki. You've also discovered how to customize Panels and even how to create new ones.
There are other customizations you could bring to your XWiki Enterprise instance. An important one is the ability to fully modify the current Skin. You can make XWiki look like a public web site, an intranet, a knowledge management tool, a blog or simply like a typical first generation wiki. Or any other combination. Your imagination is the limit. By combining the application development feature and the skinability it's even possible to create full-fledged applications. In that case the wiki is used as a runtime platform and the UI is fully modified to suite the application's need.
This is how the full-fledged applications presented in the introduction above were created. They are:
- XWiki Watch : A collaborative RSS feed reader developed using GWT for its UI.
- XWiki Enterprise Manager: An extension of XWiki Enterprise to manage farms of XWiki instances.
- Chronopolys: A project management application for managing portfolio of projects.
- Nearbee: A wiki focused on work spaces with ability to share them with other users.
An other interesting application developed using the XWiki platform is XEclipse, both a plugin and an RCP application to edit XWiki documents inside an Eclipse environment, with offline features. XEclipse uses the XWiki XMLRPC API to interact with XWiki Enterprise servers.
In addition, several research projects are being developed around the XWiki platform; one is about creating a P2P version of XWiki with offline features and the ability to use mobile devices to connect to the network and another one is about developing a semantic help desk.
Last, the XWiki project is a vibrant open source project which was started by XWiki SAS (formerly XPertNet), a company selling solutions and services based on the XWiki platform. The XWiki open source project is run in a meritocratic manner, following the Apache Software Foundation principles. Everyone is most welcome to join us and help improve the XWiki platform to make it an even better Enterprise platform for developing collaborative applications. Come join us, we'll be waiting!