Integrating Eclipse and WebSphere Portal 7
Using Eclipse to develop applications for WebSphere Portal 7 can save you a considerable amount of licensing expense, but the integration can be a bit tricky in the early stages.
 Someone once told me: “If you’re going to be developing for WebSphere Portal, you’re going to have to use Rational Application Developer (RAD).” If I’m not mistaken, that someone was an IBM sales rep. Unfortunately, for many years I believed that RAD was the only way to go. It was available to me at every organization I worked. Finally, the day came when I had to develop Portlets as a contractor. Purchasing my own license would cost between $2000 and roughly $15k.
If you don’t happen to have several thousand dollars lying around, but would still like an alternative to RAD and Portlet development, please keep reading.
To help you use Eclipse to develop WebSphere Portal 7 applications, I plan to answer the following questions:
- What does Rational Application Developer offer over Eclipse?
- What are the prerequisites?
- How do I import the Portlet Template?
- What do I have to change in the Portlet Template?
- Where can I locate the JAR files I require to develop Portlets?
- Where can I locate the JSP Tag libraries?
- How do I add the required JARs to the Build path?
- How can I deploy the Portlet?
- What’s next?
What does Rational Application Developer offer over Eclipse?
Rational Application Developer 8 is the recommended development platform of choice for WebSphere Portal 7. At its core, RAD offers the following capabilities:
- Creating and managing Portlet applications
- Providing the build path with the necessary JARs and Tag libraries
- Starting and stopping Portal
- Deploy Portlet applications
- Accessing the Portal administration console
What are the prerequisites?
At the very least, you’ll require the following:
- An Eclipse IDE for Java EE Developers installed
- The WebSphere Portal profile is located at the following location:
C:\IBM\WebSphere\wp_profile
- The Portlets will be packaged and deployed to the following location:
C:\IBM\WebSphere\wp_profile\installableApps
- The Spring Portlet Development template I’ve developed.
DOWNLOAD PORTLET PROJECT TEMPLATE HERE
[Author’s Note: The template uses a Spring MVC Portlet annotated controller!]
How do I import the Portlet Template?
When you develop a Portlet in RAD, a default Portlet template is provided for you. It might be an Empty Portlet, a Basic Portlet, or a JSF/Struts Portlet. I’m assuming you’ve already downloaded the Portlet Project Template from the prerequisite section.
Perform the following steps to import the template:
1) Start Eclipse
2) Select File -> Import…
3) Select General -> Existing Projects into Workspace
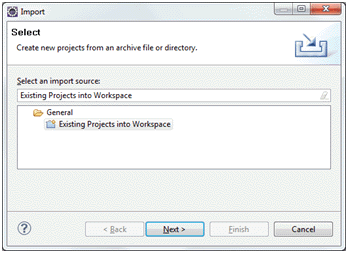
4) Click Next
5) Select the Select archive file radio button and select the location of the archive file you downloaded
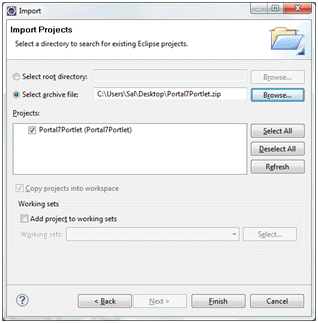
6) Click Finish
What do I have to change in the Portlet Template?
If you’re going to use the sample template for your own applications, you’ll have to change the following at a minimum:
1) The ca.pece.spring.portlet package name… although feel free to use it if you like
2) The id attribute of the <portlet-app> element in the /WebContent/WEB-INF/portlet.xml file. This value must be unique across installed Portlets.
3) Portlet title name in the javax.portlet.title properties in the ca.pece.spring.portlet.nl.portal7portlet.properties and ca.pece.spring.portlet.nl.portal7portlet_en.properties files
4) Change the display name in the /WebContent/WEB-INF/web.xml file
[Author’s note: If you forget to change the id, the Portlet install will fail. Trust me.]
Where can I locate the JAR files I require to develop Portlets?
It took a little digging but I eventually located the following requisite JAR files:
| JAR File | Description | Location |
| portletapi_20.jar | Core Portlet development libraries | C:\IBM\WebSphere\PortalServer\doc\compile |
| com.ibm.ws. portletcontainer.jar | Portlet Utility Classes (optional) | C:\IBM\WebSphere\AppServer\plugins |
| j2ee.jar | Standard Servlet/JSP libraries | C:\IBM\WebSphere\AppServer\lib |
Where can I locate the JSP Tag libraries?
Locating this one was a little tougher, but if you want to use the standard Portlet JSP tag libraries (and I’m sure you will) here it is:
| JAR File | Description | Location |
| wp.engine.tags.jar | C:\IBM\WebSphere\PortalServer\base\ wp.engine.tags\shared\app |
How do I add the required JARs to the Java Build path?
Perform the following steps to add the previously listed JAR files to the Portal7Portlet’s build path:
1) Right-click the Portal7Portlet and select Properties
2) Select Java Build Path from the list
3) Click the Add External JARs button
4) Select the required JAR file from the list above
5) Click Open
6) Repeat Steps 1-5 for all the required JARs
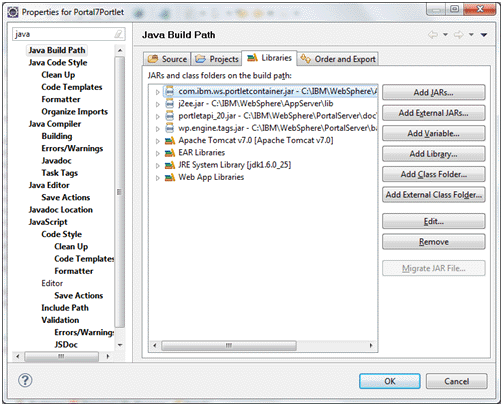
7) Click OK to close the Properties window
How can I deploy the Portlet?
The first time deploying the Portlet will be the hardest, but I promise it’ll become much easier. Perform the following steps to deploy the Portlet:
1) Right-click the Portal7Portlet project and select Export -> WAR file
2) Specify the destination as C:\IBM\WebSphere\wp_profile\installableApps\ Portal7Portlet.war
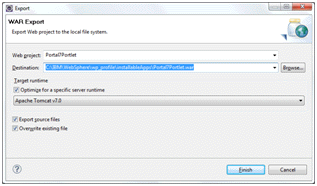
3) Click Finish
4) Start WebSphere Portal
5) Log into the WebSphere Portal Server as an administrator
6) Select Administration
7) Select Portlet Management -> Web Modules
8) Click Install
9) Set the Directory field to the following:
C:\IBM\WebSphere\wp_profile\installableApps\Portal7Portlet.war
10) Click Next
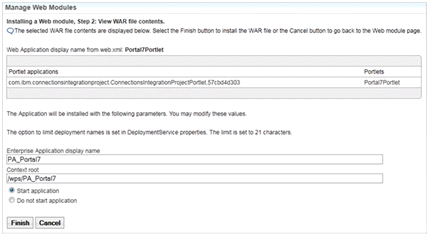
11) Click Finish
12) You should see the following:

13) Add the Portlet to a page and verify that you see the following:

[Author’s Note: This will be the last time you’ll have to manually update the Portlet yourself! In the next article, I’ll provide a series of ANT scripts to help out with the deployments.]
What’s next?
Now that we have the basics covered, in the next article, I’m going to provide a series of ANT scripts to help perform the other key functions from within Eclipse:
- Starting/Stopping Portal
- Deploying Portlet Applications
- Accessing the Portal Administration console


