JSF Tutorial: Completing the Ajax based Facelets application
If you're using JSF, you're probably using Facelets, and if you're creating modern web based applications, you'll likely want to use Ajax based request-response cycles. Here we conclude our tutorial on JavaServer Faces, Facelets and Ajax based programming.

This tutorial is the final part of a two part series on Ajax based development with JSF and Facelets. The first part of this tutorial can be found here: Integrating Ajax, Facelets and JSF 2.0
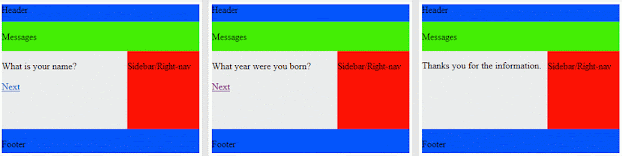
In the previous tutorial we create the FacePainter class which is used by the Facelets framework to dynamically populate the content area of our web based application. By updating the mainContent property of the FacePainter on every Ajax based request, the central content in our web application is constantly updated, all of which happens using asynchronous, Ajax based request-response cycles. The page ends up transitioning from one screen to the next with the central content being updated, creating an Ajax based JSF experience that is diagramed in the image below:
The complete template page
With the ui:include tag's src attribute pointing to the FacePainter's mainContent property, the full template page, index.xhtml, looks as follows:
<html xmlns="https://www.w3.org/1999/xhtml"
xmlns:ui="http://xmlns.jcp.org/jsf/facelets" xmlns:f="http://java.sun.com/jsf/core"
xmlns:h="http://xmlns.jcp.org/jsf/html">
  <h:head>
    <link href="stylesheet.css"rel="stylesheet" type="text/css" />
  </h:head>
  <h:body>
     <div id="page">
       <div id="header-container">
        <div id="header">
           <ui:insert name="header">
            <ui:include src="header.xhtml" />
         </ui:insert>
        </div>
      </div>
      <div id="messages-container">
        <div id="messages">
          <ui:insert name="messages">
            <ui:include src="messages.xhtml" />
          </ui:insert>
        </div>
      </div>
      <div id="content-container">
        <div id="content">
          <ui:insert name="content">
            <ui:include src="#{facePainter.mainContent}" />
          </ui:insert>
        </div>
      <div id="sidebar">
      <ui:insert name="rightnav">
        <ui:include src="rightnav.xhtml" />
      </ui:insert>
    </div>
  </div>
  <div id="footer-container">
    <div id="footer">
  <ui:insert name="footer">
    <ui:include src="footer.xhtml" />
   </ui:insert>
  </div>
 </div>
 </div>
</h:body>
</html>

Pruning the application pages
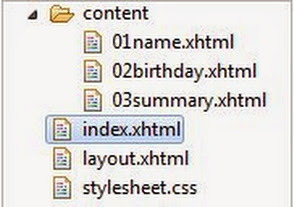
By the way, when this step is done, you can delete the following files that you might have in your workspace if you have been following along from previous tutorials:
- step01_name.xhtml
- step02_birthday.xhtml
- step03_completed.xhtml
The final step is to have the individual web page fragments that are being inserted into the main content area of the page to call on the managed bean. That means wrapping the content in a JSF form tag, using a JSF commandLink, working with a JSF Ajax tag, and invoking the corresponding method of the managed bean. It sounds like a lot, but when you look at the code, you'll see that it's relatively straight forward.
01name.xhtml
<!DOCTYPE html PUBLIC "-//W3C//DTD XHTML 1.0
Transitional//EN"  "https://www.w3.org/TR/xhtml1/DTD/xhtml1-transitional.dtd">

<h:html xmlns="https://www.w3.org/1999/xhtml"
       xmlns:ui="http://xmlns.jcp.org/jsf/facelets"
       xmlns:f="http://java.sun.com/jsf/core"
       xmlns:h="http://xmlns.jcp.org/jsf/html"><h:head></h:head><h:body> <ui:composition> <h:form id="form">
<p>What is your name?</p>
<p>
<h:commandLink value="Next" action="#{userInfo.captureUsername}" id="next">
<f:ajax render="content form" />
</h:commandLink>
</p>
</h:form>
 </ui:composition>
</h:body>
</h:html>
02birthday.xhtml
<!DOCTYPE html PUBLIC "-//W3C//DTD XHTML 1.0 Transitional//EN"
  "https://www.w3.org/TR/xhtml1/DTD/xhtml1-transitional.dtd">
<h:html xmlns="https://www.w3.org/1999/xhtml"
       xmlns:ui="http://xmlns.jcp.org/jsf/facelets"
       xmlns:f="http://java.sun.com/jsf/core"
       xmlns:h="http://xmlns.jcp.org/jsf/html">
<h:head></h:head>
<h:body>
<ui:composition>
<h:form id="form">
<p>What year were you born?</p>
<h:commandLink value="Next" action="#{userInfo.captureBirthday}" id="next">
<f:ajax render="content form" />
</h:commandLink>
</p>
</h:form>
</ui:composition>
</h:body>
</h:html>
03summary.xhtml
<!DOCTYPE html PUBLIC "-//W3C//DTD XHTML 1.0 Transitional//EN"
  "https://www.w3.org/TR/xhtml1/DTD/xhtml1-transitional.dtd">
<h:html xmlns="https://www.w3.org/1999/xhtml"
xmlns:ui="http://xmlns.jcp.org/jsf/facelets" xmlns:f="http://java.sun.com/jsf/core"
xmlns:h="http://xmlns.jcp.org/jsf/html">

<h:head></h:head>
<h:body>
       <ui:composition>
              <h:form id="form">
                <p>Thanks you for the information.</p>
               <h:commandLink value="Again" action="#{userInfo.backToLandingPage}"    id="again">
                 <f:ajax render="content form" />
               </h:commandLink>
             </h:form>
       </ui:composition>
</h:body>
</h:html>
Notice that the render attribute in f:ajax tag is set to both content and form. Setting the render attribute to content forces only the DIV element with the id of content to be refreshed when the commandLink is clicked. The form value is only in there because of a bug in the Mojarra release of JSF 2.2 which stops the page from loading properly. Hopefully that will be addressed in an upcoming release, but for now, the form value needs to be included in the render attribute. If there are any other parts of the page you would like refreshed through an Ajax based cycle, they can be listed here additionally as well.
And that's it. That's how easy it is to combine JSF, Ajax and Facelets. If you're starting a new project, and you want to be able to provide the a full-featured, asynchronous, web 2.0 experience to the end user, there is no excuse not to go with JavaServer Faces, the industry standard.
Code used in this example
For reference, here is both the FacePainter and the UserInfo classes used by the code above:
package com.mcnz.facelets;

import javax.faces.bean.ManagedBean;
import javax.faces.bean.SessionScoped;

@ManagedBean(name="facePainter")
@SessionScoped
public class FacePainter {

	private String mainContent = "content/01name.xhtml";

	public String getMainContent() {
		return mainContent;
	}

	public void setMainContent(String mainContent) {
		this.mainContent = mainContent;
	}

}
package com.mcnz.facelets;

import javax.faces.bean.ManagedBean;
import javax.faces.bean.ManagedProperty;
import javax.faces.bean.SessionScoped;

@ManagedBean
@SessionScoped
public class UserInfo {

	@ManagedProperty(value="#{facePainter}")
	public FacePainter facePainter;

	public FacePainter getFacePainter() {
		return facePainter;
	}

	public void setFacePainter(FacePainter facePainter) {
		this.facePainter = facePainter;
	}

	public void backToLandingPage() {
		facePainter.setMainContent("content/01name.xhtml");
	}

	public void captureUsername() {
		facePainter.setMainContent("content/02birthday.xhtml");
	}

	public void captureBirthday() {
		facePainter.setMainContent("content/03summary.xhtml");
	}

}
You should follow Cameron McKenzie on Twitter: @cameronmcnz
Interested in more articles and opinion pieces from Cameron McKenzie? Check these out:
- Why the Amazon S3 outage was a Fukushima moment for cloud computing
- Software ethics and why ‘Uber developer’ stains a professional resume
- It was more than user input error that caused the Amazon S3 outage
- Don’t let fear-mongering drive your adoption of Docker and microservices?
- Stop adding web UI frameworks like JSR-371 to the Java EE spec
Dig Deeper on Core Java APIs and programming techniques
-
![]()
Ajax, JavaScript support and CDI alignment tops the list of what's new in JSF 2.3
By: Cameron McKenzie
-
![]()
Use the Struts jQuery plugin to simplify Ajax request cycles example
By: Cameron McKenzie
-
![]()
Top Java frameworks for web app development
By: Cameron McKenzie
-
![]()
Stop adding web UI frameworks like JSR-371 to the Java EE spec
By: Cameron McKenzie