TheServerSide.com
https://www.theserverside.com/blog/Coffee-Talk-Java-News-Stories-and-Opinions/Ajax-JavaScript-file-upload-example
Simple Ajax file upload with pure JavaScript example
By Cameron McKenzie
Note, this article deals with client-side JavaScript. For a client and server-side JavaScript upload example, check out this File Uploads with Node and JavaScript tutorial.
It used to be a daunting challenge for a developer to upload files through a browser. Poor client-side facilities hampered the equation, and server-side components needed to exist to handle the incoming data stream.
Fortunately, HTML5 file input form tags simplified things on the client side. However, developers have added needless complexity to their application when it comes to creating Ajax and JavaScript file uploads. When developers turn to popular libraries such as jQuery or Dojo Toolkit, they add unnecessary issues to file uploads. Thankfully, there is an easier way.
| More File Upload Options |
|---|
|
I put together a bunch of file upload tutorials. Pick your technology and get uploading!
Uploading files to the server need not be a problem. |
The easiest and simplest way for a developer to accomplish an Ajax file upload is to use pure JavaScript and leave the bulky libraries and frameworks behind.
Ajax file uploads
A developer can perform an Ajax-based file upload to a server with JavaScript in five steps:
- An HTML5 input form element must be included in the webpage that renders in the client’s browser;
- A JavaScript method must be coded to initiate the asynchronous Ajax based file upload;
- A component must exist on the server to handle the file upload and save the resource locally;
- The server must send a response to the browser indicating the JavaScript file upload was successful; and
- The client’s browser must provide an Ajax-based response indicating the file uploaded successfully.
In this example, the JavaScript file upload target is an Apache Web Server. As a result, the server-side component that handles the Ajax request will be written in PHP. If a Tomcat or Jetty server was the upload target, a developer could code a Java based uploader on the server-side.
HTML5 file tags
HTML5 introduced a new type of input form field named file. When a browser encounters this tag, it renders a fully functional file picker on the web page. When it’s combined with an HTML5 button tag that can trigger a JavaScript method, these two elements represent the required markup elements to begin the JavaScript and Ajax file upload process.
The following HTML5 tags provide the required components to add a file selector and an upload button to any web page:
<input id="fileupload" type="file" name="fileupload" />
<button id="upload-button" onclick="uploadFile()"> Upload </button>
The button kicks off a method named uploadFile(), which contains the JavaScript file upload logic.
<script>
async function uploadFile() {
    let formData = new FormData();
    formData.append("file", fileupload.files[0]);
    await fetch('/upload.php', {
      method: "POST",
      body: formData
    });
    alert('The file has been uploaded successfully.');
}
</script>
JavaScript file upload logic
The above script tag contains nothing but pure JavaScript. There’s no jQuery or Dojo thrown into the mix and the logic is straightforward:
- Create a FormData object to contain the information to be sent to the server;
- Add the chosen file to be uploaded to the FormData object;
- Asynchronously call server-side resource to handle the upload; and
- The server-side resource is invoked through the POST method
- The server-side resource is passed the FormData which contains the file
- In this example that server-side resource is named upload.php
- When notified that the JavaScript file upload was successful, send an Ajax based alert to the client.
All the HTML and JavaScript logic will be contained in a single file named uploader.html. The complete HTML looks as follows:
<!DOCTYPE html>
<html>
 <head>
  <title> Ajax JavaScript File Upload Example </title>
 </head>
 <body>
  <!-- HTML5 Input Form Elements -->
  <input id="fileupload" type="file" name="fileupload" />
  <button id="upload-button" onclick="uploadFile()"> Upload </button>

  <!-- Ajax JavaScript File Upload Logic -->
  <script>
  async function uploadFile() {
  let formData = new FormData();
  formData.append("file", fileupload.files[0]);
  await fetch('/upload.php', {
    method: "POST",
    body: formData
  });
  alert('The file has been uploaded successfully.');
  }
  </script>

 </body>
</html>
Apache file upload processing
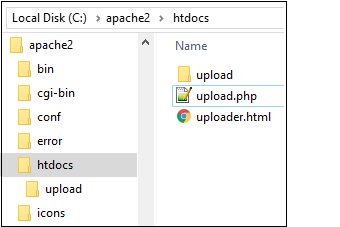
Required JavaScript file upload components.
When an asynchronous JavaScript file upload happens, a server-side component must exist to handle the incoming file and store it. Since this example uses an Apache HTTP Server (AHS), and since PHP is the language of AHS, it requires a file named upload.php that contains a small PHP script to save the incoming file to a folder named uploads:
<?php

/* Get the name of the uploaded file */
$filename = $_FILES['file']['name'];

/* Choose where to save the uploaded file */
$location = "upload/".$filename;

/* Save the uploaded file to the local filesystem */
if ( move_uploaded_file($_FILES['file']['tmp_name'], $location) ) {
  echo 'Success';
} else {
  echo 'Failure';
}

?>
The PHP script is also straightforward. It obtains the name of the file being uploaded, and then creates a spot in a folder named upload to save the file. PHP’s move_uploaded_file method is then used to save the uploaded file to this new location.
Run the JavaScript file upload example
The files used in this example, along with a folder named upload, must be added to the htdocs folder of AHS. When a client accesses the uploader.html file through a browser, the client will be able to upload a file to the server using Ajax and pure JavaScript.
A pure JavaScript file uploader simplifies Ajax based interactions with the server.
 Cameron McKenzie is an AWS Certified AI Practitioner, Machine Learning Engineer, Solutions Architect and author of many popular books in the software development and Cloud Computing space. His growing YouTube channel training devs in Java, Spring, AI and ML has well over 30,000 subscribers.
27 Jun 2025