Create an HTML5 and PHP file upload form for Apache example

PHP HTML file upload tutorial
Don’t fret if you’re a developer with an Apache web server and the goal is to code an HTML5 and PHP file upload component. Modern browsers, along with simplified server-side APIs, make this process incredibly simple, especially compared to how much effort it took just five to 10 years ago.
PHP file uploader
A developer can follow these four steps to create an HTML5 file input form and a PHP server-side component to handle the file upload process:
- Create a web page that contains an HTML5 file input form element;
- From the web page, invoke a sever-side PHP file that can save the uploaded file;
- Receive the file upload in the PHP file and save the file locally; and
- Send a response back to inform the client the PHP file upload was successful.
HTML5 file selector
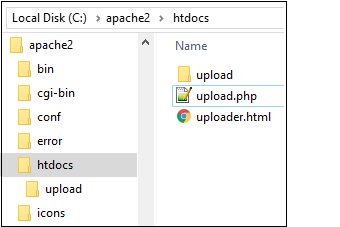
Required HTML5 and PHP Hoqwfile upload components.
The HTML5 API introduced a new type of input tag named file. When a developer uses this HTML5 file input tag a web browser will render a file selector, which allows a user to search for files anywhere on their local file system. When this input tag is associated with a submit button and wrapped within an HTML form tag, it becomes possible for the user to upload a file to the server through a Chrome or Firefox browser.
A developer will need to save the following code in a file name uploader.html to the htdocs folder of the Apache HTTP Server.
<!DOCTYPE html>
<html>
 <head>
  <title> HTML5 PHP File Upload Example </title>
 </head>
 <body>

  <!-- HTML5 Input Form  -->
  <form action="upload.php" method="post" enctype="multipart/form-data" >
    <input id="file" type="file" name="file" />
    <input id="html5-upload-button" type="button" value="Upload" />
  </form>

 </body>
</html>
PHP file upload component
The HTML5 file input form calls a server-side resource named upload.php. This component saves the uploaded file to a folder named upload in the Apache server’s htdocs directory.
| More File Upload Options |
|---|
| I put together a bunch of file upload tutorials. Pick your technology and get uploading!
Uploading files to the server need not be a problem. |
Next, save the following code in a file named upload.php and place it in the same htdocs folder as the uploader.html file:
<html>
<body>
<?php

/* Get the name of the file uploaded to Apache */
$filename = $_FILES['file']['name'];

/* Prepare to save the file upload to the upload folder */
$location = "upload/".$filename;

/* Permanently save the file upload to the upload folder */
if ( move_uploaded_file($_FILES['file']['tmp_name'], $location) ) {
  echo '<p>The HTML5 and php file upload was a success!</p>';
} else {
  echo '<p>The php and HTML5 file upload failed.</p>';
}

?>
</body>
</html>
A developer will need to create a folder named upload in the Apache server’s htdocs directory to support the PHP file upload component. This folder is where the HTML5 file uploads will be saved.
For Apache on Linux, a developer will need to perform a 775 chmod operation on this folder to give the PHP file upload component rights to write images and other files to this directory.
Run the PHP file upload example
Now that the developer has created the folder and coded both the HTML5 and PHP file upload components, the application can run when a user accesses the uploader.html file through a web browser such as Chrome of Firefox. When the program runs, the user will be able to select a file, and when they click the submit button, the file will be uploaded to the server and the application will display a confirmation message.
Both HTML, PHP and even JavaScript can be used to upload files. In this example, JavaScript and Ajax calls invoke the server-side PHP file upload script.
 Cameron McKenzie is an AWS Certified AI Practitioner, Machine Learning Engineer, Solutions Architect and author of many popular books in the software development and Cloud Computing space. His growing YouTube channel training devs in Java, Spring, AI and ML has well over 30,000 subscribers.