Hierarchical Kubernetes namespaces explained by example

Namespaces are a critical resource for supporting multi-tenant architectures for a Kubernetes cluster, yet they are hard to manage when working with multi-tenant clusters at scale. Fortunately, you can make multi-tenant clusters easier to manage by adding hierarchical namespace capabilities to Kubernetes.
This article assumes that you have a basic understanding of Kubernetes, that you know what a cluster is and what containers and pods are. Also, working with hierarchical namespaces requires a basic understanding of Kubernetes namespaces. If you don’t know about Kubernetes namespaces, don’t worry. This is where we’ll start.
Kubernetes Namespaces 101
Namespaces are a Kubernetes resource that allows engineers to isolate other Kubernetes resources in a distinctive, secure manner. As with most Kubernetes resources there are two ways to create a namespace. One way is to use the declarative approach and define the resource within a manifest file. The other way is imperatively at the command line. The code below shows an example of a manifest file that creates the namespace coolapp. This is the declarative approach.
apiVersion: v1
kind: Namespace
metadata:
  name: coolapp
The following command set creates the namespace imperatively using the kubectl CLI tool:
kubectl create namespace coolapp
Once a namespace is created, engineers assign other Kuberentes resources to the namespace. The example below shows how to imperatively run a Kubernetes pod with an nginx container and assign it to the namespace named coolapp. Also, displayed in the result of the command.
# kubectl run ngnix --image nginx -n coolapp pod/ngnix created
In order to list resources in a given namespace you must declare the namespace. The listing below shows the code and results to get the pods in the namespace coolapps.
# kubectl get pods -n coolapp
NAME    READY   STATUS    RESTARTS   AGE
ngnix   1/1     Running   0          3m5s
Once a resource is assigned to a namespace, it can only be accessed in terms of that namespace. the code below shows the result of getting the pods in the default namespace, which in this case has no pods.
# kubectl get pods
No resources found in default namespace.
The reason that there are no pods shown above is because the nginx pod that was created previously was assigned to the namespace coolapp, not the default namespace. The nginx pod is visible only in terms of the coolapp namespace and no other.
Namespaces provide a security benefit
Making a resource accessible in terms of its namespace provides the benefit of added security. Under kubernetes it is possible to assign users, groups and other resources access permissions according to namespaces using role-based access control (RBAC). For example, an engineer can create a group named coolapp-admins and grant that group full access to any resource in the coolapp namespace. Having full access means that those in the coolapp-admins group can perform actions such as create, list, update, patch, and delete resources.
On the other hand, an engineer can create a group named coolapp-devs that only has permission to create, update and delete pods in the namespace coolapp. That group’s permissions are restricted to pods and particular activities related only to pods.
Namespaces make it so that permissions can be assigned to resources and roles at a very fine grain. This level of security is particularly appropriate when it comes to supporting a Kubernetes cluster that has many tenants.
The basics of a multi-tenant Kubernetes architecture
A Kubernetes multi-tenant cluster is one in which a number of organizations exist within a single cluster. (See Figure 1 below.)
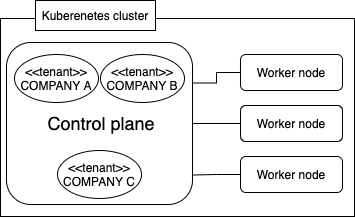
Kubernetes has the ability to support multiple tenants in a single cluster
The benefit of a multi-tenant architecture is that it’s more cost effective and easier to manage than an architecture in which each organization exists within a dedicated Kubernetes cluster.
In a dedicated architecture, each organization has its own control plane and worker node(s) virtual machines. This can get costly. Also, each cluster will require dedicated maintenance personnel. The redundancy costs alone can be significant. And, there can be money wasted when resources are not used to full capacity.
On the other hand, because multi-tenant architectures concentrate all work to a single cluster. Hence, resource utilization both in terms of the physical cluster and IT labor is more efficient.
Simplifying multi-tenant namespace management with hierarchical namespaces
The way that Kubernetes enforces organizational isolation in a multi-tenant cluster is by using namespaces. As you read above, namespaces make it possible to isolate access permissions for users, groups and resources within a particular Kubernetes cluster. Thus, when engineers want to create a tenant in a Kubernetes cluster they will assign a tenant to one or many namespaces within the given cluster. Resource permissions are granted according to the particular namespace. (See Figure 2, below.)
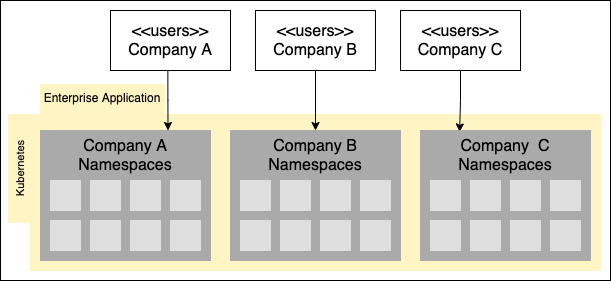
In a multi-tenant cluster, tenants are isolated using Kubernetes namespaces.
For example, imagine a multi-tenant cluster that has three tenants, Company A, Company B and Company C. Each of these organizations are tenants that are allowed to use a common enterprise application which is fictitiously named Acme-App. Acme-App is hosted by the single cluster.
Now, also imagine that each company has a variety of departments that are entitled to use different features of the application. In this case the features are HR, Finance, and Scheduling.
Thus, when it comes time to organize and isolate the three companies within the Kubernetes cluster the engineers will come up with a set of namespaces that look like this:
acme-app-company-a-hr
acme-app-company-a-finance
acme-app-company-a-scheduling
acme-app-company-b-hr
acme-app-company-b-finance
acme-app-company-b-scheduling
acme-app-company-c-hr
acme-app-company-c-finance
acme-app-company-c-scheduling
As you can see, nine namespaces have been constructed to support the permissions requirements for the tenants. It’s an appropriate construction, but it’s one that can become a maintenance headache. For example, should engineers need to make a change in a permission that is common throughout all departments in a company, the engineers will have to make changes in at least three namespaces. If the permission change is common to all companies using Acme-App, the engineers will have to twiddle the permission assignments for all nine namespaces.
Clearly a better way is needed. That better way is hierarchical namespaces. When hierarchical namespaces are in force in a Kubernetes cluster it’s possible to get a namespace structure that looks like this:
acme-app
├── company-a
│   ├── company-a-hr
│   ├── company-a-finance
│   └── company-a-scheduling
├── company-b
│   ├── company-b-hr
│   ├── company-b-finance
│   └── company-b-scheduling
├── company-c
│   ├── company-c-hr
│   ├── company-c-finance
│   └── company-c-scheduling
As you can see, hierarchical namespaces provide a simplified organizational structure. In addition to the organizational simplicity, hierarchical namespaces provide a capability that enables permissions to cascade down to subordinate namespaces.
For example, take a look at the acme-app tree shown above. Under hierarchical namespaces, when a permission change is made in the root namespace, acme-app, that permission change will cascade down to all the subordinate namespaces in the structural tree. If engineers want to make a change to all the namespaces that are subordinate to company-a, all the engineers need to do is change the permissions in the namespace, company-a. The subordinate namespaces – company-a-hr, company-a-finance and company-a-scheduling – will be modified automatically.
Hierarchical namespaces simplify not only the organization of tenants in a multi-tenant Kubernetes cluster, they also improve operational efficiency in terms of general maintenance and security. Unfortunately, as of this writing do not ship with Kubernetes “out of the box”. They must be installed.
Adding hierarchical namespace to a Kubernetes cluster
The process for installing hierarchical namespaces in a Kubernetes cluster is straightforward. The code below shows an example bash script that installs hierarchical namespaces for Kubernetes on a computer running the Linux operating system. Also, the script installs the hns plugin for the kubectl command line tool. You’ll use the plugin with kubectl to create and support hierarchical namespaces.
#!/bin/bash VERSION=v0.8.0 PLATFORM=linux_amd64 # Protect critical namespaces that Kubernetes needs kubectl label ns kube-system hnc.x-k8s.io/excluded-namespace=true --overwrite kubectl label ns kube-public hnc.x-k8s.io/excluded-namespace=true --overwrite kubectl label ns kube-node-lease hnc.x-k8s.io/excluded-namespace=true --overwrite # The the hierarchical namespace manifest from GitHub and apply it to the cluster kubectl apply -f https://github.com/kubernetes-sigs/multi-tenancy/releases/download/hnc-$VERSION/hnc-manager.yaml # Take some time out for things to adjust TIME_OUT=45 echo "Taking a break for $TIME_OUT seconds while Kubernetes refreshes itself..." echo "Start time=$(date +"%s)" sleep $TIME_OUT echo "End time=$(date +"%s" )" # Install the plugin that allows kubectl to use the subcommand, his cd /usr/local/bin curl -L https://github.com/kubernetes-sigs/multi-tenancy/releases/download/hnc-$VERSION/kubectl-hns_$PLATFORM -o ./kubectl-hns chmod +x ./kubectl-hns # Execute the hns command. If all is well, you'll get the command line # help documentation kubectl hns |
A bash script for installing hierarchical namespaces on a Kubernetes cluster
Once you’ve run the script shown above, your Kubernetes cluster will support hierarchical namespaces. Then, you can execute another example script shown below to create the hierarchical namespaces for the fictitious application, acme-app described earlier.
#!/bin/bash # Root namespace kubectl create namespace acme-app sleep 2 # Take a rest so the namespace can provision # Company A namespaces kubectl hns create company-a -n acme-app sleep 2 # Take a rest so the namespace can provision kubectl hns create company-a-hr -n company-a kubectl hns create company-a-finance -n company-a kubectl hns create company-a-scheduling -n company-a # Company B namespaces kubectl hns create company-b -n acme-app sleep 2 # Take a rest so the namespace can provision kubectl hns create company-b-hr -n company-b kubectl hns create company-b-finance -n company-b kubectl hns create company-b-scheduling -n company-b # Company C namespaces kubectl hns create company-c -n acme-app sleep 2 # Take a rest so the namespace can provision kubectl hns create company-c-hr -n company-c kubectl hns create company-c-finance -n company-c kubectl hns create company-c-scheduling -n company-c # Display the hierarchical namespaces tree kubectl hns tree acme-app |
An script to create the set of hierarchical namespaces for a multi-tenant application named acme-app
The tree that is the result of the code above is shown below:
acme-app
├── [s] company-a
│   ├── [s] company-a-finance
│   ├── [s] company-a-hr
│   └── [s] company-a-scheduling
 ── [s] company-b
│   ├── [s] company-b-finance
│   ├── [s] company-b-hr
│   └── [s] company-b-scheduling
└── [s] company-c
    ├── [s] company-c-finance
    ├── [s] company-c-hr
    └── [s] company-c-scheduling

[s] indicates subnamespaces
As you can see, the namespace hierarchy created by the script executed above mirrors the one imagined earlier in this piece.
Putting it all together
Hierarchical namespaces provide a definite benefit when supporting multiple tenants in a single Kubernetes cluster. They make it so that permissions can be managed in a cascading manner. Any change in the permissions associated with a parent namespace will cascade down to subordinates. The efficiency is apparent.
As mentioned previously, hierarchical namespaces need to be installed on a cluster by cluster basis. They do not come with Kubernetes out of the box. You’ll have to build the provisioning process into your company’s deployment workflow. It will require a bit of effort. But it’s time well spent. If your company supports multi-tenant Kubernetes clusters, making hierarchical namespaces a standard part of your Kubernetes architecture will save you time and money in the long run.