How to Transfer a Domain to Amazon's Route 53

If you’re already using a swath of AWS hosted services, it simply makes sense to move your domain names out of a hosting service like GoDaddy and into Amazon’s Route 53 domain name system (DNS).
From GoDaddy to Route 53
The process is relatively simple and straight forward, and if you follow the steps provided, you’ll be able to move your domain name onto Route 53 in a matter of minutes instead of a matter of days.
The basic steps to transfer your domain name onto AWS Route 53 from GoDaddy are the following:
- Unlock your domain and get the authorization code
- Initiate the transfer in Route 53
- Opt to accelerate the transfer
- Update all of your name server records
Unlock Your Domain and Get the Authorization Code
Log in to your current domain registrar and locate your domain’s registration settings. Domains are typically locked to prevent unauthorized transfers, so make sure it’s unlocked first. Then look for a “Transfer to another registrar.”
Your registrar will then present you with an authorization code that you will then present to Route 53. Copy the authorization to your clipboard as you’ll need it once you log into AWS.
Initiate the transfer in Route 53
To transfer your domain name into AWS Route 53, open the AWS Management Console, navigate to Route 53 and select “Transfer Domain.” Enter the domain name, confirm eligibility for transfer, and paste in the authorization code.
AWS will ask whether you want to use the existing name servers or specify new ones. If your goal is to fully manage DNS through Route 53, you should replace the old name servers with AWS ones after the transfer. You’ll also be prompted for contact information and payment, as AWS charges a fee for handling the newly transferred domain.
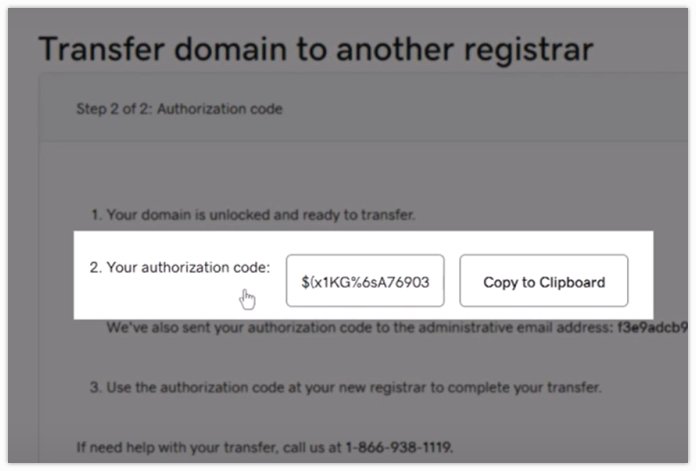
An authorization code is required to transfer from GoDaddy to AWS Route 53.
Speed up the transfer
Transfers can take 48–72 hours, but you can often accelerate the process. After initiating the transfer with Route 53, you can go back to GoDaddy and open the domain’s “Transfers Out” page. If you approve the transfer, the process is expedited and Route 53 will be handling your domain in minutes.
Update name server records
One common oversight is failing to update name server records in the “Registered Domains” section of Route 53 after the transfer. Even if your hosted zone contains AWS name servers, your registered domain settings might still point to the old ones. Update these to match the AWS name servers to ensure your DNS changes propagate correctly.
Connect your domain to AWS resources
Once DNS is correctly configured, you can map the domain to AWS services. For example, you can create a Route 53 record that uses an alias to point directly to a Python app on elastic Beanstalk, or a website hosted on S3. Just choose “Alias” as the record for your domain name and you’ll be allowed to choose the AWS service to point your domain or sub-domain at. These types of changes typically take effect within minutes when your domain name and managed services are all managed by AWS.
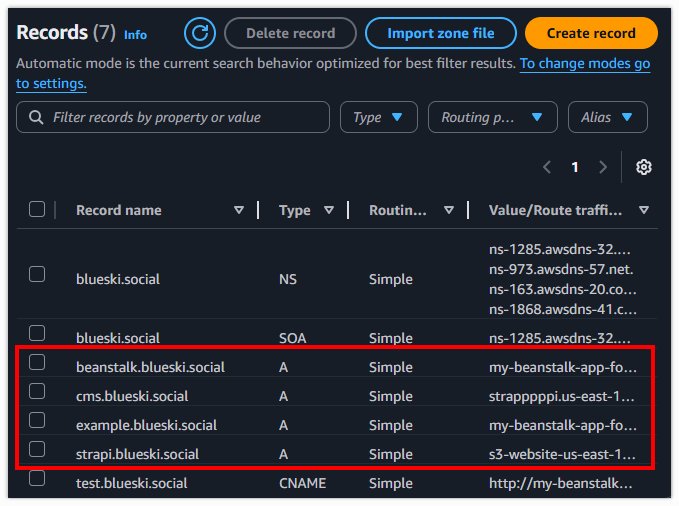
Alias records allow domains and subdomains to point to AWS resources such as S3 websites or Amazon Beanstalk.
It really is that easy to transfer your domain name from GoDaddy to Amazon’s Route 53 domain name hosting service. Just unlock the domain, transferring it to Route 53, updating the name servers, and create alias records and your domain name will be pointing to to your EKS cluster or your auto-scaled EC2 instances in no time.

Cameron McKenzie is an AWS Certified AI Practitioner, Machine Learning Engineer, Solutions Architect and author of many popular books in the software development and Cloud Computing space. His growing YouTube channel training devs in Java, Spring, AI and ML has well over 30,000 subscribers.