Git push new local branch to remote

Git push local branch to remote
Regardless of whether you prefer GitFlow, GitLab Flow or GitHub Flow, you should perform all of your software development on local, isolated feature branches.
Unfortunately, new Git branches don’t automatically push to a remote Git repo like GitHub or GitLab.
That’s true even if you push and pull back and forth against that same repo on other development branches.
Attempts to push a new branch to a remote server will likely trigger Git’s fatal no upstream branch error. That’s definitely an error you want to avoid.
To push a new Git branch to a remote repo requires an extra step — namely, add the –set-upstream parameter (with two dashes) to the git push command.
Push new branch to a remote Git repo
Follow these steps to have Git push a local branch to a remote repo:
- Create a new, local Git branch in your repository.
- Perform a git push origin -u <branchname> command to push to the remote repo.
- Continue to perform Git commits locally on the new branch.
- Simply use the git push origin command on subsequent pushes of the new branch to the remote repo.
These steps assume you have already established connectivity to the remote Git repository.
Local and remote git repo connectivity
If local connectivity to the remote Git does not exist, you’ll need to either:
- Perform a remote add to connect your existing Git project to the remote repo
- Do a git clone the remote repo and move your development workspace into the cloned location
New branch to remote Git repo commands
The following example demonstrates the steps a developer would go through to push a local branch to a remote Git repo.
Create the local branch
To create a new local branch that you will push to the remote GitHub repo, just run a Git branch, switch or checkout command. There are many ways to create branches in Git.
github@branch/c/remote/push (main)
git switch -c new-branch
Verify the branch was created
A git branch -a command verifies that the new Git branch being pushed to the remote GitHub repo was indeed created locally.
github@branch/c/remote/push (new-branch)
git branch -a
main
* new-branch
remotes/origin/HEAD -> origin/main
remotes/origin/main
remotes/origin/new-branch
Note that I use the git switch command to create and move to a new branch, rather than the git checkout command. The git switch replaced git checkout in a 2019 Git release.
Use the git push –set-upstream command
Once you create a new branch, you must run the –set-upstream switch the first time you perform a push.
This use of the –set-upstream parameter (two dashes) only needs to happen once. All subsequent git push commands automatically move local branch changes up to the remote branch.
github@branch/c/remote/push (new-branch)
$ git push --set-upstream origin new-branch
Enumerating objects: 3, done.
* [new branch] new-branch -> new-branch
Branch 'new-branch' set up to track remote branch 'new-branch' from 'origin'.

The -u switch can be used in place of the --set-upstream parameter if you want to conserve keystrokes.>
Git’s no upstream branch error
If you fail to perform the –set-upstream (two dashes) step, you will encounter the following error when you push the new branch to the remote repo:
fatal: The current branch has no upstream branch
New Git branch pushed to GitHub
Once the git push of the new branch to the remote repo is complete, go to the remote repo and verify that the file indeed successfully uploaded.
A quick refresh on the project’s landing page on GitHub shows the new Git branch successfully pushed to the remote repo.
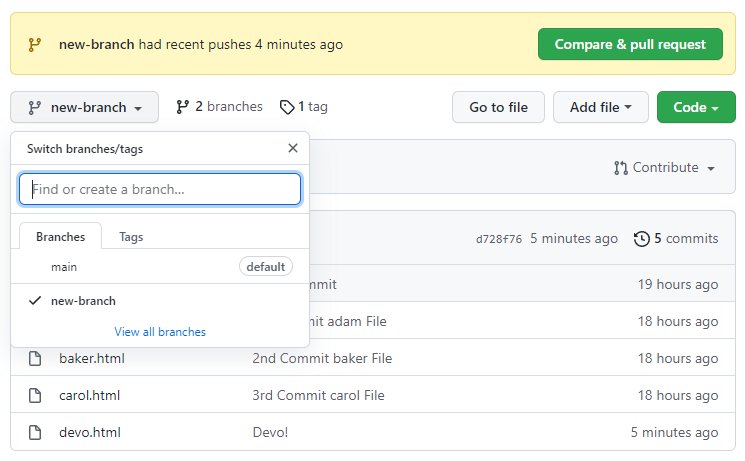
The set-upstream switch is required on the first git push of a new Git branch to a remote GitHub repository.
Tools for local and remote branch management
It’s not unusual for developers who work with Git on the command line to encounter confusing and esoteric error messages with relatively simply functions, such as pushing a new Git branch to a remote GitHub or GitLab repo.
However, there are various powerful Git GUI tools on the market that shield the developer from the complexity of working with Git on the command line. For new developers, a good GUI tool makes learning Git more fun, and for power users it can speed up their development.
The following crash-course tutorials quickly show you how to use some of the most popular Git GUI tools available:
- Learn Sourcetree with BitBucket
- Learn Git with GitKraken
- Learn Git with GitHub Desktop
GitKraken provides tools to help developers push new branches to remote Git, GitHub or GitLab repos.
Ongoing Git push and pull commands
The full set of commands used in this example of how to push a local branch remotely are as follows:
github@branch/c/remote/push  (new-branch)
git clone https://github.com/learn-git-fast/git-branch-examples.git
cd git*
git checkout -b new-branch

github@branch/c/remote/push (new-branch)
git branch -a
touch devolution.jpg
git add .
git commit -m "About to Git push a local branch upstream to a remote GitHub repo."
git push --set-upstream origin new-branch

github@branch/c/remote/push (new-branch)
touch eden.html
git add .
git commit -m "Eden added"
git push origin

Cameron McKenzie is an AWS Certified AI Practitioner, Machine Learning Engineer, Solutions Architect and author of many popular books in the software development and Cloud Computing space. His growing YouTube channel training devs in Java, Spring, AI and ML has well over 30,000 subscribers.
Next Steps
The AWS Solutions Architect Book of Exam Questions by Cameron McKenzie
So what’s next? A great way to secure your employment or even open the door to new opportunities is to get certified. If you’re interested in AWS products, here are a few great resources to help you get Cloud Practitioner, Solution Architect, Machine Learning and DevOps certified from AWS:
- AWS Certified Cloud Practitioner Book of Exam Questions
- AWS Certified Developer Associate Book of Exam Questions
- AWS Certified AI Practitioner Book of Exam Questions & Answers
- AWS Certified Machine Learning Associate Book of Exam Questions
- AWS Certified DevOps Professional Book of Exam Questions
- AWS Certified Data Engineer Associate Book of Exam Questions
- AWS Certified Solutions Architect Associate Book of Exam Questions
Put your career on overdrive and get AWS certified today!