Introduction to m2eclipse
In this article, we will explore the features m2eclipse provides and help you start using an Eclipse plugin which provides real Maven integration for the best IDE platform available.
The Eclipse IDE is the most widely used IDE for Java development today. At the same time, Apache Maven continues to mature, and has grown to be the industry standard for creating extensible and reliable enterprise builds. While it is certainly possible to develop applications in Eclipse and use Maven as a command-line build tool, most developers expect the IDE to know how to invoke and interact with the build tool they are using.
Enter m2eclipse. The m2eclipse project provides support for Maven within the Eclipse IDE. It is a plugin which helps bridge the gaps between Maven and Eclipse. Using m2eclipse you can develop a large multi-module project with nested Maven modules and have this hierarchical structure reflected in your Eclipse IDE. Using m2eclipse, you can launch and manage your project's Maven build using editors, and your IDE will become aware of both the local and remote Maven repositories allowing you to quickly search for and locate any artifact made available in the Maven repository. m2eclipse will also change the way you create projects with a novel and easy-to-use interface for creating projects from Maven Archetypes.
In this article, we will explore the features m2eclipse provides and help you start using an Eclipse plugin which provides real Maven integration for the best IDE platform available. After reading this article you should have enough information to install the m2eclipse plugin and start creating or importing existing Maven projects into your Eclipse workspace. You will also have an idea of some of the features provided the plugin.
Note: This article is an enhanced version of the m2eclipse chapter which has been published as a part of Maven: The Definitive Guide, a free, online book from Sonatype which is to be published by O'Reilly in the Summer of 2008. For more updates about m2eclipse, please see http://m2eclipse.sonatype.org.
What is m2eclipse?
m2eclipse is an Eclipse plugin which has been around since the beginning of 2006. The plugin was created in early 2006 by Eugene Kuleshov, and was developed under the auspices of the Codehaus community for two years. In May of 2008, the m2eclipse project was formally accepted into the Eclipse Foundation, and the plugin continues to undergo active development as the developers try to integrate m2eclipse with more features of the Eclipse platform.
The m2Eclipse plugin provides Maven integration for Eclipse. m2Eclipse also has hooks into the features of both the Subclipse plugin and the Mylyn plugin. The Subclipse plugin provides the m2eclipse plugin with the ability to interact with Subversion repositories, and the Mylyn plugin provides the m2eclipse plugin with the ability to interact with a task-focused interface that can keep track of development context. Just a few of the features m2eclipse provides include:
- Creating and importing Maven projects
- Dependency management and integration with the Eclipse classpath
- Automatic dependency downloads and updates
- Artifact Javadoc and source resolution
- Creating projects with Maven Archetypes
- Browsing and searching remote Maven repositories
- POM management with automatic update to dependency list
- Materializing a project from a Maven POM
- Checking out a Maven project from several SCM repositories
- Adapting nested multi-module Maven projects to the Eclipse IDE
- Integration with Web Tools Project ( WTP)
- Integration with AspectJ Development Tools ( AJDT)
- Integration with Subclipse, a Subversion Plugin for Eclipse
- Integration with Mylyn, a plugin that provides task-oriented context and integration with tools like JIRA and other issue/task-management systems.
Plugin development is currently focused on providing first-class support for the Eclipse Web Tools Platform and Eclipse AspectJ tools as well as adding graphical editors for both the POM and the Maven settings.xml file. There are many more features in m2eclipse beyond the list above and this article will survey some of the features which are currently available. Let's get started by installing m2eclipse in Eclipse.
Installing the m2eclipse Plugin
To install the m2Eclipse plugin, you will need to install some prerequisites. You will need to be running Eclipse 3.2 or higher, JDK 1.4 or higher, and you will also need to make sure that Eclipse is running on a JDK and not a JRE. This article is going to assume that you are installing m2eclipse on the Eclipse 3.3 (Europa) build, and we're going to assume that you have already downloaded and installed Eclipse. If you do not have Eclipse installed, we would encourage you to download the IDE and follow along with this article. Eclipse 3.3 can be downloaded from http://www.eclipse.org/downloads/.
Installing PrerequisitesYou can install these prerequisites when you install m2eclipse, just add a new remote update site to Eclipse for each of the prerequisite components. To install these prerequisites, go to Help → Software Updates → Find and Install.... Selecting this menu item will load the Install/Update dialog box. Choose the "Search for new features to install" option and click Next. You will then be presented with a list of "Update sites to visit". Click New Remote Site..., and add a new update site for each new prerequisite. Add a new remote site for each plugin and then make sure that the remote site is selected. After you click Finish, Eclipse will then ask you to select plugins components to install. Select the components you want to install and Eclipse will download, install, and configure your plugins.
To install JIRA integration with Mylyn, add the Mylyn extras Eclipse update URL, you'll want to do this if your organization uses Atlassian's JIRA for issue tracking. If you are installing the 0.9.4 release of m2eclipse, you may also want to install both the Web Tools Platform ( WTP) and the AspectJ Development Tools ( AJDT).
- Subclipse 1.2: http://subclipse.tigris.org/update_1.2.x
- Mylyn (Eclipse 3.3): http://download.eclipse.org/tools/mylyn/update/e3.3
- Mylyn Extras (JIRA Support): http://download.eclipse.org/tools/mylyn/update/extras
- AspectJ Development Tools (Eclipse 3.3): http://download.eclipse.org/tools/ajdt/33/update
- Web Tools Platform: http://download.eclipse.org/webtools/updates/
For more information about the AJDT project, see the AJDT project's web site at http://www.eclipse.org/ajdt/. For more information about the Subclipse plugin, please see the Subclipse project's web site at http://subclipse.tigris.org/. For more information about the Mylyn project, see the Mylyn project's web site at http://www.eclipse.org/mylyn/. For more information about the Web Tools Platform, see the Web Tools Platform project's web site at http://www.eclipse.org/webtools/.
Installing the m2eclipse PluginOnce you've installed the prerequisites, you can install the m2eclipse plugin from the following Eclipse update URL:
- m2eclipse Plugin: http://m2eclipse.sonatype.org/update/
If you would like to install the latest snapshot development version of the plugin, you should use the update-dev URL instead of the previous URL:
- m2eclipse Plugin (Development Snapshot): http://m2eclipse.sonatype.org/update-dev/
To install m2eclipse, just add a the appropriate update site for m2eclipse. Go to Help → Software Updates → Find and Install.... Selecting this menu item will load the Install/Update dialog box. Choose the "Search for new features to install" option and click Next. You will then be presented with a list of "Update sites to visit". Click New Remote Site..., and add a new update site for m2eclipse. Add a new remote site for m2eclipse and then make sure that the remote site is selected. After you click Finish, Eclipse will then ask you to select plugins components to install. Select the components you want to install and Eclipse will download, install, and configure m2eclipse.
If you've installed the plugin successfully, you should see a Maven option in the list of preferences options when you go to Window → Preferences....
Enabling the Maven ConsoleAfter you install the m2eclipse plugin, one of the first things you are going to want to do is enable the Maven Console. When you import a Maven project, or create a new Maven project, you are going to want to watch the Maven console to see what the m2eclipse plugin is doing. To enable the Maven Console, open the Console View by going to Window → Show View → Console. Then click on the little arrow on the right-hand side of the Open Console icon and select Maven Console as shown below:
Figure 1. Enabling the Maven Console in Eclipse
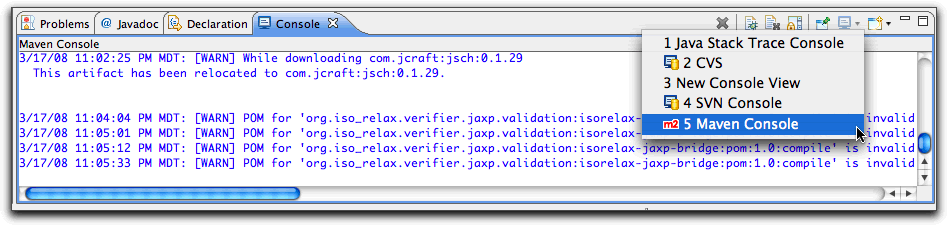
Maven Console shows the Maven output that normally appears on the console when running Maven from the command line. It is useful to be able to see what Maven is doing and to work with Maven debug output to diagnose issues.
Creating a Maven Project
When using Maven, project creation takes place through the use of a Maven Archetype. In Eclipse, project creation takes place via the new project wizard. The m2eclipse plugin improves upon this wizard to provide the following additional capabilities:
- Creating a Maven project using a Maven Archetype
- Creating a Maven POM file in an existing project
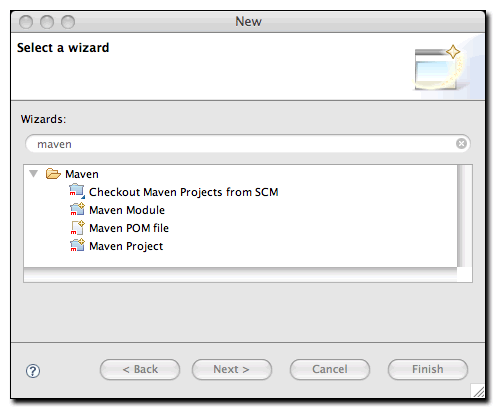
As shown in Figure 2, “Creating a New Project with m2eclipse Wizards”, there are four options available, but this article focused on two options: Maven Project and Maven POM file. When you are trying to set up a development environment in an organization with an existing codebase, you are likely going to want to checkout Maven projects from a source control system like Subversion, and this process is covered in more detail later. If you are moving to Maven, you'll want to be able to add new pom.xml files to an existing project, and if you are starting to write a new system, you'll need to be able to create a new project. The m2eclipse plugin introduces the concept of the Maven Archetype to the Eclipse platform, and because m2eclipse has access to an index of the Central Maven Repository, you gain access to a large collection of Maven Archetypes. Let’s take a quick look at two of these project creation options.
Figure 2. Creating a New Project with m2eclipse Wizards
This is probably the most interesting new functionality introduced by the m2eclipse plugin. Without m2eclipse, creating a new Maven project from a Maven Archetype involves typing out a huge command line in which you specify the artifactId and groupId of both the Archetype and the project you are trying to create. With m2eclipse, using a Maven Archetype is as easy as filling out a simple New Maven Project dialog and selecting an archetype from a list of all Maven Archetypes in the Central Maven Repository. If someone has published a Maven Archetype to a Maven repository, m2eclipse will be able to locate this archetype when it queries the repository index. Right out of the gate, m2eclipse provides access to over 80 Maven Archetypes for projects ranging from Mule to AppFuse.
To create a Maven project using a Maven Archetype, choose File → New → Project..., and then type in "maven" in the filter field. Select New Maven Project and click Next. In the first screen of the New Maven Project wizard dialog, you can select "Create a simple project" which will have the effect of skipping Maven Archetype selection. This first screen also allows you to change the directory in which the new project will be created. By default, the new project will be created in your Eclipse workspace. The second screen of the New Maven Project provides an interface to select a Maven Archetype for your new project. There are many Maven Archetypes provided in the list that comes with m2eclipse as shown in Figure 3, “Creating a New Project with a Maven Archetype”.
Figure 3. Creating a New Project with a Maven Archetype
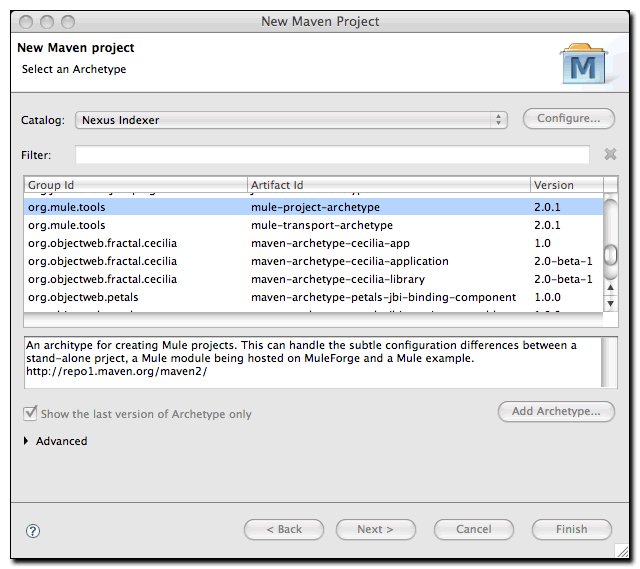
The list of archetypes in Figure 3, “Creating a New Project with a Maven Archetype” is a list generated by something called the Nexus Indexer. Nexus is a Maven Repository manager from Sonatype which is available for download at http://nexus.sonatype.org. Nexus maintains an index of all artifacts and metadata in the Maven Central Repository which allows tools like Nexus and m2eclipse to rapidly search the contents of a Maven repository. When this article was written, m2eclipse had approximately ninety archetypes in this Archetype dialog. In addition to the standard set of Maven archetypes, this list of Archetypes contains the following highlights:
- Apache Cocoon Archetypes under org.apache.cocoon
- Apache Directory Server Archetypes under org.apache.directory.server
- Apache Geronimo Archetypes under org.apache.geronimo.buildsupport
- Apache MyFaces Archetypes under org.apache.myfaces.buildtools
- Apache Tapestry Archetypes under org.apache.tapestry
- Apache Wicket Archetypes under org.apache.wicket
- AppFuse Archetypes under org.appfuse.archetypes
- Codehaus Cargo Archetypes under org.codehaus.cargo
- Mule Archetypes under org.mule.tools
- Springframework OSGI and Web Services Archetypes under org.springframework
- Trails Framework Archetypes under org.trailsframework
And these were just the archetypes that were listed under the Nexus Indexer Catalog, if you switch Catalogs you'll see other archetypes. A catalog is simply a reference to a repository index. You can manage the set of catalogs that the m2eclipse plugin knows about by clicking on the Configure... button next to the catalog drop down. If you have your own archetypes to add to this list, you can click on Add Archetype....
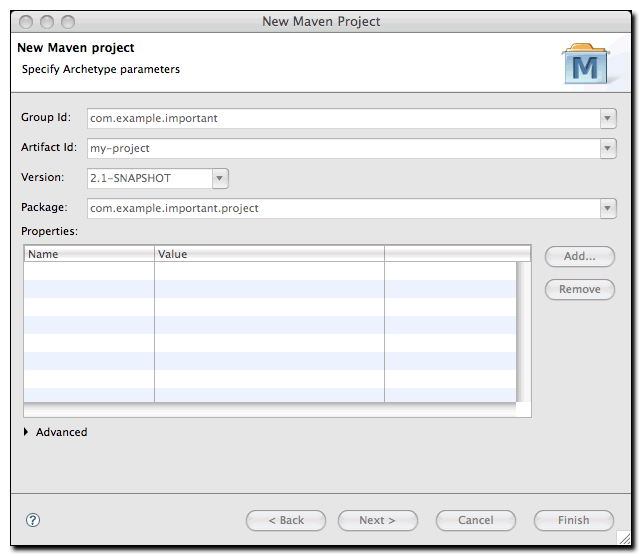
Once you choose an archetype, Maven will retrieve the appropriate artifact from the Maven repository and display the dialog shown in Figure 4, “Selecting Maven Coordinates for New Maven Project”. This last page of the New Maven Project wizard is where you configure the Maven Coordinates for your project: the artifactId , the groupId , and the version . This dialog also provides you with a field to customize the default package for a new project, and the ability to specify properties to be present in the new project pom.xml .
Figure 4. Selecting Maven Coordinates for New Maven Project
Once you've selected an archetype and provided a set of unique coordinates, click Finish. m2eclipse will then create the new project in your Eclipse workspace.
Create a Maven POM FileIf you already have an Eclipse project which is not using Maven, you can start using Maven in a project by creating a new Maven POM file. m2eclipse provides a wizard to easily create a new POM file inside an existing project. To launch this wizard, select File → New → Other..., type in "maven" in the filter field, and select Maven POM File. This POM creation wizard is shown in Figure 5, “Creating a New POM”:
Figure 5. Creating a New POM
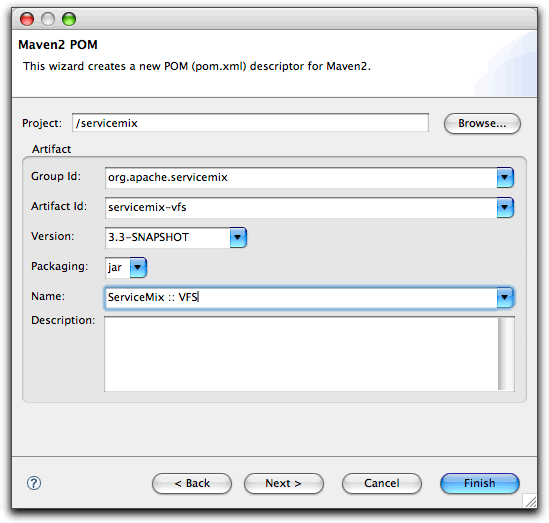
Creating a new Maven POM is just a matter of selecting a project, entering the Group Id, Artifact Id, Version, choosing the Packaging type, and providing a Name into the fields provided. Click the Next button to start adding dependencies. m2eclipse will then give you an opportunity to search for dependencies in a figure that resembles Figure 17, “Searching for a Dependency”. Because m2eclipse maintains an index of the Maven Central Repository, you can easily search for dependencies by name, artifactId , groupId , and even locate artifacts that contain a particular class. For more information about adding and searching for dependencies, see Section 6.2, “Adding and Updating Dependencies and Plugins”.
Importing Maven Projects
If you are trying to work with an existing codebase, then you will need to import a Maven project using m2eclipse. m2eclipse provides three options for importing a Maven project into Eclipse including:
Import Maven Projects
When you have a Maven project on your computer and you need to import one or more modules from this project into Eclipse, you can tell m2eclipse where to find the project and it will scan a directory tree for pom.xml files.
Check out Maven Projects from SCM
m2eclipse will check out a project from source control and then scan the checked out directory from pom.xml files.
Materialize Maven Projects
Given nothing more than a project's POM, m2eclipse can use the metadata about a project to locate the Source Control repository. It can then checkout the project from the SCM repository listed in the POM.
Figure 6, “Importing a Maven Project” shows the options available for importing Maven projects:
Figure 6. Importing a Maven Project
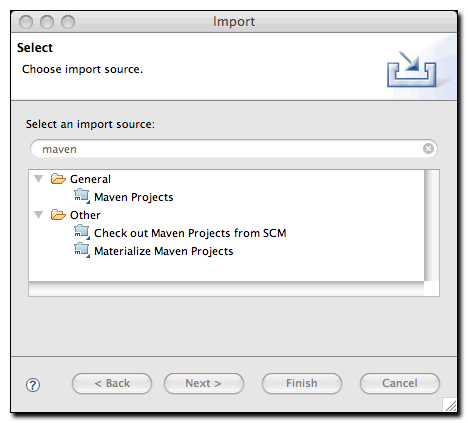
The dialog in Figure 6, “Importing a Maven Project” is displayed by using the File → Import command in Eclipse and then typing the word "maven" in the filter field. Let's take a look at the most straightforward import operation, importing an existing set of Maven projects from a directory.
Importing a Maven Projectm2eclipse can import a Maven project with an existing pom.xml . Pointing m2eclipse at the directory containing a pom.xml , and m2eclipse will detect all the Maven POMs in the project and provide a hierarchical list of modules as shown in Figure 7, “Importing a Multi-module Maven Project”.
Figure 7. Importing a Multi-module Maven Project
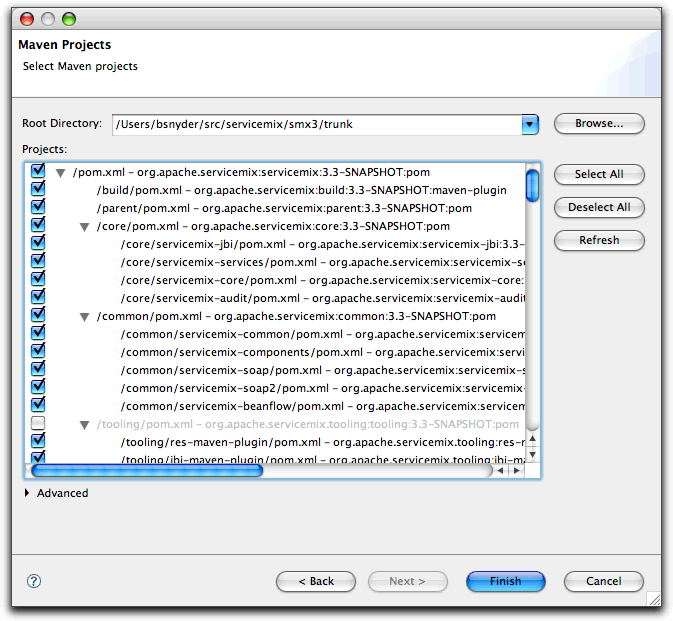
Figure 7, “Importing a Multi-module Maven Project” displays the view of the project being imported. Notice that all the POMs from the project are listed in a hierarchy which reflects the module-submodule relationships of the multi-module project. This is a vast improvement on the way one had to work with Maven projects before m2eclipse. Before m2eclipse, Eclipse had no awareness of the hierarchical nature of a Maven multi-module project, and, when you were using Eclipse to work with nested modules, you just had to accept the fact that Eclipse wasn't going to be able to understand these relationships.
Once you import these projects, Eclipse is going to list each module as a project in your workspace. If you imported the projects as shown in Figure 7, “Importing a Multi-module Maven Project” there would be a project for each artifactId . The top-level servicemix project would be next to a project for other multi-module projects like build , parent , and core . All of these projects would be next to child projects which contain source code like servicemix-jbi and servicemix-core . While m2eclipse allows Eclipse to model the relationships between modules in a multi-module Maven project, Eclipse will still show each node in the tree in a single list of projects.
Checking Out a Maven Project from SCMm2eclipse provides the ability to check out a project (or a tree of projects) directly from a SCM repository. You'll likely need to do this if you are checking out the source for an existing project or if you need to import some Maven projects from an open source project. m2eclipse will checkout the source from source control and scan a directory tree for pom.xml files. m2eclipse will then allow you to import a project for each Maven module it finds. To check out a Maven project from a SCM system, go to File → New → Other... this will load the New dialog. Type in maven in the filter field, and select checkout Maven Projects from SCM. In the Checkout as Maven Project from SCM dialog, enter the SCM information for a project and it will check it out for you to a location of your choice as shown in Figure 8, “Checkout a New Project from Subversion”:
Figure 8. Checkout a New Project from Subversion
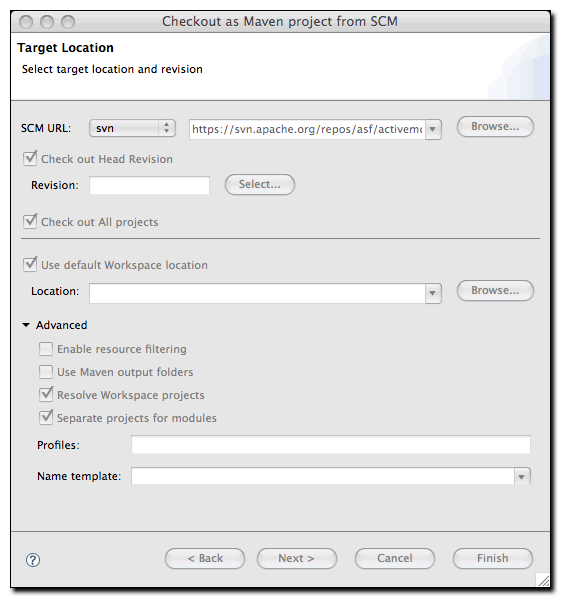
There are additional options in this dialog for specifying a particular revision by browsing the revisions in a Subversion repository or by simply entering the revision number manually. If you wanted to checkout a particular revision of a Subversion repository you would click on the Select... button next to the Revision field. When you click on Select..., the m2eclipse plugin is going to interact with the Subclipse plugin and query the repository for Resource History.
You can also control which projects the m2eclipse plugin is going to import from the checked out directory. By default, m2eclipse is going to import every project under the directory it checks out from source control. If you checkout a large directory tree which contains several nested Maven modules, m2eclipse is going to scan these directories and list each of these projects in a subsequent dialog. If "Check out All projects" is not selected, m2eclipse will only import the top-level Maven project.
If "Use default Workspace location" is checked, m2eclipse will checkout the projects into your Eclipse workspace. If you prefer to keep your project's source code outside of your Eclipse workspace, uncheck this option and supply a Location for the newly checked out Eclipse project.
m2eclipse supports a wide array of source code repositories. In addition to Subversion, the m2eclipse plugin also supports the following SCM providers:
- Bazaar
- Clearcase
- CVS
- git
- Mercurial (hg)
- Perforce
- Starteam
- Subversion
- Synergy
- Visual SourceSafe
m2eclipse also offers the ability to "materialize" a Maven project, and it is a a feature which relies on the metadata stored in a project's POM. Materialization is similar to the process of checking out a Maven project from Subversion, but instead of manually entering the URL to the project’s Subversion repository, the Subversion URL is discovered from the project’s root POM file. You can use this feature to "materialize" projects from nothing more than a POM file if the POM file has the appropriate elements to specify the location of a source repository. Browse the central Maven repository for projects, and materialize them into Eclipse projects. This comes in handy if your project depends on a third-party open source library, and you need to get your hands on the source code. Instead of tracking down the project web site and figuring out how to check it out of Subversion, just use the m2eclipse project to magically "materialize" the Eclipse project.
Figure 9, “Materializing a Maven Project” shows the wizard after choosing to materialize Maven projects:
Figure 9. Materializing a Maven Project
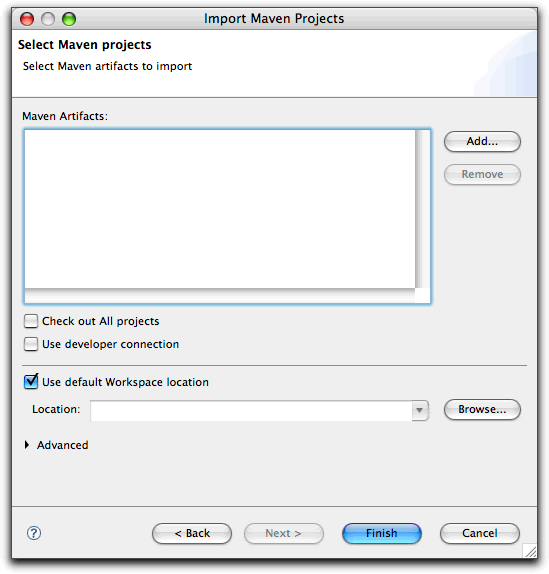
Notice that the dialog box for Maven artifacts in Figure 9, “Materializing a Maven Project” is empty. This is because no projects have been added yet. In order to add a project, you must click the Add button on the right side and select a dependency to add from the central Maven repository. Figure 10, “Selecting Artifact to Materialize” shows how to add a project:
Figure 10. Selecting Artifact to Materialize
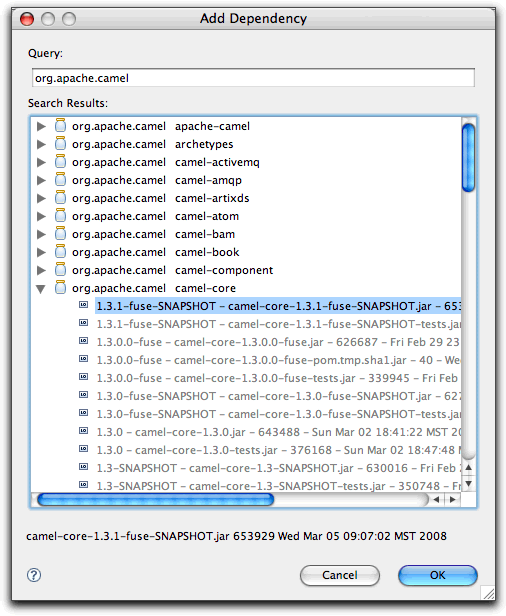
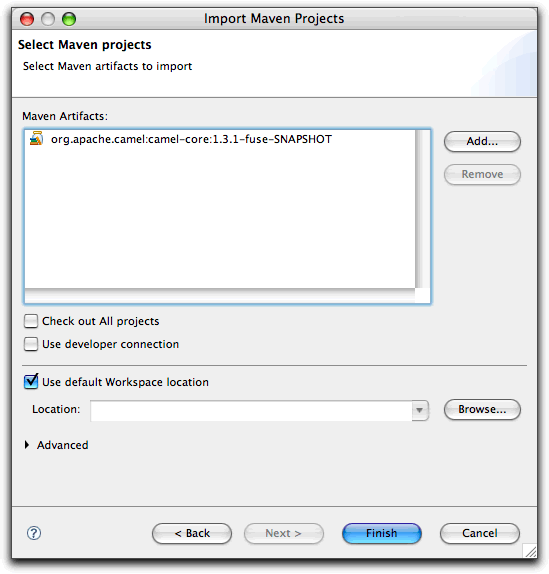
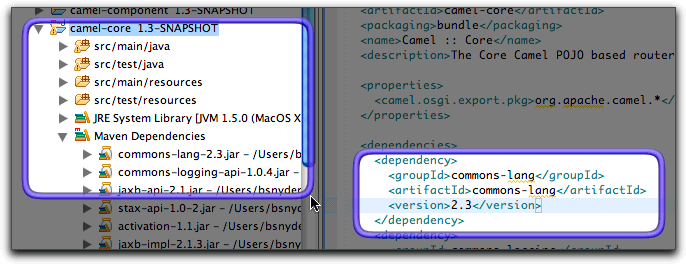
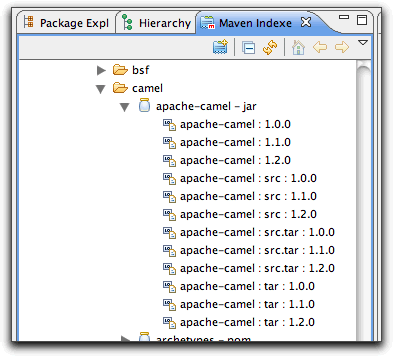
Upon entering a query, candidate artifacts will be located in the local Maven repository. Select the artifact you would like to materialize and click OK so that they are added to the list as shown in Figure 11, “Materializing Apache Camel”.
Figure 11. Materializing Apache Camel
Upon adding a dependency, you have the option of telling the m2eclipse plugin to check out all projects for the artifact. If "Check out All projects" is selected, Maven will materialize the top-level project and all modules it contains. If "Use developer connection" is selected, Maven will use the developer source control repository information instead of the public source control repository information. You would use the developer connection when you have commit rights to the project's source control repository. When you use the developer connection, you will usually need to supply credentials for the source code repository.
Once you select artifacts to materialize, Maven will retrieve the project from the source control repository and create a new Eclipse project for each of the imported projects. Project materialization only works if the projects you want to materialize have populated the SCM information in the artifact's POM.
Working with Maven Projects
The m2eclipse plugin also provides a set of features for working with Maven projects once they are inside of Eclipse. When you right-click on a project and select the Maven menu item, you can see the available Maven features. Figure 12, “Available Maven Features” shows a screenshot of this:
Figure 12. Available Maven Features
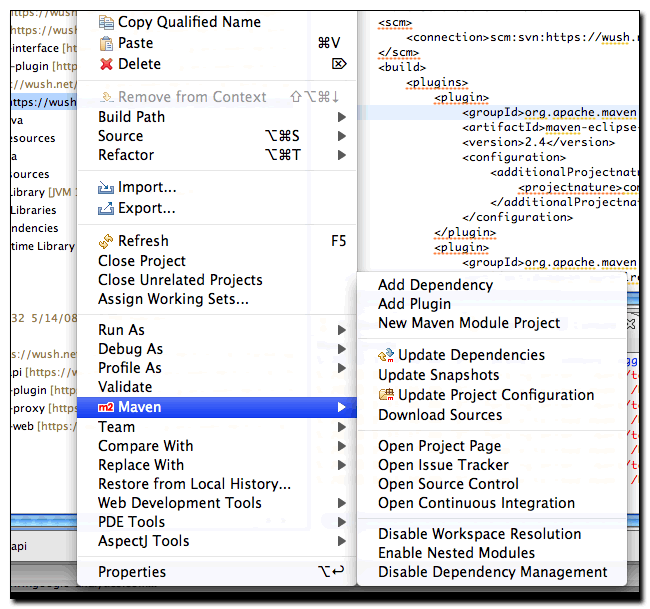
In Figure 12, “Available Maven Features”, the available Maven features include:
- Adding dependencies and plugins
- Updating dependencies, snapshots and source folders
- Creating a Maven module
- Downloading the source
- Opening Project URLs such as the Project Web Page, Issue Tracker, Source Control, and Continuous Integration tool.
- Enabling /Disabling workspace resolution, nested Maven modules and dependency management
These features are also big time savers so let’s review them briefly.
Running Maven Buildsm2eclipse modified the Run As... and Debug As... menus to allow you to run a Maven build within Eclipse. Figure 13, “Running an Eclipse build with Run As..” shows the Run As... menu for an m2eclipse project. From this menu you can run one of the more common lifecycle phases like clean, install, or package. You can also load up the Run configuration dialog window and configure a Maven build with parameters and more options.
Figure 13. Running an Eclipse build with Run As..

If you need to configure a Maven build with more options, you can choose Run Configurations... and create a new Maven build. Figure 14, “Configuring a Maven Build as a Run Configuration” shows the Run dialog for configuring a Maven build.
Figure 14. Configuring a Maven Build as a Run Configuration

The Run configuration dialog allows you to specify multiple goals and profiles, it exposes options like "skip tests" and "update snapshots", and allows you to customize everything from the project to the JRE to the environment variable. You can use this dialog to support any custom Maven build that you wish to launch with m2eclipse.
Adding and Updating Dependencies and Pluginsm2eclipse offers two options for adding dependencies to a project. The first option is by manually editing the POM file to type in the XML to add the dependency. The downside to manually editing the POM file to add a dependency is that you must already know the information about the artifact, or use the features discussed in the next section to manually locate the artifact information in the repository indexes. The upside is that after manually adding the dependency and saving the POM, the project’s Maven Dependencies container will be automatically updated to include the new dependency. Figure 15, “Manually Adding a Dependency to the Project's POM” shows how to add a dependency for commons-lang to a POM. Once you save the POM, the Maven Dependencies container is automatically updated to included it:
Figure 15. Manually Adding a Dependency to the Project's POM
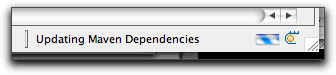
Manually adding a dependency works well but requires more work than the second approach. Upon manually adding the dependency element to the POM, the Eclipse progress in the lower right-hand corner of the Eclipse workbench reflects the action as shown in Figure 16, “Updating Maven Dependencies”:
Figure 16. Updating Maven Dependencies
The second option for adding a dependency is much easier because you don’t have to know any information about about the artifact other than its groupId . Figure 17, “Searching for a Dependency” shows this functionality:
Figure 17. Searching for a Dependency
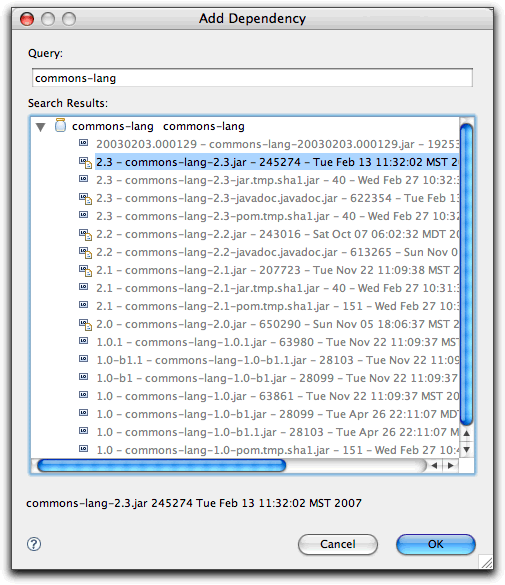
By simply entering a groupId into the query field, m2eclipse queries the repository indexes and even shows a version of the artifact that is currently in my local Maven repository. This option is preferred because it is such a tremendous time saver. With m2eclipse, you no longer need to hunt through the central Maven repository for an artifact version.
Creating a Maven Modulem2eclipse makes it very easy to create a series of nested projects in a multi-module Maven project. If you have a parent project, and you want to add a module to the project, just right click on the project, go the Maven menu, and choose "New Maven Module Project". m2eclipse will walk you through the project creation process to create a new project, then it will update the parent project's POM to include the module reference. Before m2eclipse came along it was very difficult to use a hierarchy of Maven projects within Eclipse. With m2eclipse, the details of the underlying relationships between parent and child projects are integrated into the development environment.
Downloading SourceIf the central Maven repository contains a source artifact for a particular project, you can download the source from the repository and expose it to the Eclipse environment. When you are trying to debug a complex issue in Eclipse, nothing can be easier than being able to right click on a third-party dependency and drill into the code in the Eclipse debugger. Select this option, and m2eclipse will attempt to download the source artifact from the Maven repository. If it is unable to retrieve this source artifact, you should ask the maintainers of the project in question to upload the appropriate Maven source bundle to the central Maven repository.
Opening Project PagesA Maven POM contains some valuable URLs which a developer may need to consult. These are the project's web page, the URL for the source code repository, a URL for a continuous integration system like Hudson, and a URL for an issue tracker. If these URLs are present in a project's POM, m2eclipse will open these project pages in a browser.
Resolving DependenciesYou can configure a project to resolve dependencies from a workspace. This has the effect of altering the way that Maven locates dependency artifacts. If a project is configured to resolve dependencies from the workspace, these artifacts do not need to be present in your local repository. Assume that project-a and project-b are both in the same Eclipse workspace, and that project-a depends on project-b . If workspace resolution is disabled, the m2eclipse Maven build for project-a will only succeed if project-b 's artifact is present in the local repository. If workspace resolution is enabled, m2eclipse will resolve the dependency via the eclipse workspace. In other words, when workspace resolution is enabled, project's don't have to be installed in the local repository to relate to one another.
You can also disable dependency management. This has the effect of telling m2eclipse to stop trying to manage your project's classpath, and it will remove the Maven Dependencies classpath container from your project. If you do this, you are essentially on your own when it comes to managing your project's classpath.
Working with Maven Repositories
m2eclipse also provides some tools to make working with Maven repositories a bit easier. These tools provide functionality for:
- Searching for Artifacts
- Searching for Java classes
- Indexing Maven repositories
m2eclipse adds a couple of items to the Eclipse Navigation menu that make searching for Maven Artifacts and Java classes easy work. Each option is available by clicking on the Navigate menu as shown in Figure 18, “Searching for Artifacts and Classes”:
Figure 18. Searching for Artifacts and Classes
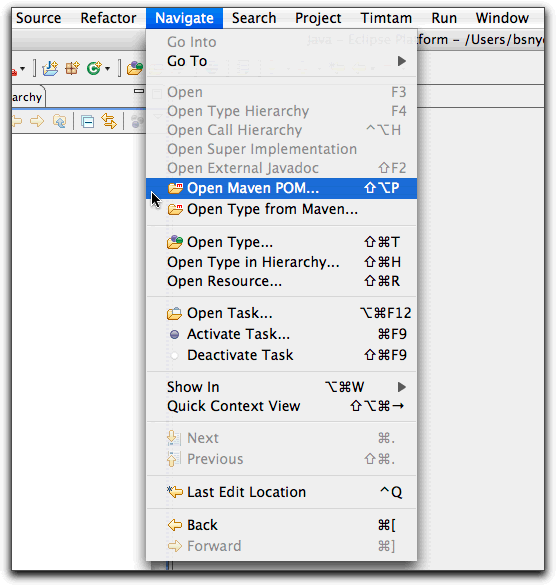
Notice the available options in Figure 18, “Searching for Artifacts and Classes” under the Eclipse Navigate menu named Open Maven POM and Open Type from Maven. The Open Maven POM option allows you to search the Maven repository for a given POM as shown in Figure 19, “Searching for a POM”:
Figure 19. Searching for a POM
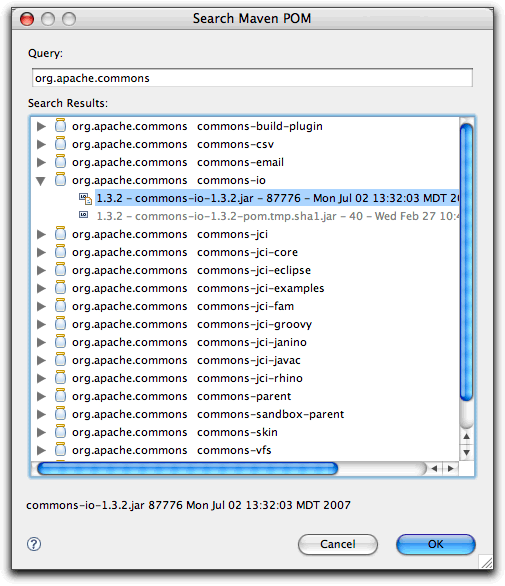
Upon selecting an artifact and clicking OK, the POM for that artifact is opened in Eclipse for browsing or editing. This is handy when you need to take a quick look at the POM for a given artifact.
The second m2eclipse option in the Navigate menu is named Open Type from Maven. This feature allows you to search for a Java class by name in a remote repository. Upon opening this dialog, simply type ‘factorybean’ and you’ll see many classes with the name FactoryBean in them as shown in Figure 20, “Searching the Repository for a Class”:
Figure 20. Searching the Repository for a Class
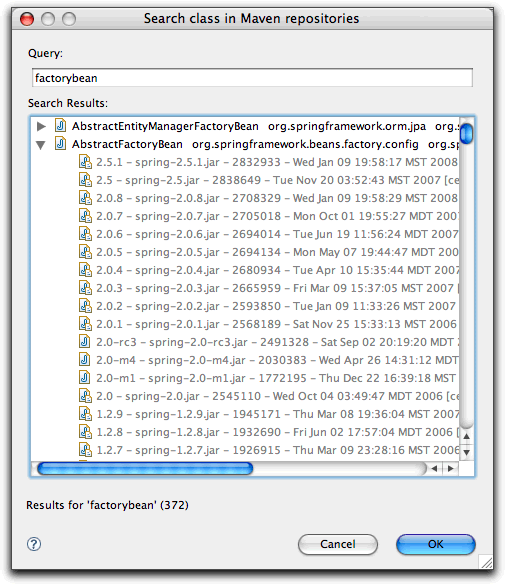
This is a big time saving feature because it means that manually searching through artifacts in a Maven repository for a particular class is a thing of the past. If you need to use a specific class, just fire up Eclipse, go to the Navigate menu and search for the class. m2eclipse will show you the list of artifacts in which it appears.
Indexing Maven RepositoriesThe Maven Indexes View allows you to manually navigate to POMs in a remote repository and open them in Eclipse. To see this View, go to View → Show View → Other, type the word "maven" into the search box and you should see a view named Maven Indexes as shown in Figure 21, “Show Maven Indexes View”:
Figure 21. Show Maven Indexes View
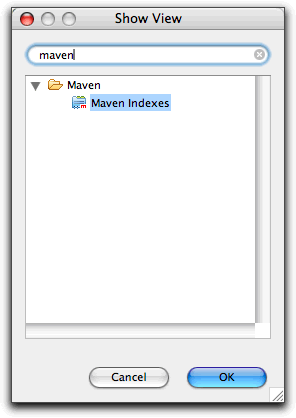
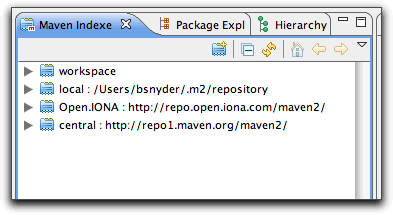
Select this View and click OK. This will show the Maven Indexes View as shown in Figure 22, “Maven Indexes View”:
Figure 22. Maven Indexes View
Additionally, Figure 23, “Locating a POM from the Indexes View” shows the Maven Indexes View after manually navigating to locate a POM:
Figure 23. Locating a POM from the Indexes View
After finding the apache-camel artifact, double-clicking on it will open it up in Eclipse for browsing or editing.
These features make working with remote repositories from inside of Eclipse so much easier and faster. After all the hours you may have spent doing these types of tasks by manually over the last few years - visiting repositories through a web browser, downloading artifacts and grepping through them for classes and POMs - you'll find that m2eclipse is a welcome change for the better because it leverages the Nexus repository index.
Maven Preferences
The ability to adjust the Maven preferences and some Maven options is an important aspect of developing with Maven and m2eclipse offers the ability to tweak these items via the Maven preferences page inside of Eclipse. Typically when using Maven on the command line, such preferences and options are available from files in your ~/.m2 directory and as command line options. m2eclipse provides access to some of the most important preferences and options from the Eclipse IDE. Figure 24, “Maven Preferences for Eclipse” shows the Maven preferences page in Eclipse:
Figure 24. Maven Preferences for Eclipse
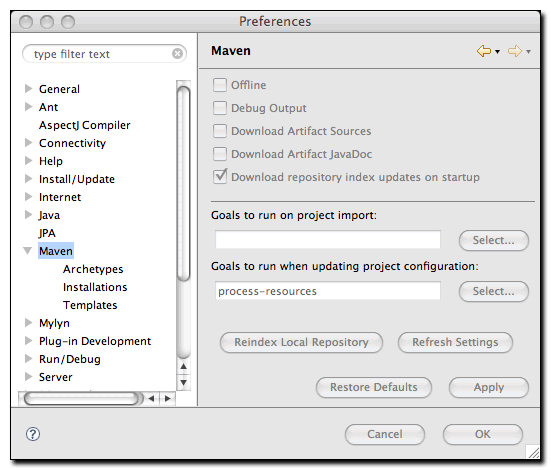
The check boxes in the top section provide the ability to:
- Run Maven in Offline mode, disabling any downloads from remote repositories
- Enable Debug output in the Maven Console
- Download Source jars for artifacts from remote Maven repositories
- Download JavaDoc jars for artifacts from remote Maven repositories
- Download and Update local indexes for remote repositories on startup
The next section offers a pop-up menu to select which goal you’d like to be executed when a project is imported and when the source folders for a given project are updated. The default goal is named process-resources which copies and process the resources for the project into the destination directory to make the project ready for packaging. Customizing this list of goals can come in handy if you need to run any custom goals which process resources or generate supporting configuration.
If you need help selecting a goal, click the Select... button to see the "Goals" dialog. Figure 25, “Maven Goals Dialog with Maven Lifecycle” shows the Goals dialog with a list of all the phases in the default Maven lifecycle.
Figure 25. Maven Goals Dialog with Maven Lifecycle
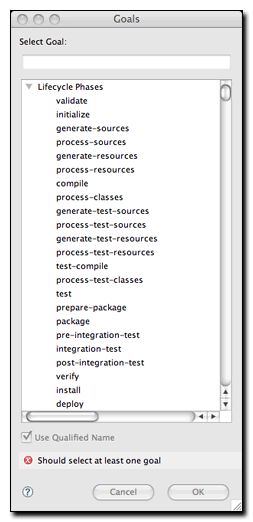
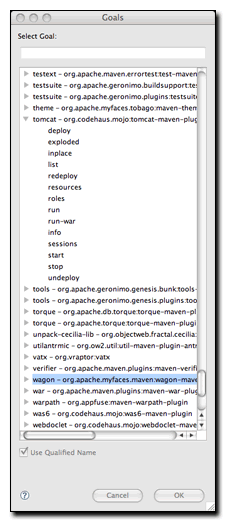
When you see the Goals dialog for the first time, there's a chance you might be overwhelmed by the number of goals it lists. There are literally hundreds of Maven plugins for everything from generating a database, to running integration tests, to performing static analysis, to generating web services with XFire. There are over two hundred plugins with selectable goals in the Goals dialog, Figure 26, “Goal Selection with Tomcat Plugin Highlighted” shows the "Goals" dialog with the Tomcat Maven plugin's goals highlighted.
Figure 26. Goal Selection with Tomcat Plugin Highlighted
Another Maven preference page is the Maven Installations configuration page shown in Figure 27, “Maven Installations Preference Page”:
Figure 27. Maven Installations Preference Page

This page allows you to add other Maven installations to the Eclipse environment. If you want to use a different version of Maven with the m2eclipse plugin you can configure multiple installations of Maven from this configuration page, this is very similar to the ability to add more than one Java Virtual Machine to be run inside of Eclipse. An embedded version of the Maven known as the Maven Embedder is already specified. This is what is used to execute Maven inside of Eclipse. If you have another installation of Maven which you would like to use instead of the Maven Embedder, you can add another Maven runtime by clicking on the Add.. button. Figure 27, “Maven Installations Preference Page” shows a configuration page that lists the Maven Embedder, Maven 2.0.9, and an installation of Maven 2.1-SNAPSHOT.
The Installations configuration page also allows you to specify the location of the global Maven settings file. If you do not specify the location of this file on this configuration page, Maven will use the default global settings file found in conf/settings.xml of the selected Maven installation. You can also customize the location of your user settings file from the default location of ~/.m2/settings.xml , and you can customized the location of your local Maven repository from the default location of ~/.m2/repository .
Summary
When you install m2eclipse, you'll understand that it adds support for Maven projects. You'll be able to run a Maven build seamlessly and import and create Maven projects. m2eclipse will be aware of the relationships between projects, and you'll find yourself resorting to the command-line less and less to run a Maven build. After a few weeks, you'll start to realize that m2eclipse has changed the way you approach development in Eclipse.
Because of the integration with the Nexus repository index, m2eclipse exposes some very valuable information to the developer, and it brings the semantic wealth of the central repository to your fingertips. Running a Maven lifecycle phase from Eclipse is interesting, but being able to see a full list of Maven Archetypes in the central repository and being able to search for all artifacts that contain a specific class are the features that will make m2eclipse an invaluable addition to your development kit.
Dig Deeper on Development tools for continuous software delivery
-
![]()
Master the fundamentals of the Apache Maven build tool for Java
By: Cameron McKenzie
-
![]()
How to import a Maven project from GitHub into Eclipse
By: Cameron McKenzie
-
![]()
Five ways to fix the 'no persistence.xml file found' error in Eclipse
By: Cameron McKenzie
-
![]()
Struts 2 development with the Eclipse IDE tutorial
By: Cameron McKenzie