
Maksim Kabakou - Fotolia
How to install Maven and build apps with the mvn command line
If you want to learn Maven and become a build master, the first step is to install Maven, and the second is to use the mvn command-line tool to compile and package Java apps.

Apache Maven forms the backbone of build tools like Gradle, continuous integration tools like Jenkins and even development tools like Eclipse. But because these aforementioned products often abstract Maven away, many developers have never had any reason to properly learn Maven fundamentals. This tutorial will help to quickly address that build tool knowledge shortcoming by demonstrating how easy it is to install Maven, create a Maven project and run a simple build job using the mvn command-line tool.
How to install Maven
A Maven install is one of the easier software installations you can do. At a high level, the steps to install Maven are:
- Download Maven binaries from the Apache website.
- Unzip the Apache Maven download, and move the folder to a place on your computer where you keep all of your other DevOps tools.
- Add system variables named MAVEN_HOME and M2_HOME, and point both of these variables to the root Maven directory. The root Maven directory will contain a folder named \bin, which contains the pivotally important mvn command-line utility.
- The root Maven directory contains a subfolder named \bin. Add this \bin directory to the OS' path. This makes the mvn command-line tool universally available to the OS.
In my personal development environments, I like to rename the Maven directory _maven, and when I install Maven on a Windows machine, I place that folder directly in the root of the C: drive. Here's how the system variables and edited path look after you successfully configure and install Maven.

Learn Maven with the mvn command line
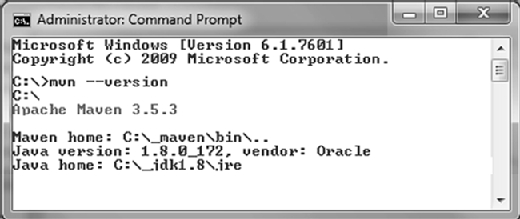
If you want to learn Maven, you need to make sure your Maven install was successful, and you can't be completely sure of that until you have successfully invoked the mvn command-line tool. When you install Maven on Windows, check the mvn by entering the following command on the DOS prompt:
C:\>mvn --version
Prerequisites to install Maven
If you look at the console output generated from the mvn command-line tool, you will notice both the Java version and Java home directories are listed. This is a Maven prerequisite, so before using Maven, first install a Java Development Kit (JDK) and configure the JAVA_HOME system variable. When Maven compiles and runs Java code, it uses the preinstalled JDK tools to do so. Maven doesn't have any facilities to compile Java code itself.
Create a Maven project
Maven has stringent expectations on how to structure a software project, so it's best to ask the mvn command-line utility to create a Java project, rather than to create one by hand. To do so, just create a folder in which you want your Maven project to reside, and then, issue the following command:
mvn -B archetype:generate
   -DarchetypeGroupId=org.apache.maven.archetypes
     -DgroupId=com.mcnz.maven
       -DartifactId=install-maven-tutorial
Note how the above instruction is broken over four lines due to formatting constraints, but when executed in a scripting environment, it should all be contained on a single line, lest you will receive a Failed to execute goal error.
This command instructs the tool to create a Maven project named install-maven-tutorials (the artifactId). This command also indicates that all Java code will be placed under a set of subfolders that map to the package name com.mcnz.maven (the groupId). The command itself might look a little bit intimidating, but quite frankly, this command is probably the most difficult task for people who want to learn how to install and use Maven. Furthermore, when you look at the structure of the Maven project this command creates, the switches and flags used in the mvn command will make much more sense.
Maven directory structure
Maven can create a variety of different projects, from a microservice to a Spring Boot application, depending upon what type of Maven archetype you specify. The command used in this Maven tutorial simply uses a default Maven archetype, which maps to a basic Java project.
In my personal development environment, I ran this Maven command from a folder named _maven projects. The command then created a new Maven project folder named install-maven-tutorial, based on the -DartifactId switch. Maven also created an impressive branch of folders under the project for separating test code from application source code. The default Maven directory structure looks as follows:
install-maven-tutorial
|--pom.xml
~--src
----main
~------java
~--------com
----------mcnz
~------------mvn
|--------------App.java

~----test
~------java
~--------com
~----------mcnz
~------------mvn
|--------------AppTest.java
Along with the impressive directory structure, the Maven command also created three additional files:
- pom.xml
- App.java
- AppTest.java
A Maven POM example
A key objective when you learn Maven is to understand the role of the pom.xml file. The POM (Project Object Model) file describes how to build a given project, how the code should be packaged when it is deployed and any dependencies upon which the project relies.
When you look at the pom.xml file that was generated when the Maven project was created, you will notice it contains the artifactId and groupId properties that were specified when you ran the mvn command-line utility. In addition, Maven has indicated through the version property that this is a snapshot version. You can use the packaging property to package and deploy the project as a JAR file. You can also see from the dependency management section that you will use the JUnit during the test lifecycle phase.
Here's the Maven POM example file generated when you execute the task to create a new Maven project.
<project>
  <!--Install and learn Maven tutorial-->
  <modelVersion>4.0.0</modelVersion>
  <groupId>com.mcnz.maven</groupId>
  <artifactId>install-maven-tutorial</artifactId>
  <packaging>jar</packaging>
  <version>1.0-SNAPSHOT</version>
  <name>install-maven-tutorial</name>

  <dependencies>
    <dependency>
      <groupId>junit</groupId>
      <artifactId>junit</artifactId>
      <version>3.8.1</version>
      <scope>test</scope>
    </dependency>
  </dependencies>

</project>
Sample Maven Java files
Along with the pom.xml file, Maven provides two Java classes named App.java and AppTest.java to help get your project started. The App.java file simply contains a basic Hello World application.
package com.mcnz.maven;

/* App.java from the install Maven tutorial.*/

public class App {
    public static void main( String[] args ){
        System.out.println( "Hello World!" );
    }
}
The App.Test.java file simply contains a simple JUnit test that will always pass.
package com.mcnz.maven;
import junit.framework.*;

/* AppTest.java from the install Maven tutorial.*/

public class AppTest extends TestCase{

    public void testApp(){
        assertTrue( true );
    }

}
Run a Maven build job
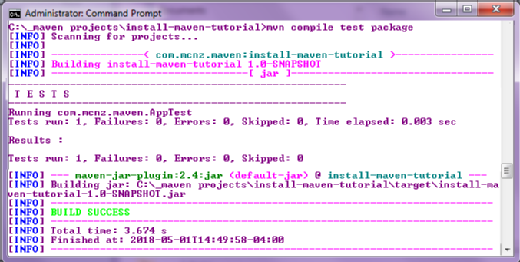
These two Java files aren't particularly interesting, but they do allow you to test some key Maven build facilities, such as compiling code, running tests and packaging an application. Run the following command from the root folder of the project. It will compile the code in the App.java file, run the JUnit test in the AppTest.java file and zip and package the compiled code in a JAR file.
C:\_maven projects\install-maven-tutorial>mvn compile test package
Package apps with the mvn command
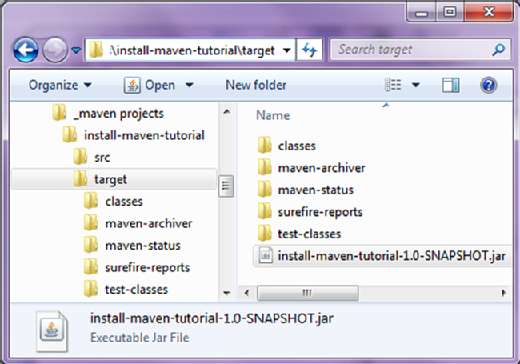
As the mvn command-line utility runs, Maven will display the results of compilation, communicate the results of any failed JUnit test and specify the location of the packaged application. In this instance, the mvn command has created a new folder in the project named target and added a file to that folder with the following name: install-maven-tutorial-1.0-SNAPSHOT.jar.
Use the mvn command line to learn Maven
And that's all there is to it if you need to know how to install Maven and are interested in performing a simple build using the mvn command-line utility. It's really not that hard to learn Maven. Of course, there wasn't a great deal of Java development in this exercise, but with the Maven directory structure created, the pom.xml file added to the root of the project and sample source code provided, that can be addressed when the developer begins to write code. The process will be much easier to do with Maven taking care of the testing, compiling and packaging.
TheServerSide Maven guide
Part 1 -- "How to install Maven and build apps with the mvn command line"
Part 2 -- "Fix broken builds with this log4j Maven dependency example"
Dig Deeper on Development tools for continuous software delivery
-
![]()
Flatpak vs. Snap: Why Snap is still relevant on servers
By: Joseph Ottinger
-
![]()
Master the fundamentals of the Apache Maven build tool for Java
By: Cameron McKenzie
-
![]()
Struts 2 development with the Eclipse IDE tutorial
By: Cameron McKenzie
-
![]()
What is Maven in Java? Crash course tutorial for beginners
By: Cameron McKenzie