How to setup an Nginx reverse proxy server example

What is an Nginx reverse proxy?
Most enterprise architectures use a single, reverse proxy server to handle all incoming requests.
The proxy server then inspects each HTTP request and identifies which backend system, be it an Apache, Tomcat, Express or NodeJS server, should handle the request.
The reverse proxy then forwards the request to that server, allows the request to be processed, obtains a response from that backend server, and then send the response back to the client.
An Nginx server configured as a reverse proxy serves this function.
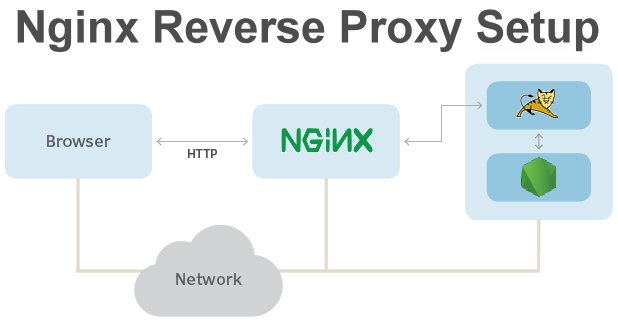
This Nginx reverse proxy example uses Tomcat as the origin server, but any backend server, such as Node, Jetty or WebSphere, will work.
What are the benefits of an Nginx reverse proxy setup?
The benefits of using Nginx as a reverse proxy include:
- Clients access all backend resources through a single web address.
- The reverse proxy can serve static content, which reduces the load on application servers such as Express, Tomcat or WebSphere.
- The Nginx reverse proxy can navigate through firewalls that protect backend resources.
- The reverse proxy can act as a cache or buffer to reduce latency.
- User access control is greatly simplified with a single point of access to your site.
Nginx reverse proxy configuration steps
Follow these steps to setup and configure an Nginx reverse proxy server of your own:
- Install Nginx on your Windows or Linux server (prerequisite).
- Add the Nginx proxy_pass setting in a virtual host or the default config file.
- Map a context root to the URL of a backend server.
- Optionally set headers for the Nginx reverse proxy to use with the backend.
- Restart Nginx reverse proxy and test the reverse proxy setup.
Install Nginx
On Ubuntu, install the latest version of Nginx. Perform the apt-get update and apt-get upgrade commands, followed by the apt-get install command.
sudo apt-get update -y
Reading package lists... Done
sudo apt-get upgrade -y
Calculating upgrade... Done
sudo apt-get install nginx -y
The following Nginx packages will be installed on Ubuntu 22:
libnginx-mod-http-geoip2 nginx-common nginx-core nginx-proxy
Setting up nginx 1.18 ubuntu 22... Done
How to verify an Nginx install?
Perform your due diligence and check to see if the Nginx server install was successful.
A status check should indicate that Nginx is active.
sudo systemctl status nginx
● nginx - A high performance web, http and reverse proxy server
   Loaded: loaded (/lib/systemd/system/nginx.service; enabled;)
   Active: active (Nginx server running)
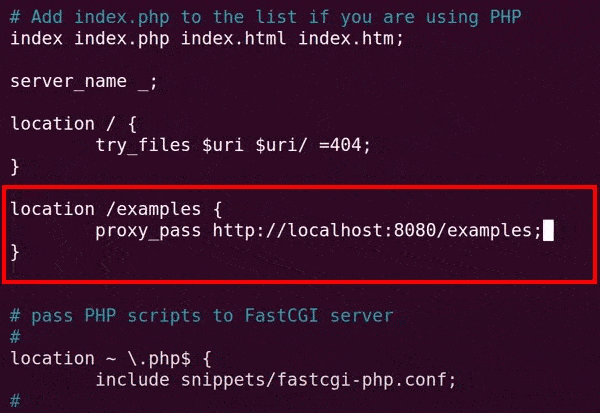
Add an Nginx proxy_pass setting
The most important configuration step in an Nginx reverse proxy configuration is the addition of a proxy_pass setting that maps an incoming URL to a backend server.
In this Nginx reverse proxy example, we assume an Apache Tomcat server is running on localhost at port 8080, and we need Nginx to proxy an application with the context root of /examples.
The proxy_pass setting makes the Nginx reverse proxy setup work.
The proxy_pass is configured in the location section of any virtual host configuration file. To set up an Nginx proxy_pass globally, edit the default file in Nginx’s sites-available folder.
sudo nano /etc/nginx/sites-available/default
Nginx proxy_pass example
For this example, we setup the location mapping of the Nginx reverse proxy to forward any request that has /examples in the URI to an Apache Tomcat server that runs on port 8080:
# example nginx reverse proxy mapping
# /etc/nginx/sites-available/default
location /examples {
  proxy_pass http://localhost:8080/examples;
}
Set Nginx proxy header values
By default, Nginx relays its own IP address to reverse proxy targets.
To have Nginx relay the IP address, host and port info about the client that made the original request, you can set proxy_set_header values.
Furthermore, Nginx buffers data to help manage heavy workloads, but this may be undesirable for applications that require the lowest latency possible. Instead, it may be better to turn proxy_buffering off for Nginx reverse proxy configurations.
This Nginx reverse proxy example turns off buffering while at the same time sets client headers for the backend servers that handle the proxied requests:
# example nginx reverse proxy config file
# /etc/nginx/sites-available/default
location /examples {
  proxy_pass http://localhost:8080/examples;
  proxy_buffering off;
  proxy_set_header X-Real-IP $remote_addr;
  proxy_set_header X-Forwarded-Host $host;
  proxy_set_header X-Forwarded-Port $server_port;
}
Add these Nginx proxy_pass, proxy_buffering and proxy_set_header updates to your default configuration file and save you changes.
Restart Nginx as a reverse proxy
To see Nginx function as a reverse proxy, simply restart the server to load the new configuration.
sudo systemctl restart nginx
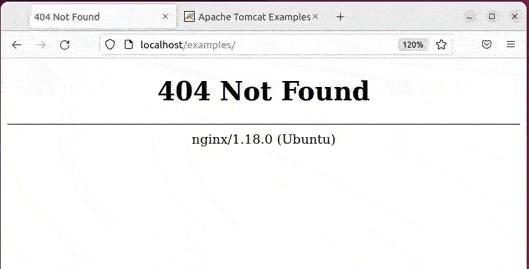
When the server comes online, try to access the backend server through the Nginx reverse proxy. In this example, we can access the Tomcat server running on port 8080 through Nginx.
http://localhost/examples -- proxies for --> http://localhost:8080/examples
The Nginx reverse proxy forwards act as a single point of entry for all requests for the examples application on Tomcat. This proves that the Nginx reverse proxy config setup was a success.
The Nginx reverse proxy example maps the /example URI to an Apache Tomcat server.
And that’s how easy it is to configure and setup an Nginx reverse proxy on Ubuntu.
 Cameron McKenzie is an AWS Certified AI Practitioner, Machine Learning Engineer, Solutions Architect and author of many popular books in the software development and Cloud Computing space. His growing YouTube channel training devs in Java, Spring, AI and ML has well over 30,000 subscribers.