

How to configure Nginx Proxy Manager
Nginx is a powerful reverse proxy and web server, but hand-editing Nginx configuration files is not always the most convenient approach.
Nginx Proxy Manager provides a web interface for common reverse-proxy tasks such as forwarding domains, issuing Let's Encrypt certificates, configuring redirection hosts, creating access lists and exposing TCP or UDP streams.
The modern installation path is straightforward:
- Install Docker and Docker Compose.
- Create a Compose file for Nginx Proxy Manager.
- Persist the application's data and certificate directories.
- Start the stack with
docker compose up -d. - Open the administration interface on port
81. - Create a Proxy Host that points to the backend application.
- Optionally request and force an SSL certificate.
Modern Nginx Proxy Manager Docker Compose file
For a simple installation, Nginx Proxy Manager can use its built-in SQLite database. The important point is that the data must be stored outside the container so that configuration survives container replacement and upgrades.
Create a directory for the project and a file named compose.yaml:
services:
  app:
    image: jc21/nginx-proxy-manager:2.15.1
    container_name: nginx-proxy-manager
    restart: unless-stopped

    ports:
      - "80:80"
      - "81:81"
      - "443:443"

    environment:
      TZ: "America/Toronto"

    volumes:
      - ./data:/data
      - ./letsencrypt:/etc/letsencrypt
This is deliberately simple. It exposes:
- port
80for HTTP traffic; - port
443for HTTPS traffic; and - port
81for the Nginx Proxy Manager administration interface.
The two bind-mounted directories are critical:
./data         -> /data
./letsencrypt  -> /etc/letsencrypt
The first stores Nginx Proxy Manager configuration and database data. The second stores certificate-related files. Without persistent storage, deleting and recreating the container can also delete the configuration stored inside it.
Why there is no version field in modern Compose
Older Compose tutorials often begin with a declaration such as:
version: "3"Modern Docker Compose does not require that top-level version declaration for a normal Compose application, so the current example simply begins with services.
Start Nginx Proxy Manager
Start the container in detached mode:
docker compose up -dCheck its status:
docker compose psFollow the startup logs if necessary:
docker compose logs -f appOn first startup, initialization may take a short amount of time while the application creates its database, keys and Nginx configuration.
Open the admin interface
Once the container is ready, open the administration UI in a browser:
https://localhost:81For a server on another machine, replace localhost with that machine's hostname or IP address.
Do not expose the administration port to the public internet unless you have deliberately secured access to it. Port 81 is intended for management, while normal reverse-proxied HTTP and HTTPS traffic arrives on ports 80 and 443.
Create an Nginx Proxy Manager Proxy Host
After logging in, open Hosts > Proxy Hosts and choose Add Proxy Host.
A typical configuration requires:
- a public domain name;
- the backend scheme, normally
httporhttps; - the backend hostname or IP address; and
- the backend port.
For example, imagine a Spring Boot application running on another host at:
https://192.168.1.50:8080You could configure:
Domain Names:             app.example.com
Scheme:                   http
Forward Hostname / IP:    192.168.1.50
Forward Port:             8080
Nginx Proxy Manager generates the underlying Nginx configuration and begins forwarding requests for app.example.com to that backend.
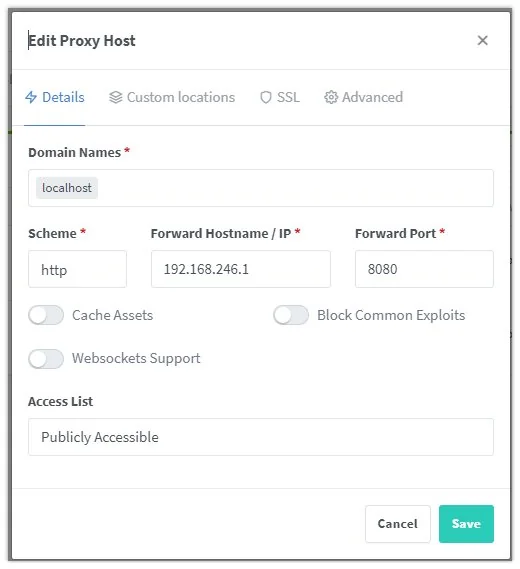
A Proxy Host maps an incoming domain name to a backend HTTP service.
Add Let's Encrypt SSL
One of Nginx Proxy Manager's most useful features is its integration with Let's Encrypt.
When you edit a Proxy Host, open the SSL tab and request a new certificate for the configured domain. After issuance succeeds, you can enable options such as Force SSL so HTTP requests redirect to HTTPS.
For normal HTTP-based certificate validation, the public DNS record for the domain must resolve to the Nginx Proxy Manager host, and inbound ports 80 and 443 must be reachable.
Custom locations
A Proxy Host can also define custom locations when different URL paths need different forwarding behavior.
For example, a site might use:
/        -> frontend server
/api/    -> API server
/admin/  -> administration service
Nginx Proxy Manager exposes these path-based rules through the Proxy Host configuration interface, which avoids the need to manually write location blocks for many common scenarios.
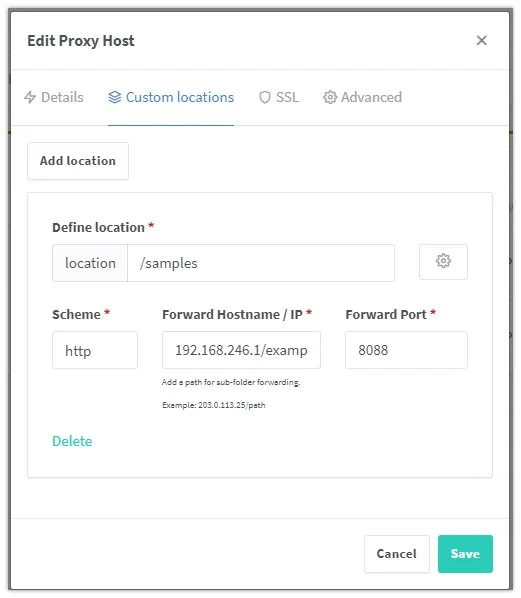
Custom locations can route different URL paths to different backend services.
Use Docker service names for backends in the same Compose network
If the backend application runs in the same Compose project, you do not need to route through a host IP address. Docker's internal DNS can resolve a Compose service name directly.
For example:
services:
  app:
    image: jc21/nginx-proxy-manager:2.15.1
    ports:
      - "80:80"
      - "81:81"
      - "443:443"
    volumes:
      - ./data:/data
      - ./letsencrypt:/etc/letsencrypt

  backend:
    image: my-company/my-app:1.0
    expose:
      - "8080"
The Proxy Host can then use:
Forward Hostname / IP: backend
Forward Port:          8080
This is cleaner than hard-coding a container IP address, because container IPs can change while the Compose service name remains stable.
Do not use localhost for another container
A common Docker mistake is to configure a backend as localhost when that backend actually runs in another container.
Inside the Nginx Proxy Manager container, localhost refers to the Nginx Proxy Manager container itself.
If the application is another Compose service, use its service name. If the application runs on the Docker host, use an address that is actually reachable from the container environment.
Persistent SQLite vs. external databases
For a straightforward deployment, the built-in SQLite database is sufficient and keeps the Compose stack simple.
Nginx Proxy Manager can also use an external relational database when the deployment requires it. The project's current setup documentation includes MariaDB/MySQL and PostgreSQL configuration options.
Whichever approach you choose, database credentials and persistent storage deserve production-level treatment. Do not embed weak example passwords in a real deployment.
Pin the Docker image version
The latest tag is convenient for experimentation, but it moves as new releases are published.
A tutorial or production Compose file is easier to reproduce when it specifies an explicit release:
image: jc21/nginx-proxy-manager:2.15.1Before upgrading, review the release notes, back up the persistent data and certificate directories, pull the new image and recreate the container.
docker compose pull
docker compose up -d
Back up Nginx Proxy Manager
For the simple SQLite configuration used in this tutorial, the two directories that matter most are:
data/
letsencrypt/
Back them up before upgrades or migrations. They contain the application state and certificate-related files needed to recreate the deployment.
Nginx Proxy Manager features
Beyond basic reverse proxying, Nginx Proxy Manager provides a graphical interface for several common Nginx tasks:
- Proxy Hosts;
- Redirection Hosts;
- 404 Hosts;
- TCP and UDP streams;
- Let's Encrypt and custom certificates;
- Access Lists and basic HTTP authentication;
- advanced Nginx configuration;
- user management and permissions; and
- audit logging.
Nginx Proxy Manager Docker commands
| Task | Command |
|---|---|
| Start the stack | docker compose up -d |
| Check status | docker compose ps |
| View logs | docker compose logs -f app |
| Stop the stack | docker compose down |
| Pull a newer configured image | docker compose pull |
| Recreate after an upgrade | docker compose up -d |
Nginx Proxy Manager is useful when you want Nginx's reverse-proxy and SSL capabilities without maintaining every server block manually. Docker Compose makes the deployment simple, while persistent volumes ensure that proxy hosts, users, certificates and configuration survive container replacement.