Maven Magic
Maven is a high-level, intelligent project management, build and deployment tool from the Apache project. There is nothing that Maven does that Ant cannot do. At the end of this article you will be able to build J2EE project artifacts using Maven.
Introduction
Maven is a high-level, intelligent project management, build and deployment tool from the Apache project. There is nothing that Maven does that Ant cannot do. Ant gives the ultimate power and flexibility in build and deployment to the developer. Why do you need Maven then? Maven adds a layer of abstraction above Ant (and uses Jelly). Maven can be used to build any Java application, but in this article we will investigate the applicability of Maven from a J2EE standpoint. J2EE build and deployment as we know it today is pretty much standardized. Every enterprise has some variations, but in general it is all the same: deploying EARs, WARs, and EJB-JARs. Maven captures this intelligence and lets you achieve the build and deployment in about 5-6 lines of Maven script compared to dozens of lines in an Ant build script. In other words, Maven simplifies a developer's life. Everybody loves things to be simple right?
If you think of Ant as a modular language like C, then Maven can be compared to an object oriented language like C++ or Java. Maven plugins are like the standard JDK libraries. The C language, albeit a giant leap from assembly languages, falls short of addressing the complexities of enterprise projects. Java on the other hand, being object oriented, forces the developer to program in a certain way and reduces complexities in large enterprise projects by letting you manage dependencies by breaking them into chunks via CRC - Class, Responsibility and Collaboration - which is a big paradigm shift from C. There are some tasks that C alone can do, but for the majority of enterprise programming Java will suffice.
Every comparison between C and Java listed above applies to Ant and Maven. Ant lets you do any variations you want, but requires a lot of scripting. Maven on the other hand mandates certain directories and file names, but it provides plugins to make life easier. The restriction imposed by Maven is that only one artifact is generated per project (A project in Maven terminology is a folder with a project.xml file in it). If you are thinking "My EAR artifact itself consists of multiple artifacts, I am out of luck, I cannot use Maven", it is time to take a closer look. A Maven project can have sub projects. Each sub project can build its own artifact. The topmost project can aggregate the artifacts into a larger one. This is synonymous to jars and WARs put together to form an EAR. Maven also provides inheritance in projects. I will address these topics in the following sections. At the end of this article you will be able to build J2EE project artifacts using Maven.
| Maven simplifies build enormously by imposing certain fixed file names and acceptable restrictions like one artifact per project. |
First there was make. But make was not cross platform. Then came Ant. Ant lets you do cross-platform builds in a systematic manner. It is very elegant compared to make. However as you may have already realized, build tasks in a project are pretty standard. The tricky part is partitioning, compiling and packaging classes, resources and descriptors into the right deployment artifacts like jars, WARs and EARs and managing dependencies on the right version of libraries - both internal and third party ones. After a while you will find yourself copying Ant script snippets from one place to another and modifying them. Then there is the universal problem of classpath. We all have different versions of different libraries installed in different locations on the development workstations. Nobody can be sure if the Ant build copied the right version of the library into the deployment artifact at all. We all have seen the classic developer shrug - "It works on my machine"! Ant does little to address this problem. Enter Maven.
What is it that makes Maven an attractive option for today's enterprises? The basic tenet of Ant build scripts is copying, renaming and deleting files under various conditions into various deployable artifacts - which are again treated as files on your computer by the build script. Maven hides the fact that everything is a file and forces you to think and script to create a deployable artifact such as an EAR, that has a dependency on a particular version of a third party library residing in a shared remote (or local) enterprise repository, and then publish your library into the repository as well for others to use. No more classpath issues. No more mismatch in libraries. This sounds like a very real and practical solution to our everyday problems. It also gives you the power to embed Ant scripts within Maven scripts if absolutely essential.
In the words of Jason van Zyl, an important contributor to the Maven source code base, "the intent of Maven is to make intra-project development highly manageable in the hopes of providing more time for cross-project development. You might call it cross-project pollination or the sharing of project development knowledge; this is what Maven attempts to encourage".
| Maven installation You can download the 1.0 Release Candidate from http://maven.apache.org/builds/release/1.0-rc1/. The version of Maven available at the time of this writing was 1.0-beta 10. Everything in this article refers to the 1.0-beta 10. It is feature complete for 1.0 pending any defects. Unzip the archive onto your machine. It creates a directory called maven-1.0-beta-10. Before you go any further, set the MAVEN_HOME environment variable to this directory. Also add the MAVEN_HOME/bin to the PATH environment variable. Make sure you have set the JAVA_HOME appropriately. Go to the command line and type maven -g. If you see a long list of output, your installation has succeeded. |
Maven basics
The basic concept of Maven is a project. In Maven terms, any directory that has a project.xml in it is a project. When the sub-directories underneath have their own project.xml, they are projects on their own too. Another concept in Maven is that of a repository. The repository holds the artifacts on which your project depends. There are two kinds of repository: local and remote. Both of them can be declaratively set. Unless specified otherwise, the local repository is created in a special directory called ".maven/repository". In Windows, this directory is created in C:Documents And Settings. For example, if your project depends on commons-logging version 1.0.2, you can specify the dependency in project.xml and when maven is executed, it will copy the appropriate commons-logging jar file from the remote repository to the local repository and then use it to build your project's artifact. The maven repository folder has subfolders for each library. For instance, there is a sub folder for commons-logging. Beneath the commons-logging folder there is another subfolder called jars. This jars folder has the commons logging jar files suffixed by version number. Jars are not the only type of artifacts supported in the repository. You can have EARs and WARs too.
The role of the repository is immediately obvious. Instead of each project having its own copies of third party libraries, the repository helps developers across projects to share the libraries. Each project can also in turn generate its artifacts and publish it into the remote repository. The process of publishing a jar into the repository is called "install" in Maven lingo. This install process helps organizations to share internal artifacts across projects in a standard manner. This also holds the basis for continuous integration among inter-dependent projects. Continuous Integration is a concept that was developed by Martin Fowler and developers of Cruise Control. Individual projects can continue to build and publish the release and snapshot artifacts to corporate repositories. Daemon processes running on dedicated machines can schedule integration builds, deploy to execution platforms (application servers) and run automated tests to verify the build status. Figure 1 shows the role of project.xml, repository, goals and plugins in Maven build. The grey colored rectangles are provided by you. The green colored rectangles are provided by Maven. The pink colored rectangle shaded is the output - the deployment artifacts from your project. Custom plugins and maven.xml are optional. The rest of the inputs are mandatory.
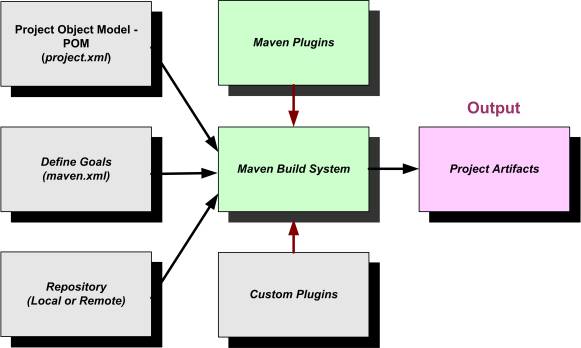
Figure 1 Overview of Maven build elements
project.xml details
The project.xml is divided into four main parts namely, Project Management Section, Project Dependency Section, Project Build Section and Project Reports Section. Listing 1 shows the outline of a typical project.xml. The mandatory items are shown in bold.
Listing 1 Outline of project.xml
01 <?xml version="1.0"?>
02 <project>
03   <pomVersion>3</pomVersion>
04   <groupId>Sample-Maven-Project</groupId>
05   <id>sample-project</id>
06   <currentVersion>1.1</currentVersion>
07   <name>Sample Maven Project</name>
08
09   <!--         Project Management section  goes here        -->
10
11   <!--         Project Dependency section  goes here        -->
12
13   <!--            Project Build section goes here           -->
14
15   <!--           Project Reports section goes here          -->
16
17 </project>
- Line 02 - Root element defining the project.
- Line 03 - Project Object Model (POM) Version. This tag is unused but needed.
- Line 04 - A directory with this name is created in Maven repository to hold the artifacts of projects sharing the group id.
- Line 05, 06 - The id and version is used to create the artifact name as <id>-<version>.jar
- Line 07 - Name of the Project
The Project Management Section is shown in detail in Listing 2 and has general information on the organization, its web site, project web site, location of SCM, deployment and issue tracking site, developer list, mailing lists to name a few. Most of the items in this section is boilerplate and are optional. Maven allows inheritance in the project.xml. Every organization can have an enterprise wide template which can be extended for projects. Each subproject will simply fill in the relevant section of this file. Most of the project management section elements get defined in the enterprise wide template and top-level project template. The only mandatory element is the organization name.
Listing 2 Project Management Section in project.xml
01   <organization>
02      <name>Foobar Travels</name>
03      <url>http://www.foobar.com</url>
04      <logo>http://www.foobar.com/logo.jpg</logo>
05   </organization>
06
07   <inceptionYear>2003</inceptionYear>
08   <package>foobar.blah.*</package>
09   <logo>http://www.foobar.com/project-logo.jpg</logo>          |
10   <description>Project description goes here</description>
11   <shortDescription>Short Description</shortDescription>
12   <url>http://www.foobar.com</url>
13   <issueTrackingUrl>http://jira.foobar.com</issueTrackingUrl>
14   <siteAddress>http://staging.foobar.com</siteAddress>
15   <siteDirectory>/etc/staging</siteDirectory>
16   <distributionDirectory>/etc/builds</distributionDirectory>
17
18   <repository>
19      <connection>cvs:pserver:[email protected]:/foo</connection>
20      <url>http://scm.foobar.com</url>
21   </repository>
22
23   <mailingLists>
24      <mailingList>
25         <name>Dev List</name>
26         <subscribe>[email protected]</subscribe>
27         <unsubscribe>[email protected]</unsubscribe>
28      </mailingList>
29      ...
30      ...
31   </mailingLists>
32
33   <developers>
34      <developer>
35         <name>Srikanth Shenoy</name>
36         <id>shenoy</id>
37         <email>[email protected]</email>
38      </developer>
39      ...
40      ...
41   </developers>
- Lines 01-05 - Organization details
- Line 08 - Top level package for the project
- Line 09 - Project Logo
- Line 12 - Project web site
- Line 14 - The site where the project is hosted
- Line 15 - Physical location of project deployment
- Line 16 - Physical location where the project distributions are available
- Lines 18-21 - SCM to access the project source
- Lines 23-31 - Mailing list for the project
- Lines 33-41 - Developers in the project
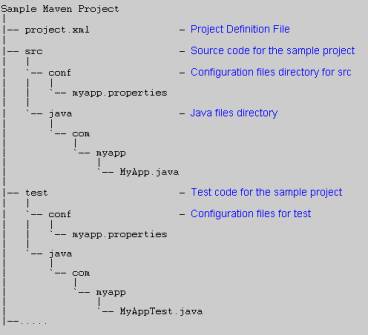
Figure 2 Sample Maven Project Organization
The Project Build Section describes the location of source, test and resource files. This section is generally defined at the organization level to standardize templates for all projects in the organization, or at the main project level to standardize the templates for all underlying sub projects respectively. Listing 3 shows the project build section. All the information about project organization shown in Figure 2 is defined here. The project organization can be changed and so can the project.xml. All the elements in this section are optional. However, note that if this section is not specified, no build ever gets done. Once the build is complete, Maven automatically runs the tests specified in the unit test section.
Listing 3 Project Build Section in project.xml
01 <build>
02   <nagEmailAddress>[email protected]</nagEmailAddress>
03   <sourceDirectory>${basedir}/src/java</sourceDirectory>
04   <unitTestSourceDirectory>${basedir}/test/java</unitTestSourceDirectory>
05   <unitTest>
06      <includes>
07         <include>**/*Test.java</include>
08      </includes>
09   </unitTest>
10
11   <resources>
12      <resource>
13         <directory>${basedir}/src/conf</directory>
14         <includes>
15            <include>*.properties</include>
16         </includes>
17      </resource>
18   </resources>
19 </build>
- Line 02 - Email address to send notification about the build status
- Line 03 - Folder containing the source files for the project. The source can be java, jsp and so on.
- Line 04 - Directory containing the unit test files for the project.
- Lines 05-09 - The test file name pattern to run after the build is completed
- Lines 11-19 - Resources to be copied in case a jar is created.
Once the build is done, different kinds of reports and documentation can be generated to report the status of the build/release. The target audience of the reports can vary from other developers in the same project to sponsors, stakeholders or users from other projects. For instance, the javadoc and java cross reference (jsr) reports target the programmers, jdepend reports are of interest to the architect. File and developer activity reports might be of interest to the Configuration Manager. The reports are meant to effectively communicate and collaborate with the team and the stakeholders about the project's status. Listing 4 shows the Project Reports Section in the project.xml. Do not worry about the specifics of each of the entries. You can pick them up as you use Maven.
Listing 4 Project Reports Section in project.xml
<reports>
   <report>maven-changes-plugin</report>
   <report>maven-jdepend-plugin</report>
   <report>maven-checkstyle-plugin</report>
   <report>maven-pmd-plugin</report>
   <report>maven-junit-report-plugin</report>
   <report>maven-clover-plugin</report>
   <report>maven-changelog-plugin</report>
   <report>maven-file-activity-plugin</report>
   <report>maven-developer-activity-plugin</report>
   <report>maven-file-activity-plugin</report>
   <report>maven-license-plugin</report>
   <report>maven-linkcheck-plugin</report>
   <report>maven-jxr-plugin</report>
</reports>
The final section covers the Project Dependency and is the key to every project. Consider Listing 5 that shows the dependencies for the Sample Maven Project. The first dependency states that this project depends on a jar file in a folder named BeanUtils. The name of the jar file is commons-beanutils-1.5.jar [according to the id-version.jar convention described earlier]. The folder BeanUtils exists in the .maven/repository folder.
Listing 5 Project dependency Section in project.xml
<dependencies>
      <dependency>
        <groupId>BeanUtils</groupId>
        <artifactId>commons-beanutils</artifactId>
        <version>1.5</version>
      </dependency>
      <dependency>
        <groupId>commons-logging</groupId>
        <artifactId>commons-logging</artifactId>
        <version>1.0.3</version>
      </dependency>
      <dependency>
        <groupId>castor</groupId>
        <artifactId>castor</artifactId>
        <version>0.9.4.3</version>
      </dependency>
</dependencies>
Maven Hands-On
Now that we have sufficient understanding of the project.xml file let us get on try something out. At the time of this writing Maven 1.0 beta 10 - a feature complete version for the 1.0 release is generally available, which we will use in the course of this article. After downloading Maven from maven.apache.org, unzip the archive into your local directory. Set the JAVA_HOME variable to point to the JDK installation and MAVEN_HOME to point to the Maven directory. Also add the MAVEN_HOME/bin to the PATH environment variable. With these settings, you are ready to use Maven.
Create a directory structure as shown in Figure 2. Then create a simple MyApp.java class without any dependencies outside JDK libraries. Create a project.xml with the information supplied in Listing 1 through 5. Since your sample project does not depend on external entities, the only exceptions is that you will have an empty dependencies section like this: <dependencies/>. Go to the command line and cd to the Sample-Maven-Project directory and type in
C:Sample-Maven-Project> maven java:compile
You will see that all the java files in src and test directory are compiled. A maven temp directory called target is created directly under C:Sample-Maven-Project, which contains all the compiled class files. As I have stated earlier Maven's power lies in its plugins. You might not know it, but you have just used one of its plugins. When you typed maven java:compile you signaled Maven to use the "java" plugin and attain the "compile" goal. Maven uses the project.xml and the repository to execute a "goal" on the project. The generic format of the maven command is
maven <plugin name>:<goal name>
A plugin is a logical collection of goals written using Jelly - an XML based scripting language. The conditional constructs from Jelly control the execution of ready-made ant scripts for the pre defined tasks. Each such task is called a Goal. Although I do not cover Jelly in this article a sample Jelly snippet will make things clear as to how it wraps an Ant script. This snippet is from the Maven java plugin. The plugin internally invokes the <ant:javac> to compile the java code.
<j:when test="${sourcesPresent == 'true'}">
     <ant:javac  destdir="${maven.build.dest}"
                 excludes="**/package.html"
                 debug="${maven.compile.debug}"
                 deprecation="${maven.compile.deprecation}"
                 target="${maven.compile.target}"
                 optimize="${maven.compile.optimize}">
        <ant:src>
          <ant:path refid="maven.compile.src.set"/>
        </ant:src>
     </j:when>
A plugin may have a default goal. In such a case you just have to type in maven <plugin name>. In this case the compile goal in java plugin has the knowledge to go to the src and test folders specified in the project.xml and recursively compile all the java files. Similarly a jar plugin has a default goal of "jar" - i.e. to jar the class files after compiling. The jar plugin invokes java:compile or something to that effect to compile the java classes first and then creates the jar file from the classes and automatically generates the manifest. A plugin thus captures the common practices into a reusable "library" saving you from reinventing the wheel and cutting and pasting ant scripts. Now let us go ahead and execute the jar:install goal. Type the following on the command line
C:Sample-Maven-Proejct>maven jar:install
When the jar:install goal is attained, a jar file with name sample-project-1.1.jar is created and is copied into the C:/Documents And Settings/<login-id>/.maven/repository/Sample-Maven-Project/jars folder. This is how you publish artifacts as mentioned earlier in this section and is the basis for continuous integration.
| You can see all the goals of Maven by typing the command maven -g at the command line. |
Using Maven in J2EE Projects
In the previous section you saw how to use Maven to set up a project template, compile source files, create a jar and publish the artifact into the repository. There is much more to Maven than that. We will cover inheritance in Maven POM, setting up a Sample J2EE project, creating WARs, EJB-JARs, dependency jars and ultimately creating EARs. However let's first look at another important concept in Maven.
In Maven, a project can produce only one artifact. The top-level project can have multiple sub projects and they in turn can have siblings too. But at the end, each of them can only produce one artifact. This makes a lot of sense if you consider how the Ant scripts are used to create multiple artifacts from a project - which gets confusing over time - to say the least. Typically, projects have a monolithic (or maybe a couple) source tree(s), from which all the dependency jars, WARs and EARs are created using different build scripts. At the end, the message of application partitioning is lost and classes are created in different packages without consideration to the classloader mechanism, making it even harder to keep build scripts up to date. Maven discourages this practice at the outset. Of course Maven gives you flexibility to override this practice. There are ways to produce multiple artifacts but that goes against the very spirit of Maven and has to be avoided unless absolutely essential.
Customizing Maven with maven.xml
Until now you saw how to compile java classes in a maven project and create jar files out of it. What if you wanted to customize Maven behavior? You can create a file called maven.xml in the same folder where project.xml resides. In this file, you can customize goals, define and pre and post goals.
Listing 6 shows a sample maven.xml. We are achieving quite a bit in this file. Look at the default goal for the project. The default goal is set to foobar-dist. A goal is equivalent of an Ant target. The default goal is the same as the default target in Ant. What this means is that the default goal is executed when you go to the directory containing this file and simply type maven. The foobar-dist goal is simply a wrapper on top of another goal called war:install. The "install" goal in the war plugin creates a war and publishes it into the repository. The "attainGoal" instructs maven to achieve the goal described by the name attribute.
The preGoal element instructs Maven to execute the defined tasks in the preGoal before achieving the goal specified in its name attribute. This can get confusing at times. Note that the preGoal name (java:compile) is different from the default goal (foobar-dist). The default goal for this project installs a war file. However the war plugin has to compile the java files in the project before creating the actual WAR archive. The preGoal specified is linked to this java:compile goal rather than the foobar-dist goal. In this case, the pre goal executes a Xdoclet maven plug in. We will use Xdoclet Maven plugin later in this article to generate tlds (tag library definitions) from the actual tag classes.
A postGoal can be specified for any of the implicit goals achieved as part of the default goal or for the default goal itself. In Listing 6, a postGoal is specified for the war:war goal, which gets executed just before war:install goal. The postGoal specifies that a certain directory have to be created after the WAR is built. Notice the use of standard ant tasks within the postGoal. In fact any of the ant tasks can be embedded within the goal, preGoal or postGoal. This is what makes Maven flexible. It is also very easy to abuse this flexibility by compiling and creating multiple artifacts using Ant tasks within Maven. In other words, you would have written Ant scripts under the hoods of Maven. That practice is discouraged and should be used if there is no other option. If you find yourself repeating the steps of putting ant tasks into Maven goals, what you need is a custom plugin.
Listing 6 Sample maven.xml
<project default="foobar-dist" xmlns:m="jelly:maven">

    <preGoal name="java:compile">
        <attainGoal name="xdoclet:webdoclet"/>
    </preGoal>

    <goal name="foobar-dist">
        <attainGoal name="war:install" />
    </goal>

    <postGoal name="war:war">
      <mkdir dir="${test.result.dir}"/>
      <echo>Creating directories</echo>
        </postGoal>

</project>
A custom plugin is written in a file called plugin.jelly using the Jelly scripting language and bundled along with project.xml and other files into a jar and copied into the C:/Documents And Settings/<login-id>/.maven/plugins directory. This plugin is then available to all of your processes using Maven. We will customize the war plugin later in this article since it lacks some of the features we need.
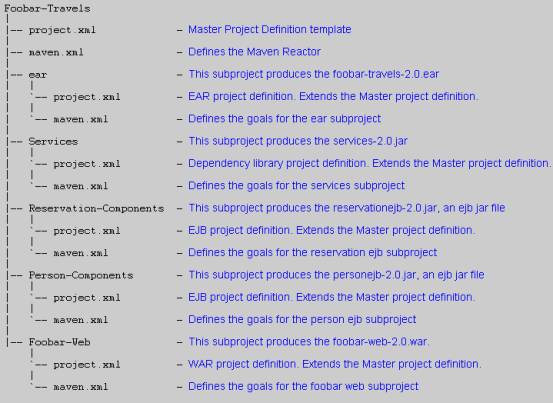
Figure 3 Inter-Project relationships for Foobar Travels
Let us now jump to applying Maven to J2EE projects. The most common J2EE artifact generated and deployed is the EAR. The EAR itself consists of dependency jars, ejb jars, wars and third party libraries. In other words, EAR is an aggregate artifact. For Foobar Travels, we will use the same project template as shown in Figure 2. Figure 3 shows the inter-project relationship and hierarchy. The master project template is defined at the top project level. A simplified master template is shown in Listing 7 only with the essential elements. A real one will have most of the items described in the section Maven basics. The key thing to note is that the dependencies are not declared in this template. This is because the master project.xml is just that - a template for other sub projects to extend. The only thing we have not touched upon from Listing 7 is the ${pom.artifactId}. I will explain this shortly in the context of extending the template. Figure 4 shows the structure of the EAR file generated by this project. You will find that the EAR content organization closely resembles the Maven project shown in Figure 3. In most of the J2EE project you would not deviate from a deployment artifact as in Figure 4. And when you stick to the usual route, Maven "out-of-the-box" build scripts work as is.
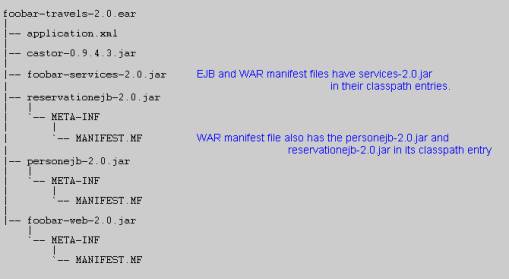
Figure 4 The EAR structure for Foobar Travels
Listing 7 Master Project Definition Template
<project>
    <pomVersion>3</pomVersion>
    <id>foobar-online</id>
    <groupId>Foobar-Travels</groupId>
    <currentVersion>2.0</currentVersion>
    <name>Foobar Online Project</name>
    <organization>
        <name>Foobar Travels</name>
    </organization>
    <package>foobar.*</package>
    <distributionDirectory>
    /foobar/dist/${pom.artifactId}/
    </distributionDirectory>
    <dependencies/>
    <build>
      <sourceDirectory>${basedir}/src/java</sourceDirectory>
      <resources/>
    </build>
</project>
To summarize Figure 4, we have to build the following artifacts from the project shown in Figure 3.
- foobar-services-2.0.jar - The dependency jar
- reservationejb-2.0.jar - The Reservation EJB and create its Manifest file with Manifest Class-path pointing to the services jar file.
- personejb-2.0.jar - The Person EJB and create its Manifest file with Manifest Class-path pointing to the services jar file.
- foobar-web-2.0.jar - The Web application for Foobar Travels and create its Manifest file with Manifest Class-path pointing to the personejb, reservationejb and service jars
- application.xml - the J2EE application deployment descriptor.
- Build the EAR by including all of the above artifacts and also including the castor jar file since the services jar depends on it at runtime.
Building the dependency jars
Listing 8 shows the project definition for Services - a subproject in Maven. This subproject creates the foobar-services-2.0.jar file - a dependency library used by both ejbs and the web tier. Note that the definition extends from the master template in Listing 7. By extending from the parent, it inherits all the properties. It defines the dependency elements to indicate the dependencies on the J2EE APIs (not defined in the parent) and overrides the id, name and description defined in the parent.
Listing 8 Services Sub-Project Definition
<project>
  <extend>${basedir}/../project.xml</extend>
  <id>foobar-services</id>
  <name>Foobar Services Framework</name>
  <package>foobar.service.*</package>
  <description>Services JAR project.</description>
  <dependencies>
        <dependency>
            <groupId>j2ee</groupId>
            <artifactId>j2ee</artifactId>
            <version>1.3.1</version>
        </dependency>
  </dependencies>
</project>
Now let us get back to the ${pom.artifactId} mentioned earlier (Listing 7). This lets you introduce polymorphism into Maven. At runtime, the value of ${pom.artifactId} for the Services sub-project is its id - foobar-services. Hence the value of the distribution directory for the Services project is /foobar/dist/foobar-services. In other words the pom can capture the variables and abstract them in a standard manner and establish a procedural approach instead of the chaotic one.
Now let us introduce you to the maven.xml for the Services Project. Technically speaking, maven.xml is not needed since you can always go to this sub project and execute maven jar:install. However as we will see later, having a maven.xml will help us eliminate manual execution of Maven from every sub-project. The maven.xml for the Services project looks as follows.
 <project default="foobar-dist" xmlns:m="jelly:maven">
         <goal name="foobar-dist">
            <attainGoal name="jar:install" />
         </goal>
     </project>
Building the EJB jars
After having built the dependency jars let us turn our focus to building the ejb jars. This is no different, since there is already a ejb plugin and you can use the ejb:install goal to create and publish the ejb jars. However we would also like to remind you that the ejb jar (loaded by the EJB class loader) depends on the Services built in the previous step (See Figure 4). What this means for you is that the ejb manifest classpath should point to the foobar-services-2.0 jar. Listing 9 shows the project.xml for the Reservation EJB jar. Other ejb project definitions are similar.
| NOTE: In the downloadable example supplied with this article, no EJBs are included. The reason is to have even non-ejb developers using Tomcat to see Maven in action. However this section describes what it takes to build EJBs with Maven. |
As usual the ejb project depends on the J2EE jars. However since it also depends on the foobar-services-2.0.jar (loaded by the EAR class loader), it has to add that jar file name to its manifest classpath. You can achieve this by setting the property ejb.manifest.classpath to be true. The Maven variable, pom.currentVersion stands for the current version of the project. In our case, it is 2.0. This setting indicates that the version of services project on which the ejb project depends is the same as the current version of the ejb project. This version is set on the parent project template. For future releases, the version number need not be changed for every dependency in every project. Just change it in the Master project template and it takes effect everywhere. Ah, the beauty of inheritance!
Listing 9 Reservation EJB Project Definition
<project>
  <extend>${basedir}/../project.xml</extend>
  <id>reservationejb</id>
  <name>Foobar Reservation Components</name>
  <package>foobar.reservation.*</package>
  <description>Reservation Components project</description>
  <dependencies>
    <dependency>
      <groupId>j2ee</groupId>
      <artifactId>j2ee</artifactId>
      <version>1.3</version>
    </dependency>
    <dependency>
      <groupId>Foobar-Travels</groupId>
      <artifactId>foobar-services</artifactId>
      <version>${pom.currentVersion}</version>
      <properties>
        <ejb.manifest.classpath>true</ejb.manifest.classpath>
      </properties>
    </dependency>
  </dependencies>
</project>
The discussion of building the ejb jars is incomplete without mentioning the maven.xml file. This file is not straight forward as in the services project. Listing 10 shows the maven.xml for the Reservation EJB project. There are a few things happening here. First, the foobar-dist goal is used as a wrapper for attaining the goal ejb:install. One of the first goals to be achieved during the install is init, when the file system and other resources are initialized and then the ejb classes are compiled. The compiler expects to find the home, local and remote interfaces, failing which it will throw a compiler error. This is where XDoclet comes into play.
Listing 10 maven.xml for the Reservation EJB Project
<project default="foobar-dist" xmlns:m="jelly:maven"
                                xmlns:ant="jelly:ant">
   <goal name="foobar-dist">
     <attainGoal name="ejb:install" />
   </goal>

   <preGoal name="ejb:init">
      <attainGoal name="xdoclet:ejbdoclet"/>
   </preGoal>

   <postGoal name="ejb:install">
      <ant:property name="maven.ejb.install.dir"
       value="${maven.repo.local}/${pom.artifactDirectory}/ejbs"/>
      <ant:mkdir dir="${maven.ejb.install.dir}"/>
      <ant:copy file="${maven.build.dir}/${maven.final.name}.jar"
            tofile="${maven.ejb.install.dir}/../
                     jars/${maven.final.name}.jar"/>
   </postGoal>
</project>
XDoclet is an open source project hosted on the SourceForge. By using EJB Doclet specific tags in the Bean class (the implementation class), you signal the XDoclet to generate the home, local and remote interfaces. You will also provide the jndi names, and other information using similar tags. On parsing the file, the XDoclet will also generate appropriate deployment descriptors. Now let us get back to see how it fits in here.
XDoclet provides Maven plugins for generating the above-mentioned artifacts. By specifying the ejbdoclet as the preGoal for ejb:init, you will generate home, local and remote interfaces and xml deployment descriptors just in time for the compilation.
Now let us look at the postGoal for ejb:install. As you know, the ejb:install generates the ejb jar as the artifact and puts it in the repository in the location "C:/Documents And Settings/<login-id>/.maven/repository/Foobar-Online/jars". Suppose that you want the ejbs to be in a separate directory called ejbs instead of the jars, you have to do it after the ejb:install is finished with its business. That's why it is a postGoal. For those familiar with Ant, the postGoal is nothing but a collection of Ant tasks. Again, a couple of Maven specific properties are used. Don't try to remember all of the Maven defined properties at once. Over time, these will become second nature.
You will notice there are two distinct categories of properties - those with their name beginning with pom and the rest of them. The properties with their names beginning with pom are the individual elements in the project.xml. For instance, the currentVersion element defined in project.xml has a property with the name pom.currentVersion and so on. The project.xml is loaded to create the POM model by Maven. POM model attribute values are evaluated by using the $ sign before the attribute names. As more plugins are added new properties emerge. This is going to be a challenge. You may not find adequate documentation of these properties. The only way to find out is by opening the scripts for each of these plugins in plugin.jelly file. Luckily there aren't very many properties that you will have to know.
In your project, if you find yourself writing the same pregoals and postgoals for every ejb subproject for example, it is time to roll your own plugin.
Building the WAR
After the ejb jar, it is wartime. We will accomplish quite a bit in this section. First we will introduce you to the project.xml. Then we will add a minor missing functionality into the war plugin. Then we will show you how to use XDoclet to generate tlds for a sample tag. Then we will end the section with maven.xml.
Listing 11 shows the project.xml for the Foobar web application. The actual project definition has much more dependencies and is downloadable. Here we are showing only the relevant portions to illustrate the concepts. The important part is the dependencies section. The web application depends on the J2EE APIs provided by the container at runtime as well as compile time. However there is no need to bundle the J2EE API with the WAR since it is the servlet container's responsibility. In addition the web application depends on Struts 1.1 jar file. The property setting <war.bundle>true</war.bundle> indicates that struts.jar has to be bundled with the WAR. Whenever the war plugin is instructed to bundle the jars, it puts them under the WEB-INF/lib directory of the WAR. Compare this to manually copying the jars into the WEB-INF/lib directory in Ant. The WAR also depends on the Foobar Services jar file, foobar-services-2.0.jar. However we do not want to copy this jar into the WEB-INF/lib since it is a dependency library and shared by both the web tier and the ejbs. (Recall that any jars and classes residing in WEB-INF/lib and WEB-INF/classes are loaded by the WAR class loader.) Hence we set the war.bundle property as false for foobar-services jar file. You get all this functionality out of the box with Maven war plugin.
Listing 11 maven.xml for the Web Project
<project>
  <extend>${basedir}/../project.xml</extend>
  <id>foobar-web</id>
  <name>Foobar web application</name>
  <package>foobar.webapp.*</package>
  <description>Foobar Web project.</description>

  <dependencies>
    <dependency>
      <groupId>j2ee</groupId>
      <artifactId>j2ee</artifactId>
      <version>1.3.1</version>
    </dependency>

    <dependency>
      <groupId>jakarta-struts</groupId>
      <artifactId>jakarta-struts</artifactId>
      <version>1.0.2</version>
      <properties>
  <war.bundle>true</war.bundle>
      </properties>
    </dependency>

    <dependency>
      <groupId>Foobar-Travels</groupId>
      <artifactId>foobar-services</artifactId>
      <version>${pom.currentVersion}</version>
      <properties>
         <war.bundle>false</war.bundle>
  <war.manifest.classpath>true</war.manifest.classpath>
      </properties>
    </dependency>
  </dependencies>
</project>
However the Maven war plugin lacks one feature. It does not have the capability to set the manifest classpath. Without this feature you cannot expect to use dependency libraries. Hence I decided to add this feature to the war plugin. Only two simple changes were required to achieve this. I decided to illustrate this change to show how intuitive and easy it is to write plugins in Jelly or customize the ones that already exist. Open the plugin.jelly for the war plugin from C:/Documents And Settings/<login-id>/.maven/plugins/maven-war-plugin-<version>-[SNAPSHOT]. These changes have to be done in the goal named war (The actual WAR - deployment archive, is built in a goal named as war in the war plugin). Add the following code in that goal.
<j:forEach var="dep" items="${pom.dependencies}">
  <j:if
   test="${dep.getProperty('war.manifest.classpath')=='true'}">
    <j:set var="maven.war.classpath"
           value="${maven.war.classpath} ${dep.artifact}"/>
  </j:if>
</j:forEach>
This code iterates over each of the dependencies listed in the project.xml (identified by pom.dependencies) and checks if the war.manifest.classpath property is set to true. If so, then it appends that artifact name to a property called maven.war.classpath.
The second change is needed when the manifest file is written out. The manifest file is created by the ant plugin by executing a goal named manifest. The manifest creation code is shown below. The line in bold is the line I inserted to set the manifest classpath attribute. This uses the previously set maven.war.classpath.
<ant:manifest>
  <ant:attribute name="Built-By" value="${user.name}" />
  <ant:attribute name="Class-Path" value="${maven.war.classpath}"/>
  <ant:section name="${pom.package}">
    <ant:attribute name="Specification-Title"
                   value="${pom.artifactId}" />
    <ant:attribute name="Specification-Version"
                   value="${pom.currentVersion}" />
    <ant:attribute name="Specification-Vendor"
                   value="${pom.organization.name}" />
  </ant:section>
</ant:manifest>
That was simple wasn't it! Hopefully this will inspire you to write your own plugins when needed, instead of repetitively adding tasks into preGoals and postGoals.
Now I will show you how to use the XDoclet plugin to generate the tld automatically. I will be using XDoclet version 1.2 Beta3. Consider the declaration in the tld file for a tag say MyTag.
<tag>
   <name>mystuff</name>
   <tag-class>foobar.webapp.MyTag</tag-class>
   <body-content>JSP</body-content>
   <attribute>
      <name>locale</name>
      <required>false</required>
      <rtexprvalue>false</rtexprvalue>
   </attribute>
</tag>
It is okay to have a readymade tld for frameworks such as Struts. However when you are developing your own tags either by customizing the existing tags or from scratch, it is natural that they change and evolve constantly during development. It can be time consuming to manually synchronize the tag code and its declaration in the tld. XDoclet is designed to ease such burdens. In the source code for the MyAppTag, add @jsp.tag name="myapptag" body-content="JSP" in its class comments section. For each of the tag attributes, add a @jsp.attribute on the getter method for that attribute. For instance, add @jsp.attribute required="false" rtexprvalue="false" to the comments on the getMyMessage method to represent that myMessage is a tag attribute. Next you invoke the webdoclet goal from the xdoclet plugin in maven.xml as shown in Listing 12. XDoclet also gives you provision to generate the web.xml too. Let us look at the maven.xml for the Web project in its entirety.
Listing 12 maven.xml for the Web Project
<project default="foobar-dist" xmlns:m="jelly:maven"
                                xmlns:ant="jelly:ant">
   <goal name="foobar-dist">
     <attainGoal name="war:install" />
   </goal>

   <preGoal name="war:init">
      <attainGoal name="xdoclet:webdoclet"/>
   </preGoal>

</project>
NOTE: You have to add the XDoclet web module in the dependency section for the project.xml as follows. <dependency>
<id>xdoclet+web-module</id>
<version>1.2b4</version>
</dependency>
In addition, override the following properties in the plugin.properties file for XDoclet under the Maven plugins folder maven.xdoclet.webdoclet.deploymentdescriptor.0=false
maven.xdoclet.webdoclet.jsptaglib.0.destDir=
${maven.build.dir}/${pom.artifactId}/WEB-INF/tld The first setting disables web.xml generation and the second setting sets the generated tld file location. In this article you will just be generating the tld file, but not generating the web.xml, nor the <taglib> entry for the tld file in web.xml. As a matter of fact, XDoclet does not seem to have the Maven equivalent for the following Ant script that adds the <taglib> to web.xml. <deploymentdescriptor servletspec="2.3" destdir="${WEBINF}" >
<taglib uri="myapptaglibs" location="WEB-INF/tld/myapp.tld" />
</deploymentdescriptor> Another thing that I noticed in the XDoclet plugin is that the file name for the tag library definitions (tld) has to be provided in plugin.properties as follows. maven.xdoclet.webdoclet.jsptaglib.0.filename=myapp.tld
Otherwise the tld file is generated with the default name of taglib.tld. This does not seem right. Instead it should be set in the build script. For instance, in Ant this is done as follows <jsptaglib jspversion="1.2" destdir="${WEBINF}/tld"
shortname="basic" filename="myapp.tld"/>
Ideally I would like to set this like this: <dependency>
<id>xdoclet+web-module</id>
<version>1.2b4</version>
<properties>
<jsptaglib.filename>myapp.tld</jsptaglib.filename>
</properties>
</dependency> This is not a Maven defect. It just is an example showing that it takes time for third party vendors to catch up. |
Building the EAR
Up until now you have seen how to create each of the individual artifacts that go into the EAR. Finally we have reached the last part - building the EAR itself. You might imagine that since the EAR is the only artifact from the project as a whole, it should be built from the project definition at the top of the hierarchy, i.e. the Foobar-Travels folder. However that is not the case. The EAR is built as an artifact from a subproject called ear (See Figure 3). Why this anomaly? First of all, the project.xml at the Foobar-Travels project level is a template for other subprojects to extend. If it were to specify the dependencies to build the EAR, then it would have resulted in a cyclic dependency - a chicken and egg situation - when the template is extended by other subprojects. If the template were to be defined elsewhere, probably at the organization level, then the project.xml in Foobar-Travels folder could have produced the EAR but then it would not be the template for the rest of the subprojects to extend.
Listing 13 shows the project.xml for the ear project. In the listing, you will not see every library on which the ear is dependent upon, just a few relevant ones that need some explanation.
Listing 13 project.xml for the ear project
01 <project>
02   <extend>${basedir}/../project.xml</extend>
03   <id>foobar-travels</id>
04   <name>Foobar EAR</name>
05   <description>Sample EAR project.</description>
06   <shortDescription>Foobar EAR project</shortDescription>
07   <dependencies>
08     <dependency>
09       <groupId>j2ee</groupId>
10       <artifactId>j2ee</artifactId>
11       <version>1.3.1</version>
12     </dependency>
13     <dependency>
14       <groupId>xerces</groupId>
15       <artifactId>xerces</artifactId>
16       <version>1.4.4</version>
17       <properties>
18          <ear.bundle>true</ear.bundle>
19       </properties>
20     </dependency>
21     <dependency>
22       <groupId>${pom.groupId}</groupId>
23       <artifactId>reservationejb</artifactId>
24       <version>${pom.currentVersion}</version>
25       <type>ejb</type>
26       <properties>
27          <ear.bundle>true</ear.bundle>
28       </properties>
29     </dependency>
30     <dependency>
31       <groupId>${pom.groupId}</groupId>
32       <artifactId>foobar-web</artifactId>
33       <version>${pom.currentVersion}</version>
34       <type>war</type>
35       <properties>
36          <ear.bundle>true</ear.bundle>
37          <ear.appxml.ear.context-root>
38               foobar-online
39          </ear.appxml.ear.context-root>
40       </properties>
41     </dependency>
42   </dependencies>
43 </project>
- Line 25 Type = ejb indicates that this is a ejb jar, This is set in application.xml
- Line 34 Type = war indicates that this is a war, This is set in application.xml
- Lines 37-39 Sets the context root for the web application, This is set in application.xml
The first dependency that you will find is on J2EE itself. This library is not bundled since the container at runtime provides it. The second dependency is on the xerces xml library - a representative of the dependency library (including our very own services jar). Libraries such as these may not be provided by the application server and have to be bundled with the ear. Then comes the ejb jar itself. The type=ejb sets the application.xml appropriately. Similarly, the web application is bundled by specifying the dependency and type=war. The above project definition automatically creates application.xml for the ear. By using ear:install as the goal, the ear is also copied into the maven repository. The generated application.xml is shown in Listing 14. Obviously, setting the type has had its effect. Also note the web application context-root setting. The short description from the project.xml is used as the display name for the EAR. When Maven starts the execution of project.xml for the EAR it sees the dependencies and then proceeds to create the artifacts for the dependencies before creating the EAR itself.
Listing 14 Generated application.xml
<application>
  <display-name>Foobar EAR project</display-name>
  <module>
    <java>xerces-logging-1.4.4.jar</java>
  </module>
  <module>
    <ejb>reservationejb-2.0.jar</ejb>
  </module>
  <module>
    <web>
      <web-uri>foobar-web-2.0.war</web-uri>
      <context-root>foobar-online</context-root>
    </web>
  </module>
</application>
We haven't looked at the maven.xml for the EAR project yet. It turns out to be quite trivial in that it just executes the ear:install goal.
<project default="foobar-dist">
    <goal name="foobar-dist">
       <attainGoal="ear:install"/>
    </goal>
</project>
Another file that you need to provide is project.properties. By default auto-generation of application.xml is turned off. To force auto-generation, you can set the property in project.properties as follows:
maven.ear.appxml.generate=true
and place the file in the ear folder under Foobar-Travels directory.
Using the reactor
We have covered all the files in building a J2EE project, except one. This file that we have been intentionally postponing till the end is the maven.xml that accompanies the master project template. In the last subsection on building EAR, I stated "When Maven starts the execution of project.xml for the EAR it sees the dependencies and then proceeds to create the artifacts for the dependencies before creating the EAR itself". I lied! This is not completely true. The project definition for EAR is just like any other project.xml. For every dependency stated in that file, it will search the maven repository for the appropriate jar file. What this means is that you will have to run maven individually from dependency library projects, ejb projects, web application projects and finally the ear project in that order to execute jar:install, ejb:install, war:install and ear:install respectively. Now, that can be too cumbersome if not impossible in a large project. Maven offers the reactor as a solution to this problem.
Reactor is a tool for executing dependent multi-project builds. Given a set of project.xmls, the reactor determines the correct order of execution based on the dependencies listed in the respective project.xmls. More news: The reactor can be declared using Jelly scripts in the maven.xml file itself. This is what we will have in the maven.xml accompanying the master project template. The maven.xml in the Foobar-Travels folder (See Figure 3) is shown in Listing 15.
Listing 15 maven.xml using the reactor
<project default="foobar-buildall" xmlns:m="jelly:maven">
<goal name="foobar-buildall">
    <m:reactor basedir="${basedir}"
               includes="*/project.xml"
               goals="foobar-dist"
               banner="Building"
               ignoreFailures="false"/>
</goal>
</project>
The foobar-buildall goal is written as a reactor. The script for foobar-buildall in Listing 15 translates to simple English as "Starting from the base directory from where maven is executed, go to every subfolder and execute the goal identified by foobar-dist in every project.xml and stop on failure". When you go to the base directory (Foobar-Travels) and type in the command maven (since foobar-buildall is the default goal), the reactor figures out the dependency by reading all the project.xmls in the subdirectories and creates the artifacts in the required order.
Conclusion
This article has explained how to use Maven effectively in a J2EE project instead of plain old Ant scripts and bring about some order and modularity to the otherwise chaotic world of build and deployment. Maven is something that you should consider when looking for options to build and deploy in your project. But I've have only scratched the surface of what constitutes Maven. I hope this article has given you the confidence to build your J2EE projects with Maven and sparked your curiosity to learn more about it.
About the Author
Srikanth Shenoy is a Technical Architect at Objectseek Inc. (http://www.objectseek.com). He specializes in the architecture, design, development, and deployment of large J2EE and EAI projects. He has helped clients in the manufacturing, logistics, and financial sectors to realize the Java's "write once, run anywhere" dream. He is a Sun Certified Enterprise Architect and co- author of the upcoming book Practical Guide to J2EE Web Projects. You can reach him at [email protected].
Resources
- Download the Accompanying Source Code for this article.
Dig Deeper on Core Java APIs and programming techniques
-
![]()
Flatpak vs. Snap: Why Snap is still relevant on servers
By: Joseph Ottinger
-
![]()
Master the fundamentals of the Apache Maven build tool for Java
By: Cameron McKenzie
-
![]()
Apache Struts 2.5 with no Struts config XML file example
By: Cameron McKenzie
-
![]()
What is Maven in Java? Crash course tutorial for beginners
By: Cameron McKenzie