Step-by-step Maven Tomcat WAR file deploy example
Automated deployment of WAR files to Tomcat with Maven is a surprisingly straightforward task. If you have Maven and Tomcat installed, use a Maven project object model (POM) to describe the structure of your web application and connect to Maven Central -- where you download the Maven-Tomcat plugin, a Maven Tomcat deploy is a straightforward affair. With access to the Maven-Tomcat plugin, a WAR file deployment simply involves a few XML file edits, followed by a Maven build command.
Maven Tomcat deploy example prerequisites
To follow along with this Maven Tomcat deployment tutorial, you need these three prerequisites:
- You must have JDK 1.8 or newer installed with JAVA_HOME
- You must have Maven installed and configured.
- You must have a Java-based web application that uses a POM file.
Confirm the prerequisites
If you need a POM-based Java web application to deploy to Tomcat with Maven, you can use Git to clone a simple rock-paper-scissors application from my GitHub repository:
git clone https://github.com/cameronmcnz/rock-paper-scissors.git
cd rock*
git checkout patch-1
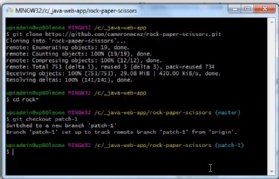
Take note of the command to switch to the patch-1 branch. The master branch will compile to an embedded JAR, which is not what we want here. Instead, we want the project to compile into a WAR file to deploy to Tomcat with Maven.
Step 1: Add a new user with deployment rights to Tomcat
To perform a Maven Tomcat deploy of a WAR file you must first set up a user in Tomcat with the appropriate rights. You can do this with an edit of the tomcat-users.xml file, which can be found in Tomcat's conf sub-directory. Add the following entry inside the tomcat-users tag:
<!-- User to deploy WAR file to Tomcat from Maven -->
<user username="war-deployer" password="maven-tomcat-plugin"
roles="manager-gui, manager-script, manager-jmx" />
Save the tomcat-users.xml file and restart the server to have the changes take effect.
Step 2: Tell Maven about the Tomcat deploy user
After you add the war-deployer user to Tomcat, register that user's name and password in Maven, along with a named reference to the server. The Maven-Tomcat plugin will use this information when it tries to connect to the application server. Edit the settings.xml file and add the following entry within the <server> tag to create the named reference to the server:
<!-- Configure the Tomcat Maven plugin user -->
<server>
<id>maven-tomcat-war-deployment-server></id>
<username>war-deployer</username>
<password>maven-tomcat-plugin</password>
</server>
Step 3: Register the tomcat7-maven-plugin in the POM
Now that Maven and Tomcat are configured, the next step is to edit the Java web application's POM file to reference the Tomcat Maven plugin. This plugin requires several pieces of information, including:
- the name of the server as it was configured in the Maven's settings.xml file;
- the URL of the Apache Tomcat Manager script processor; and
- the context root or path that the application will use as part of its URL.
You can convey this information when you add the following XML snippet within the POM file's <plugin> tag:
<!-- Configure the Tomcat Maven plugin -->
<plugin>
<groupId>org.apache.tomcat.maven</groupId>
<artifactId>tomcat7-maven-plugin</artifactId>
<version>2.0</version>
<configuration>
<url>http://localhost:8080/manager/text</url>
<path>/rps</path>
</configuration>
</plugin>
Step 4: Deploy WAR to Tomcat with Maven
The final step is to run a Maven build while you also invoke the deploy function of the Tomcat-Maven plugin, which you can do with the following command:
>> mvn install tomcat7:deploy
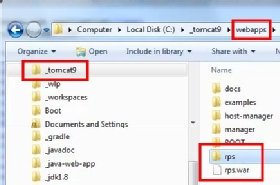
After the Maven install command is executed, you'll notice two very interesting things happened.
- A file named rps.war has been saved to Tomcat's webapps directory.
- The webapps folder has a new subdirectory named rps.
Step 5: Test the Maven-deployed WAR file on Tomcat
If Tomcat is started and the WAR file has been deployed to the webapps folder, you can test the Java web application in your browser. If your Apache Tomcat server runs on port 8080, the URL to access the application is:
http://localhost:8080/rps/index.html
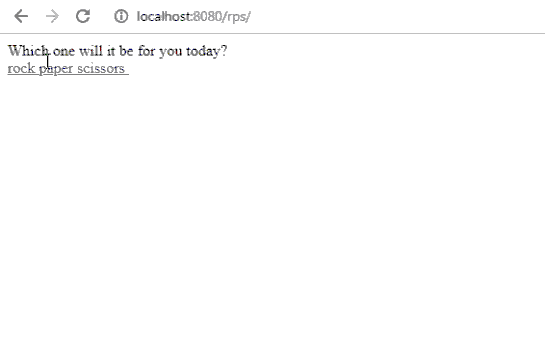 Playing the game deployed as a WAR to Tomcat with Maven
Notice how the URL includes the text string /rps/ as it was configured in the Tomcat Maven plugin.
Maven Tomcat WAR deploy summary
To recap, the five basic steps to successfully deploy a WAR file to Tomcat with Maven are:
- Add a user to Tomcat via the tomcat-users.xml file with WAR deployment rights.
- Configure Maven's settings.xml file.
- Configure the Tomcat Maven plugin in the application's POM.
- Run a Maven build with the tomcat7:deploy option.
- Test the WAR file deployment.
And that's how to deploy a WAR file to Tomcat with Maven.