Sergey Nivens - Fotolia
Spring MVC tutorial: How Spring Boot web MVC makes Java app development easy
Spring Boot has provided an opinionated approach to developing microservices. In this Spring MVC tutorial, we show how Spring Boot has changed Java web development as well.

There's a great deal of talk about how Spring Boot has simplified microservices development, but there's been relatively little talk about how it also makes the development of a Spring MVC application a decidedly simple endeavor.
In this Spring MVC tutorial, we will use the SpringSource Tool Suite to create a Spring Boot project with only three built-in Spring Boot facilities -- Thymeleaf, DevTools and Web support -- to build a simple Rock-Paper-Scissors application.
Flow of the Spring MVC example
The flow of the Spring MVC application is as follows:
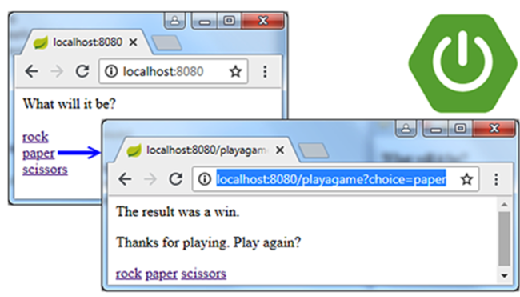
- The landing page, index.html, will ask the user to click on one of three anchor links -- namely rock, paper or scissors.
- The anchor link will trigger a Spring MVC web controller. The Spring MVC controller will process the input and evaluate if the user won, lost or tied. The server will always choose rock just to keep the logic simple.
- After the Spring MVC controller has processed the input, the outcome of the game is stored as a String in a Spring MVC model object. The Spring MVC model is then passed to the results.html page for view generation.
- The results.html page uses the Thymeleaf framework to read the outcome from the Spring MVC model and subsequently generate HTML for the user's request.
Spring MVC web development in Eclipse
The toughest part of putting together a Spring MVC application with Spring Boot is simply setting up the project. Eclipse provides a special Spring Boot Starter project, which we'll use to create a Spring MVC application from scratch:
File → New → Project → Spring Boot → Spring Starter Project
Spring Boot has provided an opinionated approach to developing microservices. In this Spring MVC tutorial, we'll show how Spring Boot has changed Java web development as well.
The Spring MVC Maven dependencies
Once we start the Spring Boot project wizard and provide the attributes for the project's Maven POM file, the wizard will let the user choose from a number of optional project dependencies. The only three dependencies needed for this Spring MVC example are Web, DevTools and Thymeleaf. Spring will add in a fourth Maven dependency, starter-testing, to encourage developers to perform Spring MVC testing as development proceeds.
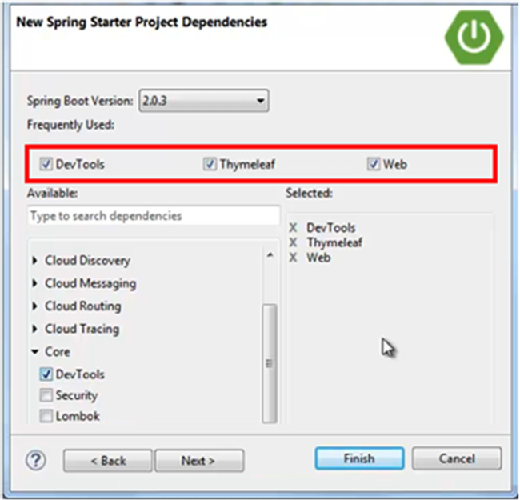
When you select the three Spring MVC Maven dependencies, click Finish on the Spring Boot wizard screen to create the project.
The Spring MVC Maven POM file
The auto-generated dependencies section of the Spring MVC Maven POM file looks as follows:
<dependency>
      <groupId>org.springframework.boot</groupId>
      <artifactId>spring-boot-starter-thymeleaf</artifactId>
</dependency>
      <dependency>
      <groupId>org.springframework.boot</groupId>
      <artifactId>spring-boot-starter-web</artifactId>
</dependency>
      <dependency>
      <groupId>org.springframework.boot</groupId>
      <artifactId>spring-boot-devtools</artifactId>
      <scope>runtime</scope>
</dependency>
<dependency>
      <groupId>org.springframework.boot</groupId>
      <artifactId>spring-boot-starter-test</artifactId>
      <scope>test</scope>
</dependency>
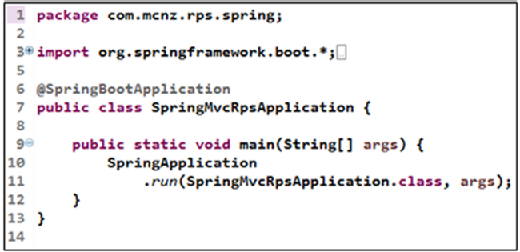
When the new Spring MVC project opens in Eclipse, look for a Java file under the src/main/java folder that is named after the project and is suffixed with the word Application. In the accompanied Spring MVC video tutorial, I've named the file SpringMvcRpsApplication.java.
Spring Boot MVC configurations
This file, decorated with the @SpringBootApplication annotation, is the heart of any Spring Boot project. Any subsequent configurations -- beans subject to Inversion of Control or components that you wish to make available for dependency injection in other parts of the program -- will be configured here. Fortunately though, Spring Boot MVC applications require very little configuration, so we won't have to add any new code to this file in this Spring MVC tutorial.
This Spring MVC tutorial only creates three new files:
- index.html
- WebController.java
- results.html
The index.html file simply provides three anchor links that point to a URI (Uniform Resource Identifier) on the server named playagame. Each link identifies itself to the server through a parameter named choice that takes on a value of rock, paper or scissors.
<html>
  <body>
    <p>What will it be?</p>
    <a href="/playagame?choice=rock">rock</a>
    <a href="/playagame?choice=paper">paper</a>
    <a href="/playagame?choice=scissors">scissors</a>
  </body>
</html>
Pay special attention to the href property of the anchor tag. It indicates that once it is clicked, a link named playagame will be invoked on the server, and a name-value pair associated with the parameter choice will be passed from the browser to the server.
Spring MVC controller example
The full code for the Spring MVC controller example is as follows. Take note of the @Controller decoration before the WebController class declaration. This Spring MVC annotation tells Spring Boot to use this component to handle web-based requests:

Remember how the anchor link in the index.html page linked to a resource named playagame? The @GetMapping annotation is what connects that anchor link to the playGame method of the WebController.
<a href="/playagame?choice=rock">rock</a>
Spring MVC annotations
Furthermore, the anchor link contains a parameter named choice. The value associated with this parameter is automatically assigned to the method argument named theChoice through the @RequestParam annotation.
@RequestParam(name="choice", required=false) String theChoice
The Spring MVC model
The objective of the playGame method is to figure out if the user has generated a win, loss or draw. A String variable named theOutcome is assigned a value of win, loss or tie by the program as it runs, and theOutcome is subsequently attached to the Spring MVC model class through the addAttribute method.
model.addAttribute("outcome", theOutcome);
At the conclusion of the Spring MVC controller example, a String named result is returned by the controller to the Spring MVC framework, which triggers the invocation of the results.html file for view generation.
The Spring MVC view component
For legacy Java developers, it may feel peculiar to forward to an HTML page rather than a Java Server Page (JSP), but it's all part of Spring Boot's opinionated approach to modern Java development. Spring Boot asserts that JavaServer has far too many shortcomings in web development, and Java developers should prefer HTML-based templating technology, like Thymeleaf, Groovy templates, FreeMarker or Mustache. In this example, we use Thymeleaf. The content of the results.jsp is as follows:
<html  xmlns:th="http://www.thymeleaf.org">
  <body>

    <p th:text="'The result was a ' + ${outcome} + '.'"/>

    <p>Thanks for playing. Play again?</p>

    <a href="/playagame?choice=rock">rock</a>
    <a href="/playagame?choice=paper">paper</a>
    <a href="/playagame?choice=scissors">scissors</a>

  </body>
</html>
The only minor imposition Thymeleaf makes on the HTML file is the addition of the XML namespace attribute and the use of Thymeleaf tag attributes. Fortunately, the Thymeleaf tag attributes are relatively easy to use, and the syntax for pulling the outcome variable out of the Spring MVC model class is just standard Spring Expression Language and makes the learning curve small. After developers work with Thymeleaf, they will quickly lose their longing for JSPs.
The complete Spring Boot MVC example
And that's it. We have a multipage application all within the confines of a Spring Boot project. When the user runs a Java web program as a Spring Boot application in Eclipse, a landing page will provide the links, and when the user clicks, they'll land on a results page that will indicate whether the user won, lost or tied the game.
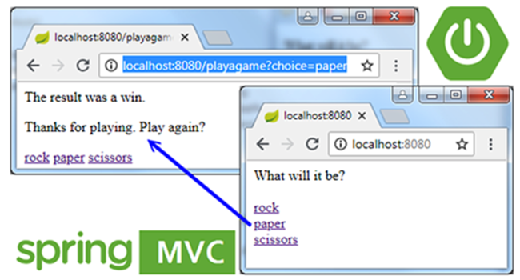
Microservices and Docker deployments tend to get all the attention when it comes to Spring Boot and cloud-native computing, but as this Spring MVC example demonstrates, Spring Boot has plenty to offer the Java web developer as well.
The full source code for this example can be found on GitHub.