How to test and deploy WARs with Tomcat and Eclipse
For Java developers, Eclipse is one of the most popular IDEs, and Apache Tomcat is a favorite application server. As a result, every developer should know how to integrate Tomcat and Eclipse and be able to quickly deploy WAR files from Eclipse to Tomcat.
For this Tomcat and Eclipse integration tutorial, let's assume that both have already been installed and appropriately configured. Since both tools run on Java, let's also assume that the JDK has been installed and JAVA_HOME has been configured.
Here is how to easily integrate Tomcat and Eclipse in five steps.
Create an Eclipse dynamic web project
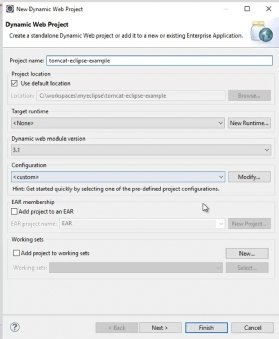
The first step to integrate Tomcat and Eclipse is to create a new dynamic web project with the following two properties configured:
- Name: tomcat-eclipse-example
- Dynamic web module version: 3.1
As part of this dynamic web project, create a new Java Server Page (JSP) named index.jsp.
Initially, the page will have an error message that indicates the superclass "javax.servlet.http.HttpServlet" was not found on the Java Build Path. You can ignore the message because when we integrate Tomcat with Eclipse, the HttpServlet class will become available and the error will go away.
Configure Tomcat as the Eclipse server
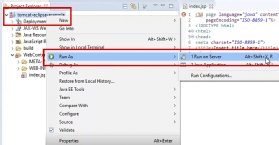
Step two is to right-click on the tomcat-eclipse-example web project and select "Run As > Run on Server."
Next, choose the version of Tomcat you use in the "Server type" selection list box that appears. I have Apache Tomcat v9 locally installed, so I clicked on that selection in this example. On the subsequent screen, select the location of the Tomcat installation and then click Finish.
Add the Tomcat libraries to Eclipse
With Tomcat and Eclipse now configured, you can inform your Java web application about the location of the Java libraries that include the missing HttpServlet class.
Add the Apache Tomcat server runtime as an optional library to the Java build path. This window appears when you right-click on the Java web project and select "Properties."
Run the Eclipse app on Tomcat
Finally, add some HTML that says, "Hello World" or prints out the current time in the JSP to make it more interesting, and then right-click on the index.jsp and choose the "Run As > Run on Server" option. The Tomcat server will start, an Eclipse WAR deployment will occur and the webpage will render on the embedded browser.

If a page comes up that says Hello World and the current date, you have successfully deployed a WAR file by integrating Eclipse and Tomcat.
How to deploy a WAR file to Tomcat with Eclipse
In summary, here are the five steps to follow to deploy a WAR file from Eclipse to Tomcat:
- Create a dynamic web project in Eclipse.
- Choose Apache Tomcat as the configured server for the web application.
- Add the Tomcat server libraries to the web project's Java build path.
- Code your JSP and then choose the Run As > Run on Server option.
- View your application in the embedded browser after the Eclipse Tomcat deploy of the WAR file proceeds successfully.
And that's all there is to integrate Apache Tomcat and Eclipse.