
chris - Fotolia
How to install the JDK on Windows and set up JAVA_HOME
You have options when it comes to JDK installations on Windows and Linux. Here are some helpful tips to ensure a proper install and why JAVA_HOME can be helpful.

There was once a time when a JDK install on Windows was a relatively simple affair. The process involved a JDK download from Oracle, a few clicks on the JDK installation wizard and a quick JAVA_HOME setup. Within minutes, you were done. Today, the JDK installation process on Windows 10 or Ubuntu Linux is a bit more involved.
The newfound complications on how to install the JDK stem from the fact that there are so many different Java distributions to choose from. Twenty years ago, if you wanted to install the JDK on Windows or Linux, you simply went to Sun Microsystems' Java page and downloaded the binaries. If you used WebSphere, you may have been one of the small group of developers who downloaded a JDK distribution from IBM. But, 20 years ago, those were pretty much your only two choices. The modern landscape of Java distributions is much more diverse.
How to choose which Java distribution to install
Oracle offers two distributions of the JDK. There is the GNU-licensed OpenJDK, which can be downloaded from jdk.java.net, and there is a commercial, non-open source build that can be found on the Oracle Technology Network.
Oracle recently changed its licensing model for long-term JDK support. In response, Amazon released Corretto, based on the OpenJDK, for which Amazon promises free long-term support.
One of the newest JDK distributions on the market is from AdoptOpenJDK. It provides reliable JDK binaries for a variety of platforms, which are all open-licensed and built from the OpenJDK project. Users who want reliable builds without any licensing hassles should consider this the JDK distribution of choice.
If you use any JBoss-related frameworks or tools -- such as Wildfly, Drools or Hibernate -- you should consider a Red Hat JDK installation. And, if exceptional scalability is part of your nonfunctional requirements, look into Azul's Zulu distribution.
But, the choice between which JDK distribution to install is only half the battle. After you make a decision on your distribution of choice, you'll still need to figure out which version of the JDK you want to use and also which JVM to include.
HotSpot vs. OpenJ9 vs. GraalVM
When you install the JDK from AdoptOpenJDK, you're not only asked which version of the Java runtime to install, but also which Java virtual machine (JVM). The two JVM choices are the HotSpot JVM from Oracle or the OpenJ9 JDK from IBM. However, there's actually a third, popular option called GraalVM. GraalVM can run a number of other LLVM-based languages, including C, C++, JavaScript, Python and Ruby.
So, yes, the Java landscape is much more complicated today than it was 20 years ago on how to install the JDK. It's a true testament to the ongoing popularity of the Java language.
Benefits of an OpenJDK installation on Windows
If you're a software developer interested in how to install the JDK on your local machine and don't have instructions on which Java distribution to install from someone in your company, here is a recommendation: Install OpenJDK, along with Oracle's HotSpot JVM, with the AdoptOpenJDK distribution.
All AdoptOpenJDK builds are based on stable OpenJDK builds. All components of the JDK install are open source-licensed. And you can choose which version of the JDK to install. You also get to pick between HotSpot and OpenJ9 as your JVM of choice. It's a viable option to choose if you don't have any specific requirements that push you into a different direction.
Follow these steps to successfully install Java with AdoptOpenJDK.
Steps to install OpenJDK 12 on Windows 10
Follow these steps to install OpenJDK on Windows 10 with the AdoptOpenJDK binaries:
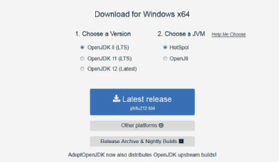
- Navigate to the AdoptOpenJDK download site, and choose which version and JVM you wish to install. For this example, we'll choose OpenJDK 12 and the HotSpot JVM.
- Using administrative rights, run the downloaded MSI file to bring up the JDK install wizard.
- In the JDK install wizard that appears:
- read and accept the license agreement;
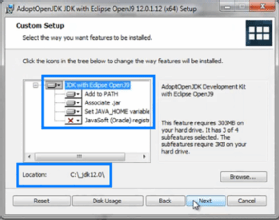
- choose the location to install the JDK -- in this example, we set C:\_jdk12.0 as the Java installation path;
- choose the custom options to set JAVA_HOME and to add the JDK to the PATH environment variable;
- click Next to get to the JDK install screen;
- click Install to kick off the process; and
- click Finish to close the JDK installation wizard.
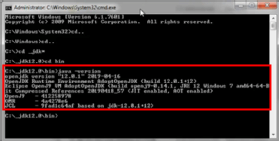
When this process is complete, you can open a new command window and run various Java command-line interface utilities to verify that the installation was successful. Use the java.exe utility with the -version switch to print out the version and distribution if the JDK install ran successfully.
How to set up the JAVA_HOME environment variable
One of the nice things about the AdoptOpenJDK installation wizard is that it both creates the JAVA_HOME environment variables and edits the Windows PATH. Not all distributions do this. Be aware that the wizard doesn't always set up environment variables successfully, so it's a good idea to validate that they are properly configured.
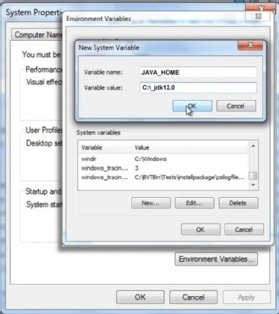
To configure the JAVA_HOME on Windows 10, simply open the Environment Variables editor, add a system variable named JAVA_HOME and associate it with the folder in which the JDK was installed.
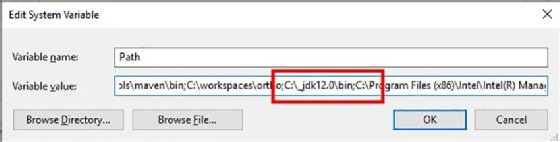
Windows 10 JDK PATH configuration
It would also be wise to add the \bin directory of the JDK install to the Windows 10 PATH variable. In doing so, the various JDK utilities found within the jdk\bin folder can be accessed by any locally installed program or locally run script.
Validate the JAVA_HOME setup
Regardless of whether you set up JAVA_HOME manually or through the installation process, it's important to verify that it was property configured. You should do this with the Java PATH setup as well.
One way to validate these variables is simply to echo their values with a command prompt. The call to echo %JAVA_HOME% should display the full path to the Java installation folder, while, on the echo %PATH% call, you should see the C:\_jdk1.2.0\bin included.
# validate that the JAVA_HOME environment variable was configured
echo %JAVA_HOME%
C:\_jdk12.0
# validate that the JDK is on the Windows PATH
echo %PATH%
C:\Windows\system32;C:\Windows;C:\Windows\System32\Wbem;C:\_jdk1.2.0\bin;C:\Windows\System32\WindowsPowerShell\v1.0\;
How to install the JDK on Linux
Just as there are many JDK distributions, there are also many distributions of Linux. For this reason, it's difficult to provide a single answer on how to install the JDK on Linux. But, for simplicity's sake, let's look at a JDK installation on Ubuntu.
If you use the latest version of Ubuntu, the easiest way to install the JDK is to run the following two commands:
# install the default JDK on Linux
$sudo apt update
$sudo apt install default-jre
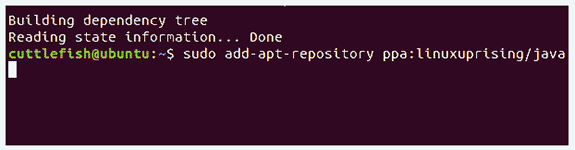
With older versions of Ubuntu, you will need to explicitly add the Java 12 repository and then perform an apt install with the Java 12 installer. The commands are as follows:
# install the JKDK 12 on Linux
$sudo add-apt-repository ppa:linuxuprising/java
$sudo apt install oracle-java12-installer
When these commands complete, you will be able to run the java -version utility in the Linux terminal and verify that you successfully learned how to install JDK 12 on Windows 10 and Ubuntu Linux.