How to delete a GitHub repository example

GitHub repo delete tutorial
After the software development process ends and an application needs to be decommissioned, developers may find themselves in a situation where they need to delete a GitHub repository.
Repository deletion isn’t an onerous task, but GitHub does make developers jump through a minor hoop or two to accomplish it. After all, it shouldn’t be so easy to delete a GitHub repository that it can happen accidentally. But it’s not that difficult either. Just be sure that if a developer wants to delete a GitHub repo that they’re prepared to enter the Danger Zone.
Steps to delete a GitHub repository
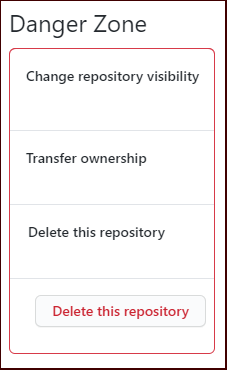
The section to delete a GitHub repo is literally called the Danger Zone
Here are the eight required steps that developers must follow to delete a GitHub repository:
- Ensure you have logged into the GitHub admin console
- Navigate to the Repositories tag
- Select the repository you wish to delete
- Click on the Settings tab
- Move down to the Danger Zone section page
- Click the Delete this repository option
- Type in the name of the repository in the challenge box
- Click the Delete button
Post deleted GitHub repository tasks
When a developer deletes a GitHub repository through the Admin console, it doesn’t serve as a Git clean up on any of the developer or DevOps professional’s machines.
However, any attempts to push or pull to the GitHub repository URL of the deleted repo will fail with a ‘repository not found’ error. If a developer wants to delete a user’s instance of a GitHub repository, it would require a manual deletion of all the associated files and folders on a user’s physical machine as well.
| Git, GitHub & GitHub Copilot Certification Made Easy |
|---|
| Want to get certified on the most popular AI, ML & DevOps technologies of the day? These five resources will help you get GitHub certified in a hurry.
Get certified in the latest AI, ML and DevOps technologies. Advance your career today. |