How to squash git commits by example

When your git commit history gets long in the tooth, and you want to clean up your feature and topic branches before the merge to master, you’ll need the facilities of the Git squash commit feature.
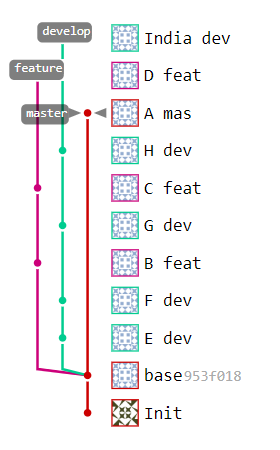
This git squash commits example begins with three active branches.
In this example of how to squash git commits, the repository I’m using has three Git Flow compatible branches:
- master with one unmerged commit
- develop with five unmerged commits
- feature with three unmerged commits
Through the use of Git’s interactive rebase feature, I will squash both the develop and feature branches down to one commit. A post-squash merge will then bring both develop and feature branches into master.
Git’s squash commits command
There is no explicit Git squash command. Instead, to squash git commits, the interactive git rebase is used.
To squash all commits on a single branch, the interactive git rebase command must be passed one of two arguments:
- the id of the commit from which the branch split from its parent
- the number of commits on the branch using a HEAD~ syntax
If there are a large number of commits on a branch, use of the id of the commit where the branch started is likely the smart approach. For smaller branches, stating the number of commits to be squashed makes more sense.
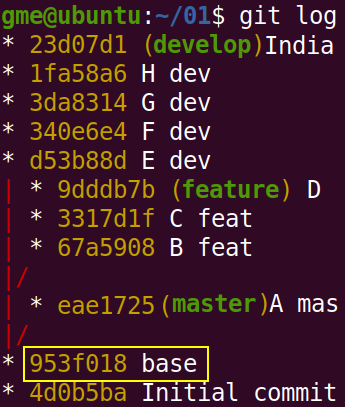
The base commit with an id of 953f018 is the parent of all three branches.
Git squash with a commit id
Make sure you have checked out the correct branch before performing the Git squash operation. Then issue a git rebase -interactive command and reference the id of the commit from where the branch spawned, which in this case is 953f018:
git checkout develop
git rebase --interactive 953f018
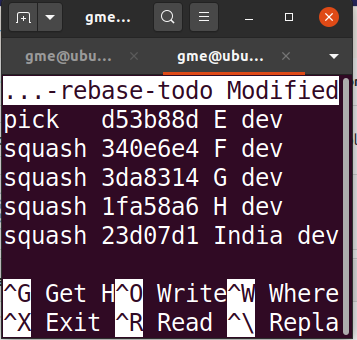
The interactive rebase tool in Ubuntu’s Nano editor
The last command opens the interactive Git rebase tool which lists all of the commits in the branch. You must type the word pick next to the commit you want all others to be squashed into. Then type ‘squash’, or just the letter ‘s’, next to each commit to squash.
It’s worth noting that commits in the interactive Git rebase tool are listed in the reverse order compared to the git log graph tool. The newest commit is at the start of the interactive rebase, while the git log lists the oldest commit first. This tends to be a source of ongoing confusion with developers learning how to squash Git commits.
When the commits to git squash have been chosen, save your changes and exit the interactive rebase tool. Enter E’ as the commit message. After fighting with the Nano editor in Ubuntu to accomplish these tasks, my new commit history looks as follows:

All commits on the develop branch are squashed.
Git squash commits with HEAD
There are only three commits on the feature branch, so it makes sense to use the HEAD syntax to squash git commits in this scenario:
git checkout feature
git rebase --interactive HEAD~3
When the second interactive rebase is complete, there is only one active commit on each of the three branches.
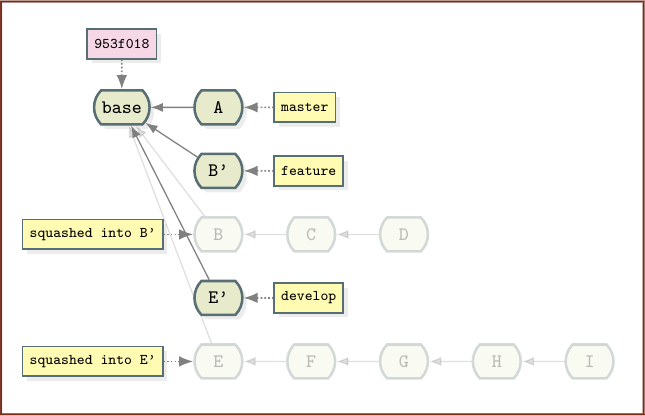
All of the branch’s git commits squashed into one.
Git squash and merge
With the branches all tidied up, you can now switch to the master branch and merge.
git checkout master
git merge develop
git merge feature
The end result is a very handsome commit history you can push to GitLab or GitHub servers with pride. It’s never a bad idea to clean up Git branches and commits.
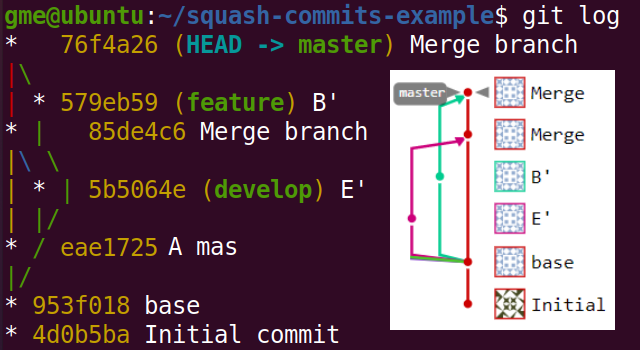
When you squash git commits your history looks much cleaner.
 Cameron McKenzie is an AWS Certified AI Practitioner, Machine Learning Engineer, Solutions Architect and author of many popular books in the software development and Cloud Computing space. His growing YouTube channel training devs in Java, Spring, AI and ML has well over 30,000 subscribers.