Create your first RPA robot in UiPath Orchestrator

The whole point of application development with UiPath Studio is to create programs that do robotic process automation. But those programs must make their way to an orchestration tool in order for their robotic potential to be realized. And that’s where UiPath Orchestrator comes in.
UiPath robots
Within UiPath Orchestrator, robots are created and configured. Once configured, they can then run the programs, instructions or scripts created for them in either an attended or unattended manner. In this tutorial, we will look at how to create unattended RPA robots in UiPath Orchestrator capable of running a Hello World application created for them in UiPath Studio.
| A strategy to Learn UiPath Orchestrator |
|---|
| There are five phases involved in order to create, deploy and manage RPA robots at runtime:
This UiPath Orchestrator tutorial focuses on how to create UiPath Orchestrator robot, which is the the second of the aforementioned five. |
How to create a UiPath Orchestrator robot
Follow these steps to create an unattended, UiPath Orchestrator robot:
- Log into the UiPath Orchestrator administrative console
- Switch from the Modern Folder layout to the Classic Folder layout
- Under the Management tab choose Robots
- Click the plus button on the top right hand side of the page and create a Standard Robot
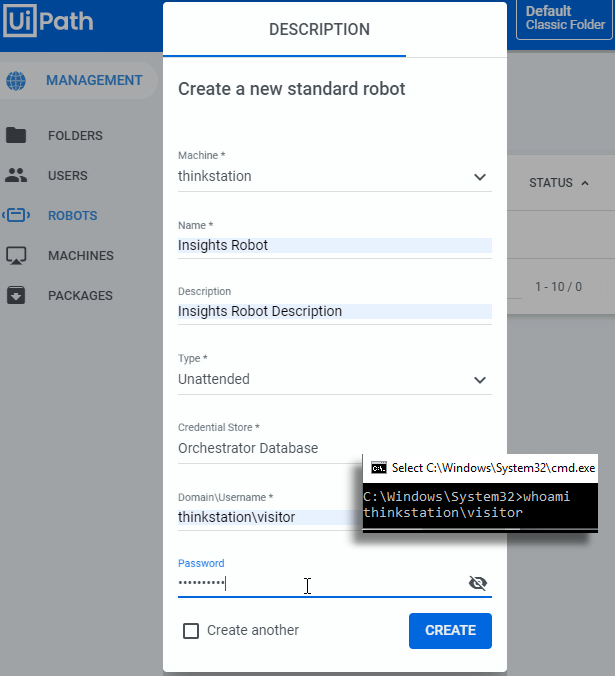
- Set the following properties of the robot:
- Set the Machine name to the hostname of your local machine and accept the option to provision the resource
- Provide a name for the robot. In this UiPath Orchestrator robot tutorial I have chosen Insights Robot
- Provide an optional description
- Choose Unattended as the type
- Set the Domain\username value to the result of a whoami call in the command prompt. In this example I have used thinkstation\visitor, as the desktop computer I use is named thinkstation, and the account I have logged in with is named visitor
- Set the password to that of the user account on your Windows machine that matches then username part of the whoami call from the previous step.
- To provision the new, unattended, UiPath Orchestrator robot click Create
- On the same screen, click on the Environments tab at the top of the page
- Click the plus button at the top right of the screen to create a new environment
- Provide a name for the environment and click Create. I named mine Insights Environment.
- In the window that follows, select the checkbox next to the UiPath Orchestrator robot you created and click update to close the window
Ensure the classic folder option is selected when you create an unattended robot in UiPath Orchestrator.
Post RPA robot creation steps
Keep in mind that the creation of an unattended UiPath Orchestrator robot is only one step in the overall process of RPA code deployment. The previous steps is to create the RPA program itself. The following steps are to deploy the RPA application to the cloud and associate the application and the robot through a manageable process. But with the UiPath Orchestrator robot created, you are well on your way to deploying and managing the runtime of an automated robotic process.