How to publish to UiPath Orchestrator example

UiPath Orchestrator runs in the cloud. UiPath Studio runs on a developer’s desktop or laptop. And RPA robots typically run on a physical desktop computer as well. Which means a piece of software must reside on the machine where RPA robots run so that instructions and feedback can be marshaled back and forth between the local desktop and the cloud based service. That is the role the UiPath Assistant plays in the architecture of robotic process automation.
| UiPath Learning Roadmap |
|---|
| There are five steps to creating, deploying and managing RPA robots at runtime. This UiPath Orchestrator tutorial focuses on the third of the following five parts:
This UiPath Orchestrator tutorial focuses on the first of these five skills. |
How to configure UiPath Assistant
The UiPath Assistant requires two pieces of information to marshal information back and forth to the cloud based UiPath Orchestrator:
- The URL of the cloud based service
- The 32 digit hexadecimal machine key
The URL is simply the path to your cloud hosted UiPath Orchestrator administrative console. Currently it is the text that precedes the word orchestrator_ in administrative console’s URL, although the structure of the URL is likely to change at any time.
The machine key is obtained by clicking on the Machines link under the management tab and selecting the configured machine that represents the desktop or laptop on which you are working. This machine was created automatically in the previous tutorial when the UiPath Orchestrator robot was created. If one is not already created, you will need to create a machine manually.

The UiPath assistant needs the administrative base URL and the machine key to connect to UiPath Orchestrator.
Publish to UiPath Orchestrator from Studio
After the UiPath Assistant is configured with the machine code and Orchestrator URL, click the connect button and wait for a green light icon to indicate a successful connection.
With the UiPath Assistant operational, the Publish button in UiPath Studio can be used to push RPA projects and applications from the development machine to the cloud. Studio projects sucessfully published to UiPath Orchestrator will be listed under the Packages subheading under the administrative console’s Management link.
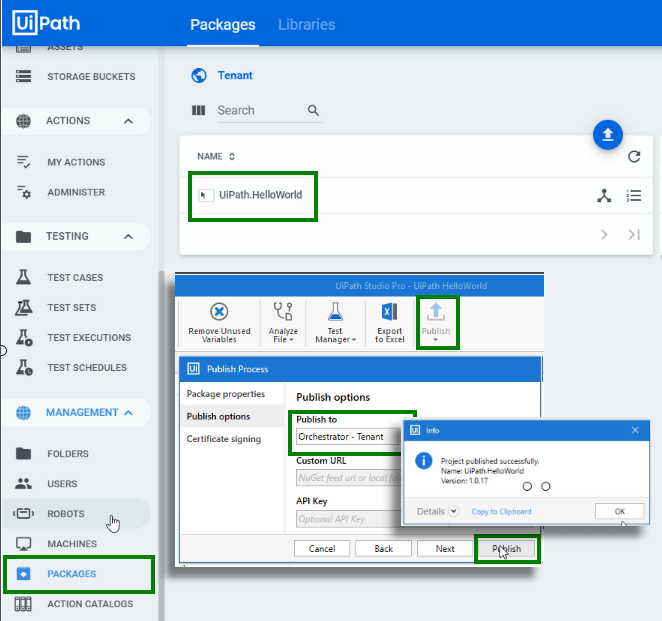
A project you publish from Studio to UiPath Orchestrator gets listed as an installed package.
Post publishing to UiPath Orchestrator steps
Steps to publish to UiPath Orchestrator
In review, the steps to publish Studio projects to UiPath Orchestrator are:
- Open UiPath Assistant on the machine with UiPath Studio installed
- Open the Orchestration Configuration page of UiPath Assistant
- Provide the UiPath Orchestrator URL and Machine Key
- Click the Connect button and wait for the status indicator to go green
- Click the Publish button of your project in UiPath Studio
- Choose the Orchestrator Tenant as the publishing target
- Open UiPath Orchestrator and verify the published UiPath Studio project is listed in the packages section
With the ability to successfully publish to UiPath Orchestrator from Studio confirmed, and a robot configured, the last step in running your automated robot is creating a UiPath process and scheduling a trigger.
 Cameron McKenzie is an AWS Certified AI Practitioner, Machine Learning Engineer, Solutions Architect and author of many popular books in the software development and Cloud Computing space. His growing YouTube channel training devs in Java, Spring, AI and ML has well over 30,000 subscribers.