Quickly generate, add and setup GitLab SSH Keys

The Secure Socket Shell (SSH) is the preferred connection mechanism, especially when compared to HTTPS, to connect from Git to a remote server such as GitLab, GitHub or BitBucket.
In this GitLab SSH Keys tutorial, we show you how to configure SSH keys to securely connect your local Git instance with your remote GitLab repositories.
How to setup GitLab SSH keys
To setup and configure GitLab SSH keys for secure Git fetch, pull, push and clone operations, follow these steps:
- Generate a GitLab SSH key pair on your personal computer.
- Copy the value of the public SSH key.
- Log into GitLab and navigate to your account’s Preferences tab.
- Click the ‘Add new key’ button in the SSH Keys tab.
- Paste the public key in as the value and set an expiration date.
- Copy the SSH URL of the GitLab repo you wish to clone.
- Issue a git clone command with the SSH URL.
How to generate GitLab SSH keys
Both Ubuntu and Windows machines have built-in SSH support through the inclusion of the ssh-keygen tool.
Updated versions of Windows 10 and Windows Server have built-in support since 2018, so there is no need to download Putty, PuttyGen or Plink to create RAS keys or to SSH in to GitLab.
| Git, GitHub & GitHub Copilot Certification Made Easy |
|---|
| Want to get certified on the most popular AI, ML & DevOps technologies of the day? These five resources will help you get GitHub certified in a hurry.
Get certified in the latest AI, ML and DevOps technologies. Advance your career today. |
Just open PowerShell in Windows or a Linux terminal window on Ubuntu and issue the following command:
C:\gitlab\ssh\example> ssh-keygen -o -t rsa -C "[email protected]"
The options provided to the ssh-keygen command force the tool to create an RSA-compatible key using the latest OpenSSL standards. The -C switch simply adds a comment to the end of the public file.
When you’re prompted for a passphrase or a special storage location, accept all the defaults.
By default, all GitLab SSH keys must go in an .ssh folder under the user’s home directory. Furthermore, a blank passphrase is acceptable unless your organization’s compliance rules state otherwise.
This operation creates Git SSH keys named id_ras.pub and id_rsa respectively.
Copy the public GitLab SSH key
You must configure the value of the public key for Git in GitLab. Open the public key in a text editor and copy the value to the clipboard:
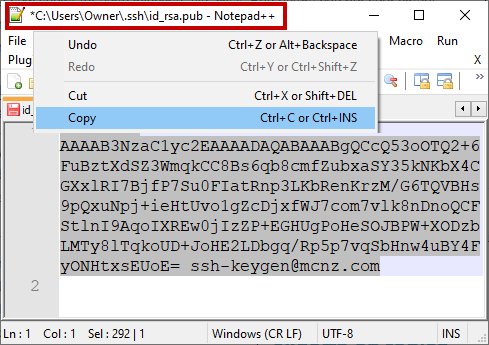
Copy the .pub key produced from the GitLab SSH key generation operation and configure it into GitLab.
Add your SSH Key to GitLab
Log into GitLab and click on your account preferences.
Click the SSH Keys link and paste the copied value into the text field.
Set an expiration date, and then click the blue button to persistently add the GitLab SSH key.
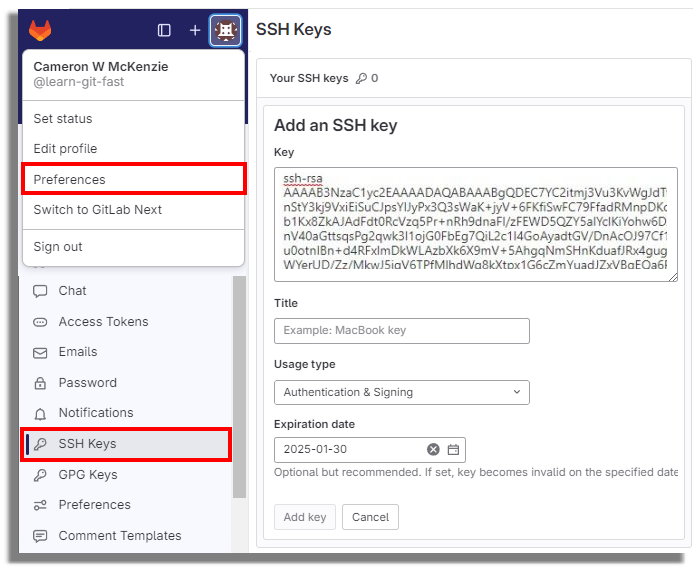
GitLab SSH keys are configured under your account preferences.
Clone GitLab with SSH
With the SSH key configured in GitLab, you can now perform regular Git operations such as clone, push, pull and fetch over SSH. Simply clone your repository of choice with the SSH URL, which is found on the landing page of your GitLab project. My GitLab SSH URL is structured as follows:
[email protected]:cameronmcnz/five-commits.git
Now that you’ve configured GitLab SSH and copied the SSH URL, issue a clone command in PowerShell. The GitLab SSH clone operation asks you to confirm the authenticity of the keys being used. Type in yes and allow the operation to continue.
PS C:\gitlab\ssh\example> git clone [email protected]:cameronmcnz/five-commits.git
Cloning into ‘five-commits’ from GitLab over SSH…
Authenticity of GitLab SSH Key can’t be established.
Do you still want to connect to GitLab over SSH (yes or no)? yes
Clone from GitLab over SSH: 100% (222/222), 2.23 MiB | 3.41 MiB/s, done.
Resolving deltas from GitLab over SSH: 100% (111/111), done.
Pull and push to GitLab over SSH
Once the clone operation is successful, continue to use Git as you normally would. All future pull and push operations to GitLab will happen over a secure SSH connection.
And that’s how easy it is to configure GitLab SSH keys to ensure all distributed Git operations occur over a secure channel.
Check out this Git and GitLab tutorial for beginners to learn more.

Cameron McKenzie is an AWS Certified AI Practitioner, Machine Learning Engineer, Solutions Architect and author of many popular books in the software development and Cloud Computing space. His growing YouTube channel training devs in Java, Spring, AI and ML has well over 30,000 subscribers.
| Jira, Scrum & AI Certification |
|---|
| Want to get certified on the most popular software development technologies of the day? These resources will help you get Jira certified, Scrum certified and even AI Practitioner certified so your resume really stands out..
You can even get certified in the latest AI, ML and DevOps technologies. Advance your career today. |