Full Git and GitLab tutorial for beginners
Git isn't hard to learn, and when you combine Git with GitLab, you've made it a whole lot easier to share code and manage a common Git commit history with the rest of your team. This tutorial shows you how it's done.
How to learn Git and GitLab
While it takes time to fully master a DevOps tool such as Git, any developer who follows this 10-step Git and GitLab tutorial will become competent with these popular DevOps and CI/CD tools very quickly.
The 10 steps to follow to learn Git and GitLab fast are as follows:
- Install Git and create a GitLab account.
- Create a Git repository in GitLab.
- Add files and commits to your GitLab repo.
- Create new Git branches.
- Toggle between branches in GitLab.
- Create a GitLab merge request.
- Approve a GitLab merge request.
- Clone the remote GitLab repo locally.
- Use the most important Git commands locally.
- Push your local changes back to GitLab.
Step 1: Install Git and create a GitLab account
To get started with Git and GitLab, you must first install Git locally and register for a GitLab account.
The Git installation on Windows is straightforward. Simply download and run the installer, accept all the defaults and Git will be installed, along with the Git Bash and Git GUI tools.
To register for a GitLab account, all you need to do is create a unique username, set your credentials and validate your email address. Once that's complete, you can move onto Step 2 of this Git and GitLab tutorial.
Step 2: Create a repository in GitLab
When you log in to GitLab for the first time, you are asked to create a project.
Choose this option to create a new, blank Git repository on the GitLab server.
Teams of developers use a Git repository to perform the following tasks:
- Track their files and their commit histories.
- Create branches and issue merge requests.
- Share code and collaborate with others.
When the form to create a project appears, simply provide a name for the project and set the GitLab repo's visibility to public.
Accept all the other defaults and submit the form to create your first GitLab repository.

Step 3: Add files and create commits online
The landing page for your new repository has a button with a plus sign on it. Click this button to create a new file.
When you save the file, you will be forced to provide a commit message. With each save, you add to your Git commit history.
Add three new files with the following names and Git commit messages:
- alpha.txt – First Git commit
- bravo.txt – Second Git commit
- charlie.txt – Third Git commit
Once added, the three files and their commit messages display on your GitLab repository's homepage. You can click on them to view their content or perform further edits.

Step 4: Create Git branches and add files
Note that you are currently on a branch called main.
Using the same plus button as you did in Step 3, create a new branch named dev.
Add another file named devo.txt and use 'Fourth Git commit' for the message.
This new file will be added to the dev branch. It will not be visible on the main branch.
Step 5: Navigate between Git branches
Use the drop-down box to toggle between the dev and the main branch.
Notice how the devo.txt file is on the dev branch, but it is not on the main branch.
Git branches allow developers to do isolated development separately and independently of the work of other developers. This encourages creativity, experimentation and chance-taking.
If an experiment doesn't work, the branch can be deleted. If the creative endeavor is a success, the new branch can be merged into the main branch for others to see.

Step 6: Create a GitLab merge request
To bring the dev and main branches in sync, click the blue Create merge request button at the top of the screen.
Fill out the title and the description and submit the merge request form.

Step 7: Accept a merge request in GitLab
When you open the GitLab navigation bar on the left, you will see a new Merge request listed.
Click the Merge requests link and then Approve to approve it. If you like Devo, give it a thumbs-up as well.
Leave the "'Delete source branch" option selected and click Merge.
When you return to the homepage of your repository, notice that the devo.txt file is in the main branch, and the dev branch is deleted.

Step 8: Clone the GitLab repository
A clone of a GitLab repository brings all the files and branches on the server down to the developer's local machine.
Most Git operations happen locally, in tandem with local software development.
Find the GitLab URL
Click the blue Code button on the repository's GitLab page and copy the HTTPS GitLab URL.
Then open Git Bash in the folder where you want to store the folders and files for this repository and issue the git clone command:
git clone https://gitlab.com/learn-git-fast/gitlab-tutorial.git
After the clone command completes, you can find all the files in your Git repository under a subdirectory with the same name as your GitLab project.

Step 9: Perform standard Git operations
With the GitLab repository cloned locally, you can add files, edit files, delete files and play around with various Git porcelain commands including the following:
- git add to add a file to the staging index.
- git commit to snapshot your local file system.
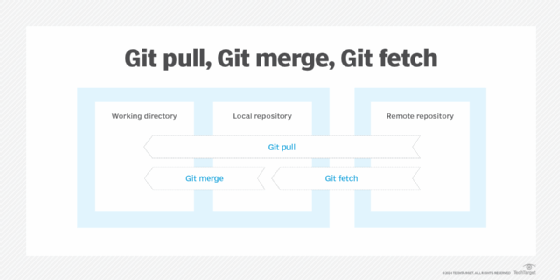
- git pull to get updates from GitLab.
- git fetch to update your remote tracking branches.
- git merge to combine branches together locally.
- git rebase to simplify your Git commit history.
- git log a dog to graphically view the commit history.
- git commit --amend to change the last Git commit message.
- git revert to undo a commit.
- git switch or checkout to move between branches.
Step 10: Push your changes back to GitLab
When you are done with local development, you can push your updated set of local commits back to the server with a push command:
git push origin
The first time you push using HTTPS, make sure you are logged into GitLab on your default web browser. You must be authenticated to push changes into a GitLab repository.
GitLab authentication troubleshooting
On a Windows machine, GitLab will try to validate your credentials using OAuth to log you in to the server.
If the git push attempt results in a 403 error, you might need to obtain a GitLab personal access token and authenticate with that.
If authentication continues to be an issue, you could alternatively create SSH keys for GitLab and authenticate over secure shell.
GitLab is a full-featured and powerful CI/CD platform built around the popular Git tool. Learning how to use Git with GitLab is the first step to take advantage of GitLab's many features.
Cameron McKenzie has been a Java EE software engineer for 20 years. His current specialties include Agile development, DevOps and container-based technologies such as Docker, Swarm and Kubernetes.