
Getty Images/iStockphoto
How to set JAVA_HOME in Windows
How do programs that need Java find it on your operating system? They search for JAVA_HOME. Here's how to set it up on your Windows machine.

For Java-based programs such as Maven, Jenkins, Gradle or Tomcat to run, they need to know that Java's JDK is installed. That's the purpose of the JAVA_HOME environment variable. It tells programs where to find the Java installation.
3 ways to set JAVA_HOME on Windows
You can set JAVA_HOME on Windows in one of three ways:
- Allow the Java installer to do it.
- Use the environment variable editor.
- Set JAVA_HOME at the command line.
Automatically set JAVA_HOME
Java installers have come a long way over the years.
In the past to install Java one had to download ZIP files, with manual extractions and extensive configuration. Today, you can download an installer that not only installs Java but also configures the PATH and JAVA_HOME environment variables.
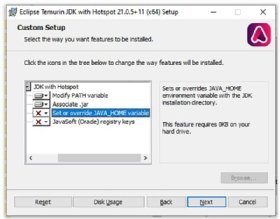
For example, with the Eclipse Temurin version of the JDK, setting JAVA_HOME is simply a matter of choosing the option to set or override the JAVA_HOME variable on the third step of the installer.
How to set JAVA_HOME through Windows
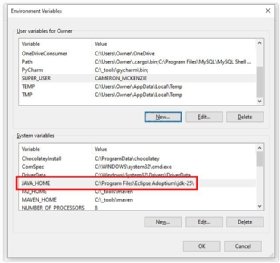
If you choose to install Java manually or you want to update the JAVA_HOME environment variable on Windows, the easiest route is to use the Windows environment variables editor. To do so, follow these steps:
- Open the Windows System Properties window.
- Choose Advanced System settings.
- Click on the Environment Variables button.
- Click on the New button under System Variables.
- Set JAVA_HOME as the environment variable name.
- Set the location of the JDK installation as the environment variable Value.
- Click OK and close the JAVA_HOME environment variable editor.
Remember that JAVA_HOME points to the root folder into which the JDK was installed. Do not point JAVA_HOME to the \bin directory of the install. The PATH variable points to \bin, while JAVA_HOME points to the root folder into which the JDK was installed.
How to set JAVA_HOME at the command line
For those who prefer to use the command line, you can easily set JAVA_HOME on Windows with any terminal window, be it PowerShell, the Command Prompt or even Git's Bash shell.
The following command permanently points JAVA_HOME to the location you set:
setx JAVA_HOME -m "C:\_jdk25.0"
The option to manually set JAVA_HOME through the command line is especially useful if you need to quickly update JAVA_HOME to point to a newer installation of the JDK, or if you need to regularly switch between Java versions.
How to echo JAVA_HOME in Windows
After you set JAVA_HOME in Windows, it's a good idea to verify the change has persisted. The easiest way to do this is to echo JAVA_HOME in a command prompt or a Bash shell.
To echo JAVA_HOME in a DOS prompt, simply bookend the variable with percentage signs, like so:
@REM How to echo JAVA_HOME in windows
echo %JAVA_HOME%
>> C:\_jdk25.0
If you use a Bash shell, or if you have set JAVA_HOME in an Ubuntu environment and need to echo JAVA_HOME in Linux, place a single dollar sign before the environment variable: echo $JAVA_HOME.
If the echo command returns the value you set for JAVA_HOME, you know your system is configured properly.
Cameron McKenzie has been a Java EE software engineer for 20 years. His current specialties include Agile development; DevOps; Spring; and container-based technologies such as Docker, Swarm and Kubernetes.