How do I install Java on Windows?

Java on Windows install Tutorial
To install Java on Windows and run Java apps on Microsoft’s operating system, you need to obtain a copy of the Java Development Toolkit (JDK) installation media.
The JDK includes both a Java Runtime Environment (JRE) and a Java Virtual Machine (JVM). These are all you need to play games like Minecraft or run applications like NASA World Wind.
The JDK also includes a number of programming tools, like a compiler and a Java web server, for programmers who need to install Java on Windows.
Install prereqs
The following prerequisites must be met to download and install Java on Windows:
- You use an updated Windows 10 or Windows 11 operating system (OS);
- You can access the Internet to download Java’s JDK;
- You have sufficient rights to download the JDK and install Java on your computer; and
- You have at least 500 MB of hard drive space for both the download and installation
Which Java distribution should I choose?
Many companies, including Oracle, Azul, Amazon and Microsoft provide their own Java installers, all of which are based on the open source OpenJDK project.
The easiest JDK to install is Eclipse’s Adoptium project (formerly AdoptOpenJDK). The Adoptium JDK has the most permissive, open-source license, which is another reason why I recommend this JDK for anyone who is installing Java on Windows for the first time.
How to install Java on Windows
Follow these five steps to setup and install Java on Windows:
-
- Download Java for Windows
- Run the Java installer
- Validate the JAVA_HOME setting
- Confirm the Java PATH variable was set properly
- Run a JDK command to verify Java install was a success
Java for Windows download
You can download the latest, recommended Java release directly from the Eclipse Adoptium homepage. At the time of writing, that’s Java 17.
Adoptium’s Java download is packaged as an .msi file that is just over 160 MB in size.
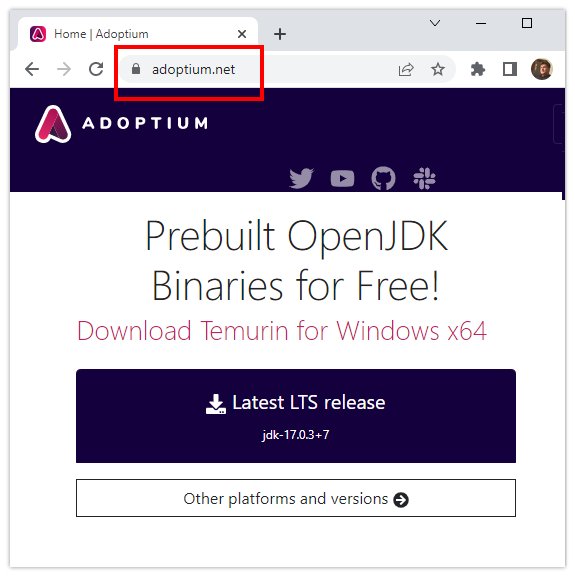
To install Java on Windows, you must first download the JDK.
Run the Windows Java installer
The Java installation wizards allows you to customize the JDK install in five different ways. You can choose:
- Where to install Java on your Windows computer
- add Java to the Windows PATH
- allow Java to automatically run JAR files
- set the JAVA_HOME environment variable
- configure JavaSoft registration keys
On a Windows computer with 1 GB of free memory, an SSD hard drive and an i5 CPU, the Java install wizard completes the setup in less than a minute.
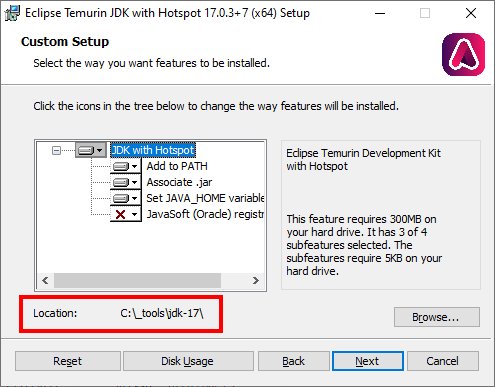
When you setup Java on Windows, change the installation folder and choose to set JAVA_HOME.
Where to install Java on Windows?
By default, Java installs into a subdirectory of C:\Program Files. The space between the words Program and Files can sometimes cause errors in scripts, which is why I recommend against installing Java in this folder.
Instead, I recommended that the Java install directory be changed to something like:
- C:\tool\jdk17
- C:\jdk17\
- C:\java\version\17
| Install option | Default | Recommendation |
| Install directory | C:\Program Files\ | Any custom folder without a space or non-text character |
| Add Java to PATH | Yes | Yes |
| Associate .jar files | Yes | Yes |
| Set JAVA_HOME variable | No | Yes |
| Configure JavaSoft keys | No | No |
Set the Java PATH
When the installer configures the Java PATH environment variable, all of the utilities that are part of the JDK can be invoked by name in a DOS prompt or in PowerShell.
This makes it very easy for developers to use JDK tools including the Java compiler and the Java Shell. That’s why it is highly recommended to allow the install wizard to configure the Java Path.
Configure JAVA_HOME
When programs such as Minecraft or Tomcat run on Java, they query Windows for the JAVA_HOME environment variable to find out where Java is installed.
As with the Java PATH, it is recommended to allow the Java install wizard to configure the JAVA_HOME environment variable for you.
Not all Java installers configure these environment variables. If you need to configure these settings manually, follow these tutorials on how to configure JAVA_HOME or set the Java PATH.
Follow these steps to setup Java on Windows and validate the install.
Validate JAVA_HOME on Windows
Use either PowerShell or the Windows Command Prompt to verify that the JAVA_HOME environment variable was set correctly.
To echo the JAVA_HOME variable in the command prompt, issue the following command:
C:\>echo %JAVA_HOME%
C:\_tools\jdk-17\
PowerShell command to echo JAVA_HOME
The command to echo JAVA_HOME in Windows Powershell is as follows:
PS C:\> echo $env:JAVA_HOME
C:\_tools\jdk-17\
Regardless of whether you echo JAVA_HOME with Powershell or the DOS Prompt, the output should be the root folder into which you installed Java.
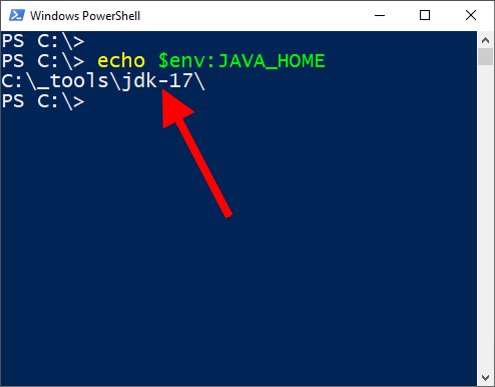
The command to echo JAVA_HOME in Microsoft PowerShell uses the $env notation.
Confirm the Java PATH configuration
After validation of JAVA_HOME, Java’s PATH setting should be confirmed.
As with JAVA_HOME, the Windows PATH setting can be echoed at the command line. Issue the following command to view the PATH in a command prompt:
C:\>echo %PATH%
C:\_tools\jdk-17\bin; C:\WINDOWS\system32; C:\WINDOWS;
The following commands outputs the Windows PATH in PowerShell:
PS C:\> echo $env:PATH
C:\_tools\jdk-17\bin;  C:\WINDOWS\system32;  C:\WINDOWS;
If the full path to the bin folder of the JDK install is listed, then the Windows PATH for Java has been configured correctly.
Run Java on Windows
The final step to confirm the Java install on Windows was a success is to actually run a Java command and see if it works.
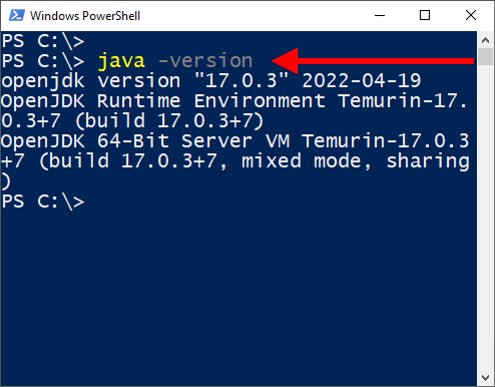
The easiest way to do this is to ask the JDK which version of Java is installed. In PowerShell it looks like this:
PS C:\> java -version
openjdk version "17.0.3" 2022-04-19
OpenJDK Runtime Environment Temurin-17.0.3+7 (build 17.0.3+7)
OpenJDK 64-Bit Server VM Temurin-17.0.3+7 (build 17.0.3+7, mixed mode, sharing)
As you can see, we have successfully setup and installed Java 17 on Windows.
To run Java apps on Windows 10, install the JDK and set JAVA_HOME.
Java 17 and Windows 10 install
And that’s how easy it is to install Java on Windows.
All there is left to do is run applications like Minecraft or Tomcat on the JRE, and consider updating the JDK when a new LTS release of Java arrives.
 Cameron McKenzie is an AWS Certified AI Practitioner, Machine Learning Engineer, Solutions Architect and author of many popular books in the software development and Cloud Computing space. His growing YouTube channel training devs in Java, Spring, AI and ML has well over 30,000 subscribers.