How to Use Spring 3.0 In a Servlet Based Web Application
This tutorial will show you how to run a simple web based application that uses Spring 3 as an IoC container.

How do you use Spring in a web application? And more to the point, how do you get the Spring IoC container to work properly in a web application if you're using an annotation based configuration class, as opposed to the standard Spring configuration file that every other tutorial on the topic seems to use. And what if you're just working with a simple web application with Servlets and JSPs, as opposed to using Spring MVC or Spring Web Flow technology? Don't fret - this tutorial will show all the steps involved in creating a simple web application that leverages the Spring IoC container, along with the Spring scope annotation that can inject your POJOs into the appropriate Servlet related scope.
Updated Spring, Spring Boot, Spring MVC and Spring IoC container tutorials
TheServerSide has been updating its resources in terms of the Spring framework, Java EE contexts and various different approaches to inversion of control (IoC) and dependency injection (DI). Check out these newer resources on the topic:
- Inversion of control explained fast with a Spring IoC example
- Spring MVC Java web development with Spring Boot
- Drawbacks to IoC and how to solve inversion of control problems
- Spring IoC vs. Google Guice's inversion of control approach
- Getting started with Google Guice
- Getting started with the Spring IoC container
- The beauty of Spring without XML: Annotation based IoC
The ClickCounter POJO
If we're going to use the IoC capabilities of the Spring container, we need a POJO that the beanFactory can spit out at us. This web application will simply display the results of a ClickCounter, so we'll make a simple little POJO with that name, ClickCounter:
package com.mcnz.spring; public class ClickCounter { private int count; public int getCount() {return count;} public void setCount(int count) {this.count = count;} }
|
The Java Configuration File
And if we're going to be using a Java file for configuration, we need to code that too, along with an @Bean method that spits out the ClickCounter:
package com.mcnz.spring; import org.springframework.context.annotation.*; @Configuration public class SimpleConfig { @Bean() @Scope(value="session") public ClickCounter clickCounter() { return new ClickCounter(); } }
|
You'll notice that we've included the @Scope annotation, indicating that the instance of the ClickCounter should be placed in the client's HttpSession scope. This saves the developer from the onerous and intrusive task of directly setting and getting attributes on the HttpSession.
The JSP Web Component
If you're going to develop a web application, you need to create web based artifact. To ensure that this remains the simplest Spring example you've ever seen, we're just going to code a single JSP that links back to itself. Here it is:
<%@page import="com.mcnz.spring.*, org.springframework.context.*, org.springframework.web.context.support.*" contentType="text/html; %> <% ApplicationContext beanFactory = WebApplicationContextUtils .getRequiredWebApplicationContext(getServletContext()); ClickCounter counter = (ClickCounter)beanFactory .getBean("clickCounter", ClickCounter.class); String clickedButton = request.getParameter("command"); if (clickedButton != null) { counter.setCount(counter.getCount()+1); } %> <html> <body> <form action="index.jsp"> <input type="submit" name="command" value="ClickToCount!"> </form> Count: <%=counter.getCount()%> </body> </html>
|
The @page directive simply imports the required packages that our little code snippet in the JSP needs.
The Java Scriptlet
We follow the @page directive with a Java code snippet. We could have coded this in a Servlet, but again, that would make this example more complicated than we want it to be. Essentially, the code snippet grabs a handle to the ApplicationContext, which is essentially the byte-code embodiment of the Spring container. When you're working in a web application, you need to grab the ApplicationContext from the WebApplicationContextUtils class. So, the initialization of our beanFactory looks like this:
ApplicationContext beanFactory =
WebApplicationContextUtils
.getRequiredWebApplicationContext(getServletContext());
With ApplicationContext instance initialized, it's Spring business as usual, as we pull the ClickCounter out of the beanFactory. One thing to notice about the code here is the fact that we never manually manipulate the HttpSession object, as the instance of the ClickCounter gets stuffed in there automatically as a result of the @Scope annotation. As a result, the count held by the ClickCounter will remain bound to the client's browser session.
The last part of the code snippet just checks to see if the button was clicked. If it was, the count property of the ClickCounter instance in incremented by one. Notice that the name of the submit button is "command", which matches the String in the request.getParameter call in the code snippet.
The remainder of the JSP is simply the markup that gets sent back to the client. The expression <%=counter.getCount()%> is used to display the current count value.
The Required Context Listeners
Now, in order to get this whole thing to work, you'll need to make a few edits to your web.xml file. First, you need to tell the web application that Spring will be sticking its nose into the HttpServletRequest object, and through that, the HttpSession object as well. So you must add the following listener entry to the web module's deployment descriptor:
<listener> <listener-class> org.springframework.web.context.request.RequestContextListener </listener-class> </listener>
|
If you leave the RequestContextListener entry out of your web.xml file, you'll run into an error that will look very similar to the following:
Error 500: Error creating bean with name 'clickCounter': Scope 'session' is not active for the current thread; consider defining a scoped proxy for this bean if you intend to refer to it from a singleton; nested exception is java.lang.IllegalStateException: No thread-bound request found: Are you referring to request attributes outside of an actual web request, or processing a request outside of the originally receiving thread? If you are actually operating within a web request and still receive this message, your code is probably running outside of DispatcherServlet/DispatcherPortlet: In this case, use RequestContextListener or RequestContextFilter to expose the current request.
You also need to configure a special ContextLoadListener so that access to the beanFactory can be mitigated through the ServletContext.
<listener> <listener-class> org.springframework.web.context.ContextLoaderListener </listener-class> </listener>
|
Failing to add in the reference to the ContextLoaderListener will generate the following error message:
Uncaught exception thrown in one of the service methods of the servlet: /index.jsp. Exception thrown : java.lang.IllegalStateException: No WebApplicationContext found: no ContextLoaderListener registered?
at org.springframework.web.context.support.WebApplicationContextUtils.getRequiredWebApplicationContext(WebApplicationContextUtils.java:84)
The Context Parameters
And of course, we're using an annotation based Java class file for maintaining our configuration data, so we need to provide two context parameters to the web.xml file, namely a contextClass parameter that points to the Spring class that implements the ApplicationContext, and secondly a contextConfigLocation class that points to the @Configuration annotated class that tells the Spring IoC container how to spit out POJOs to the calling application. For us, that's the SimpleConfig class.
<context-param> <param-name>contextClass</param-name> <param-value> org.springframework.web.context.support.AnnotationConfigWebApplicationContext </param-value> </context-param> <context-param> <param-name>contextConfigLocation</param-name> <param-value>com.mcnz.spring.SimpleConfig</param-value> </context-param>
|
Leaving out one of the context-param elements usually generates the following exception:
ContextLoader E org.apache.commons.logging.impl.Jdk14Logger error Context initialization failed
org.springframework.beans.factory.BeanDefinitionStoreException: IOException parsing XML document from ServletContext resource [/com.mcnz.spring.SimpleConfig]; nested exception is java.io.FileNotFoundException: Could not open ServletContext resource [/com.mcnz.spring.SimpleConfig]
at org.springframework.beans.factory.xml.XmlBeanDefinitionReader.loadBeanDefinitions(XmlBeanDefinitionReader.java:341)
at org.springframework.beans.factory.xml.XmlBeanDefinitionReader.loadBeanDefinitions(XmlBeanDefinitionReader.java:302)
Here's the full web.xml file for those following along:
<?xml version="1.0" encoding="UTF-8"?> <web-app id="WebApp_ID" version="2.4" xmlns="http://java.sun.com/xml/ns/j2ee" xmlns:xsi="https://www.w3.org/2001/XMLSchema-instance" xsi:schemaLocation="http://java.sun.com/xml/ns/j2ee http://java.sun.com/xml/ns/j2ee/web-app_2_4.xsd"> <display-name> SpringServletsAndJSPs </display-name> <context-param> <param-name> contextClass </param-name> <param-value> org.springframework.web.context.support.AnnotationConfigWebApplicationContext </param-value> </context-param> <context-param> <param-name> contextConfigLocation </param-name> <param-value> com.mcnz.spring.SimpleConfig </param-value> </context-param> <listener> <listener-class> org.springframework.web.context.ContextLoaderListener </listener-class> </listener> <listener> <listener-class> org.springframework.web.context.request.RequestContextListener </listener-class> </listener> </web-app>
|
The Required Jar Files
And what's next? Well, you need the required Spring files on both your runtime and design time classpaths. My preference is to just put all of those required Spring 3 jar files into the \lib directory of the web application - that way the files are in both your design-time and your runtime classpaths, and you also tend to avoid classloader issues.
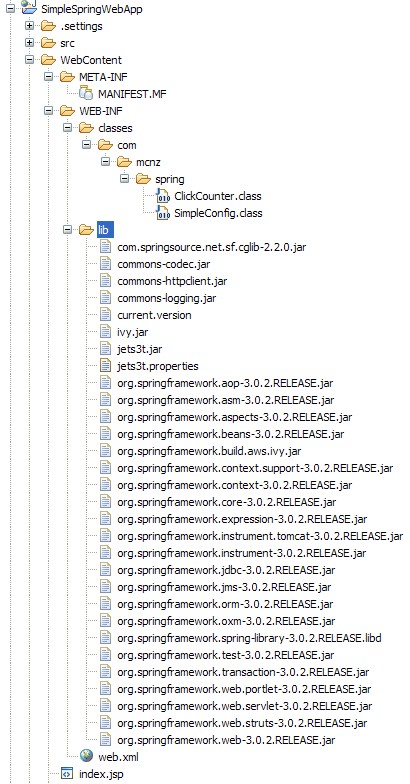
With all of the components coded, the Java files compiled into class files, your web.xml file edited appropriately, and all of the required jar files in the \lib directory, you're ready to packages up everything into a war file and run your application.
This little application was developed and tested using IBM's Rational Application Developer, and subsequently deployed to a WebSphere 6.1 test server running on a JRE at version 1.5.0. Those are pretty old versions of both WebSphere and the Java Runtime environment, so if I can get it to successfully run there, you shouldn't have any problems running it on newer versions. The only real requirement is that you have at least a Java 5 JRE, as annotations are not supported on earlier versions.
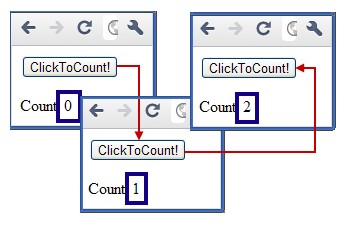
Running the Application
Here's how my application looks when it's run in a Google Chrome browser. Each time you click the button, the count, which is maintained by the ClickCounter, is incremented and displayed back to the user. The ClickCounter instance itself is pulled out of the Spring IoC container, and at the time that it is first pulled out, it is also stuffed into the HttpSession, as per the @Scope attribute placed on the corresponding method in the SimpleConfig class.
comment on this article : ask a question about getting this example to work
So, that's the simplest little Spring based, web application you'll ever see. It's a great place to start if you're having trouble configuring your environment, or getting frustrated with esoteric little exceptions you might be running into when you're trying to do the most basic things with Servlets and Spring. Sure, it doesn't contain any transactional code or JDBC, but if you can't get the Spring container to spit out a simple POJO to you, then what good is all sorts of JDBC and transactional code? This gets your feet wet and shows you how to get a simple configuration working. You can take it from here as far as the more complicated stuff goes.
What About Using an XML Configuration File?
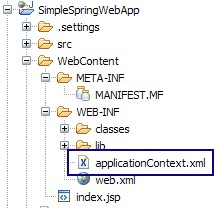
By the way, if you were using an XML based configuration file, all you need to do is edit the web.xml file a little bit, and your web application would work exactly the same as the one that uses a Java class file.
Let's say I wanted to use the following configuration file, named applicationContext.xml, which is placed in the WEB-INF directory alongside the web.xml file:
<beans xmlns="http://www.springframework.org/schema/beans" xmlns:xsi="https://www.w3.org/2001/XMLSchema-instance" xmlns:p="http://www.springframework.org/schema/p" xmlns:aop="http://www.springframework.org/schema/aop" xmlns:context="http://www.springframework.org/schema/context" xmlns:jee="http://www.springframework.org/schema/jee" xmlns:tx="http://www.springframework.org/schema/tx" xsi:schemaLocation=" http://www.springframework.org/schema/aop http://www.springframework.org/schema/aop/spring-aop-2.5.xsd http://www.springframework.org/schema/beans http://www.springframework.org/schema/beans/spring-beans-2.5.xsd http://www.springframework.org/schema/context http://www.springframework.org/schema/context/spring-context-2.5.xsd http://www.springframework.org/schema/jee http://www.springframework.org/schema/jee/spring-jee-2.5.xsd http://www.springframework.org/schema/tx http://www.springframework.org/schema/tx/spring-tx-2.5.xsd" default-autowire="autodetect"> <bean id="clickCounter" class="com.mcnz.spring.ClickCounter"/> </beans>
|
To use this file instead of the Java class file for configuration, you would simply write your web.xml file as follows:
<?xml version="1.0" encoding="UTF-8"?> <web-app id="WebApp_ID" version="2.4" xmlns="http://java.sun.com/xml/ns/j2ee" xmlns:xsi="https://www.w3.org/2001/XMLSchema-instance" xsi:schemaLocation="http://java.sun.com/xml/ns/j2ee http://java.sun.com/xml/ns/j2ee/web-app_2_4.xsd"> <display-name>SpringServletsAndJSPs</display-name> <!-- <context-param> <param-name>contextClass</param-name> <param-value> org.springframework.web.context.support.AnnotationConfigWebApplicationContext </param-value> </context-param> <context-param> <param-name>contextConfigLocation</param-name> <param-value>com.mcnz.spring.SimpleConfig</param-value> </context-param> <listener> <listener-class> org.springframework.web.context.ContextLoaderListener </listener-class> </listener> --> <context-param> <param-name> contextConfigLocation </param-name> <param-value>/WEB-INF/applicationContext.xml</param-value> </context-param> <listener> <listener-class> org.springframework.web.context.ContextLoaderListener </listener-class> </listener> <listener> <listener-class> org.springframework.web.context.request.RequestContextListener </listener-class> </listener> </web-app>
|
You can then rerun the application and it will work with the XML configuration file. No changes need to be made to any of your Servlet or JSP code to switch between bean configuration approaches.
You should follow Cameron McKenzie on Twitter: @cameronmcnz
Interested in more articles and opinion pieces from Cameron McKenzie? Check these out:
- Why the Amazon S3 outage was a Fukushima moment for cloud computing
- Software ethics and why ‘Uber developer’ stains a professional resume
- It was more than user input error that caused the Amazon S3 outage
- Don’t let fear-mongering drive your adoption of Docker and microservices?
- Stop adding web UI frameworks like JSR-371 to the Java EE spec
Recommended Books for Learning Spring
Spring in Action ~ Craig Walls
Spring Recipes: A Problem-Solution Approach ~ Gary Mak
Professional Java Development with the Spring Framework ~ Rod Johnson PhD
Pro Java EE Spring Patterns: Best Practices and Design Strategies ~ Dhrubojyoti Kayal