5 basic Git commands developers must master: Tutorial with examples
Just getting started with Git or GitHub? If so, there are five basic Git commands you need to master. This Git commands tutorial for beginners takes you through each.
Successfully installed Git? That's a good start. Now the next step in your journey to learn Git is to master these five basic git commands: init, config, add, status and commit. This Git tutorial for beginners will take you step by step through each of these basic Git commands with examples, demonstrating how easy the Git source code management tool is to use.
The git init command
The first of the five basic git commands you need to learn is init. This basic Git command does exactly what you would expect it to do: it initializes a Git repository.
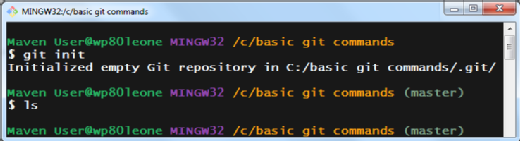
If you explore the folder in which the git init command runs, you will notice a hidden folder named .git, with a number of subfolders -- hooks, info, objects and refs. These are the folders in which Git will manage and maintain the entire source history of your recently initialized Git repo.
You only need to install Git once, after which you can create an unlimited number of Git repositories, so long as those repositories are not nested within each other. Each repository is self-contained and completely unaware of any other Git repositories that might exist on the system.
The first basic Git command beginners need to learn: git init.
The git config command
This is probably the least interesting of the five basic Git commands. I normally wouldn't throw a configuration utility at someone just getting started with a tool like Git, but if you've just installed Git, you can't issue a commit command without first configuring your name and email address, and this is done with the git config command. So familiarization with this Git command is a bit of a requirement. The following basic Git command example demonstrates the use of the config switch.
New to Git or GitHub? This tutorial for beginners will take you through five basic Git commands.
After you've installed Git but before you can commit any code, Git needs to know the committer's name and email address. That means running the git config command twice. For the first run, use the user.name attribute, and the second time use the user.email attribute.
There are three Git configuration scopes: local, global and system. Global trumps local, and system trumps global. The best practice is to set the user.name and user.email properties at the global level and then never worry about them again.
Where does Git store global config?
If you look in the .git directory of any repository, you will find an extensionless file named config. All local Git configuration is stored here.
Under the user's profile folder, there is a file named .gitconfig, and it's here that all global git configuration is stored.
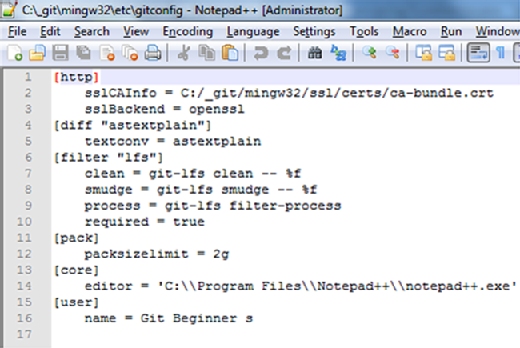
Finally, Git system configuration is saved in a file named gitconfig, which can be found in the ming\etc subfolder of your Git installation.
Git system configuration data gets saved in the
etc subfolder of the installation.
The git add command
You don't need to commit every file you create to source code control. Before a developer makes a commit to the Git repo, they must explicitly identify which files to group together as part of the commit. This is accomplished by issuing a git add command along with the name of the files to be included in the next commit.
A git add example
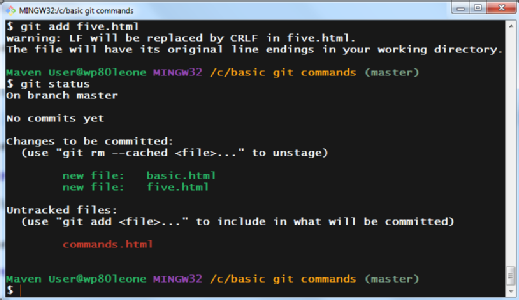
In the following set of Bash shell entries, we'll create three files with the echo command, namely five.html, basic.html and commands.html.
However, despite the fact that all three files reside in the same directory in which initialized the Git repository, only the ones associated with a git add command will be part of the next commit. So, if we want to leave the command.html file out of the next commit, we simply won't identify it in a git add call.
Is there a technical term for identifying which files will be part of the next commit? You bet: staging. When you issue a git add command on a file, you have staged the file in the Git index. The Git index is what keeps track of all of the files to be included the next git commit.
If you changed a large number of files and want them all staged, you can issue the git add [space]. command. This will add every change file to the index, with the exception of anything listed in the .gitignore file.
/c/ basic git commands (tutorial)
$ git add .
The git status command
Sometimes developers lose track of what they have or have not added to the staging area, which is why we include the git status in this Git tutorial for beginners. The git status command will tell you which branch you are on, which files you've staged to be committed and which files remain untracked and have not been added to the index. The git status command is a great tool for quickly understanding the current state of your working tree.
Learn the git status command so you can display the state of the working tree.
The git commit command
The five basic Git commands beginners should learn first are init, config, add, status and commit.
The last of the five basic commands that must be included in any Git tutorial for beginners is git commit.
To permanently save changes to the Git repository, you must issue a commit, and that commit must be associated with a message that describes the commit. Furthermore, Git keeps track of the name and email address of the user that makes the commit, which is why you need to provide that information through the git config command.
To issue a commit, use the -m switch to provide a text message that describes the commit. If you don't use the -m command, Git will ask for input through a vi editor in the Bash shell, which tends to throw Git beginners for a nasty loop. So, make life easy for yourself, and always include the -m switch.
Those are the five basic git commands with examples every software developer needs to master in order to learn Git and use it at a functional level. If you can get comfortable with the git init, config, add, commit and status commands, you are on your way to transforming from a Git beginner into a Git expert.
Advance your DevOps skills with the following resources