A Jenkins tutorial for beginners with examples
If you're ready to try Jenkins, this quick start tutorial lays out the specific steps you'll need to take to download and install the CI tool on your local machine.

Developers and operations professionals eager to participate in DevOps need to first download and install Jenkins. This Jenkins tutorial for beginners guides you from the initial download through that first build.
Download the Jenkins WAR file for Windows
To start this Jenkins tutorial for beginners, first download the product binaries.
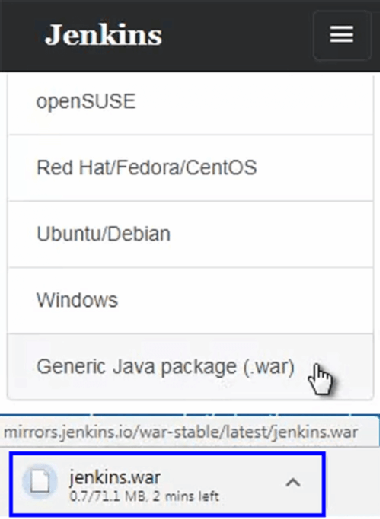
There are several download options depending on whether you want to install Jenkins on Windows, Linux or macOS. There's a Jenkins installation wizard for each option, which not only installs Jenkins but also registers the installation as a service on the local OS. The wizard provides some extra steps that are helpful in production environments, but the best way for beginners to learn Jenkins is to choose the Generic Java package (.war) option. This option downloads a single file named jenkins.war, which is run on the command line.
In this tutorial, we'll use the jenkins.war file.
Before you run Jenkins CI
The only prerequisite for using a Jenkins CI tool is to have the Java Development Kit (JDK) installed on your local machine. You'll need to configure the JAVA_HOME variable and include the bin directory of the JDK on the OS' path variable. Also, note that you will need at least Java 8 to run Jenkins on your local machine.
It's a fairly easy process to install Jenkins and run your first build.
Choose a location to install Jenkins
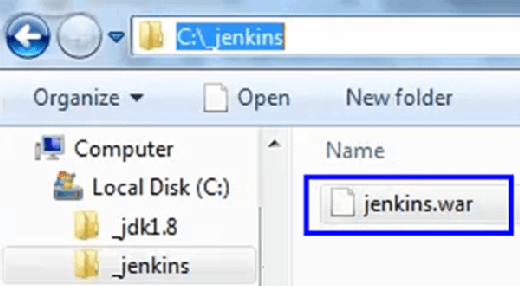
After the download, move the jenkins.war file out of the downloads folder and into a folder of your choice. And let's make it easier to work with the CI tool once the installation is finished. Copy the WAR file to a folder named _jenkins, which will reside directly under the root of the C:\ drive.
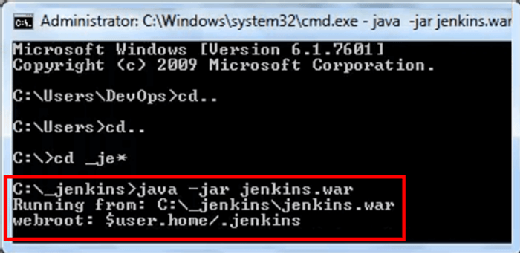
Once the download is complete, the only thing you need to do to install Jenkins is run the jenkins.war file at the command line with the JDK's java utility: C:\_jenkins\java -jar jenkins.war.
The jenkins.war file has its own web-based runtime provided by an embedded Jetty servlet engine. This embedded runtime allows you to install Jenkins on your local machine without the need to preinstall a Jakarta Enterprise Edition-based web container, such as Tomcat or Wildfly.
The first time that Jenkins runs, configuration data is written and stored in a .jenkins subfolder under the user's profile. All the Jenkins configuration data is stored in this folder, including information about Jenkins jobs and project workspaces. Since all the runtime data created at the time of the Jenkins installation is stored under a local user's profile, multiple users on the same machine can have completely separate and independent Jenkins configurations.
When the Jenkins install is complete and the CI tool is ready to run, a message will appear in the command prompt window that says: "Info: Jenkins is fully up and running." To access the Jenkins admin console, open a web browser and navigate to http://localhost:8080.
The Jenkins admin console
At this point in our Jenkins tutorial for beginners, let's note a couple of important events that happen the first time you access the admin console.
First, the CI tool wants to ensure the person with access to the Jenkins admin console is indeed the same person who installed it. To facilitate this authentication process, a hexadecimal key can be found in a file named initialAdminPassword.txt under the Jenkins configuration folders. Simply copy and paste this value into the text field and click Continue.
Jenkins security is turned on by default ever since the 2.0 release, so unauthenticated access is not initially allowed. Because of the security requirement, what you need to do to access the tool is create an administrative user. Simply invent a user named DevOps with the password installjenkins. For the full name, enter DevOps Engineer.
When you've finished the user registration form, click on the option to Save and Finish. In the next window, hit the Start using Jenkins button.
At this point, the admin console will appear. It's worthwhile to poke around in the tool and look at the various screens and wizards available, including the ability to see a build history, create a new Jenkins job, manage properties of the tool and create views. It's a good investment of your time to navigate around and see how the tool is laid out.

Now that the tool is up and running, you can run your first build job and experiment with Jenkins on your local machine. Follow the links in the Next Steps below to continue this Jenkins tutorial for beginners.
Dig Deeper on DevOps-driven, cloud-native app development
-
![]()
How to install Jenkins on Windows
By: Cameron McKenzie
-
![]()
What is Maven in Java? Crash course tutorial for beginners
By: Cameron McKenzie
-
![]()
Jenkins 2.0: A drama free, full increment release of the popular CI tool
By: Cameron McKenzie
-
![]()
How to deploy a WAR file to Tomcat 5 different ways
By: Cameron McKenzie