How to use the Jenkins multi-configuration project
The Jenkins multi-configuration project, also known as the Jenkins Matrix project, isn't often used in the design of a continuous integration system. But when the need arises to run several similar jobs based on a variable parameter or two, a Jenkins multi-configuration project can be an incredible time saver.
Most Jenkins jobs are designed to run a single build. Sometimes multiple builds are daisy-chained together to create a pipeline, but even with a pipeline, each step in the chain represents a single build job being run. In this Jenkins Matrix plugin example, we will show you how a single Jenkins build job can actually run multiple, parameterized builds simultaneously.
Let's explore how to set up the Jenkins Matrix plugin on a local system, and how it can help expedite projects.
Jenkins multi-configuration project prerequisites
There are a few things you need to set up the Jenkins multi-configuration project on your computer. First, set up a local JDK installation and a Jenkins CI installation that include the Apache Maven plugin for build automation. Ensure online access to GitHub when it's time to download a Maven-based Java project.
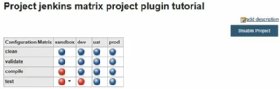
In this tutorial, we will create a single project that can run 16 build jobs based on two separate axes, namely the Maven goal to be run and the code stage. Figure 1 helps to conceptualize the configuration used in the Jenkins multi-configuration project example.
When these axes are cross-multiplied, it produces a cross-set of 16 total jobs that get run.
Create the Jenkins Matrix job project
To begin, create a new Jenkins multi-configuration project with the project creation wizard and the following name: jenkins matrix project plugin tutorial
Add axes to the Jenkins Matrix job
While still in the Jenkins Matrix job project wizard, move down to the Configuration Matrix section and add two new axes.
Name the first axis "stage" and add the following four values:
- clean
- validate
- compile
- test
Name the second axis "maven_tool" and add the following four values:
- sandbox
- dev
- uat
- test
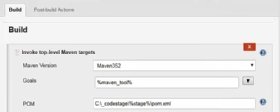
After you add the two axes, move to the Build section and add a build step of type Invoke top-level Maven targets. Then, reference the two previously configured axes by specifying %maven_tool% for the goal and C:\codestage\%stage%\pom.xml for the Project Object Model (POM) location. The variable syntax is similar to that used for a parameterized Jenkins build job.
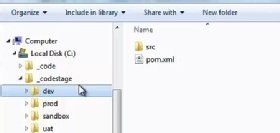
Matrix Project source code
The goal references a variable set of code stages based on the stage variable. For the Jenkins job to run, the code needs to exist in these folders.
One simple way to bring code into these folders -- along with the required POM -- is to clone my GitHub repository with the git clone command. When this is complete, run the Jenkins Matrix job. It produces 16 different builds, with the four Maven goals -- clean, validate, compile and test -- executed in each of the four development environments -- sandbox, dev, uat and test.
When the code is copied into each of the folders, the Jenkins Matrix project can run. This will trigger 16 separate build jobs, and a graphical result will display a success or failure status to the user.
And that's how easy it is to create a Jenkins multi-configuration project and perform a Matrix build.