How to integrate Nexus with Jenkins for simpler builds
Sonatype Nexus is one of the most popular artifact repositories used in the Java community. That's why developers should know how to integrate Nexus with Jenkins for software builds to complete.
In this tutorial, you'll learn how to integrate Nexus with Jenkins and enhance a continuous integration setup. Nexus and other artifact repositories manage the lifecycle of artifacts and combine version control with a centralized storage location for them.
Before you start, install these system prerequisites on the local machine:
- JDK version 1.8 or newer
- Nexus Repository Manager OSS version 2
- Jenkins CI version 2 or newer
Step 1: Install the Nexus Jenkins integration plugin
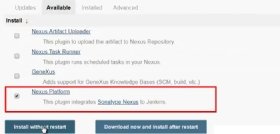
To start, install the Nexus Platform Plugin through the Jenkins CI administrative tool.
Check which Nexus plugin you select: There are several choices related to Nexus, including the Nexus Task Runner and the Nexus Artifact Uploader. The one to use in this tutorial is the Nexus Platform Plugin.
Step 2: Configure the Jenkins Nexus plugin
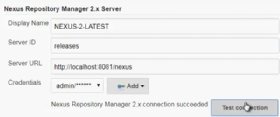
After any Jenkins plugin is installed, a configuration step typically follows. To configure the Nexus Jenkins integration plugin, go to the Jenkins administrative console's system settings and configure the following properties:
- Display Name: NEXUS-2-LATEST
- Server ID: releases
- Server URL: http://localhost:8081/nexus
- Credentials: admin/password
Step 3: Create a Jenkins build job
With the plugin installed, the next step is to create a Jenkins build job. For this example, I used these build job properties:
- Build name: nexus-jenkins-integration
- Git repository URL: https://github.com/cameronmcnz/mavenspiration.git
- Top-level Maven target goals: clean install
Step 4: Include the Nexus Repository Manager Publisher
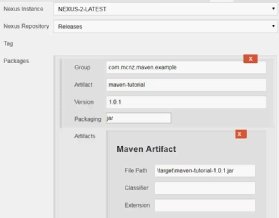
Before you save the build, add the Nexus Repository Manager Publisher as the final build step. Provide the following information to the plugin to make sure it pushes the build artifact to the repository:
- Nexus Instance: NEXUS-2-LATEST
- Nexus Repository: Releases
- Package Group: com.mcnz.maven.example
- Package Artifact: maven-tutorial
- Version: 1.0.1
- Packaging: jar
- File Path: \target\maven-tutorial-1.0.1.jar
When this is complete, save the build job.
Step 5: Run the build
Finally, you can run the build. When the build completes, inspect the Nexus Repository named "Releases." The new JAR file will be present.
Jenkins builds should be kept as simple as possible. Don't combine too many plugins and too many build and post-build steps into a singular build. Otherwise, single builds will become difficult to maintain and can incur performance problems when they run.
Instead, break complex operations into smaller jobs that can be chained together in a Jenkins pipeline. But if your build job simply needs to pull from Git, run a Maven goal and push to an artifact repository, knowing how to integrate Nexus with Jenkins via the Nexus Platform Plugin is a sensible thing to do.