How to setup PHP on Nginx with fastCGI (PHP-FPM) example

Why is Nginx, PHP and fastCGI so popular?
Nginx is the DevOps community’s most beloved http web server. And developers love the PHP programming language because it enables them to quickly build and deploy interactive websites.
As such, it’s no wonder that so many sys admins need to configure Nginx, PHP and PHP-FPM on both Linux and Windows servers.
This quick tutorial shows you how to setup PHP and Nginx on Ubuntu Linux with the fastCGI process manager (PHP-FPM) configured as Nginx’s PHP engine.
How to setup Nginx, PHP and PHP-FPM
To setup and configure fastCGI (FPM), PHP, and Nginx on Ubuntu Linux, follow these steps:
- Perform an apt-get update to ensure access to the latest packages.
- Install Nginx on Ubuntu.
- Install the php-fpm for Nginx package.
- Edit the server’s default config file to support PHP in Nginx.
- Restart the PHP configured Nginx server.
- Add a PHP file to Nginx’s html directory.
- Test the PHP, Nginx and PHP-FPM configuration.
Download the latest Nginx and PHP packages
Every software install in Ubuntu should start with a quick apt-get update and possibly an apt-get upgrade command.
sudo apt-get update -y
Reading package lists... Done
sudo apt-get upgrade -y
Calculating upgrade... Done
Install Nginx on Ubuntu
To install PHP on Nginx, you must first install Nginx, which you can achieve through a simple apt-get install command:
sudo apt-get install nginx -y
The following Nginx packages will be installed:
libnginx-mod-http-geoip2 nginx-common nginx-core
Setting up nginx 1.18.0-6 ubuntu... Done
Verify the running Nginx server
To verify the successful installation and configuration of Nginx on Ubuntu, query the HTTP server’s status:
sudo systemctl status nginx
● nginx.service - A high performance web server and a reverse proxy server
   Loaded: loaded (/lib/systemd/system/nginx.service; enabled;)
   Active: active (Nginx running)
You can visually verify the Nginx landing page displays on http://localhost:80 of a web browser.
Install PHP for Nginx with PHP-FPM
To install PHP for Nginx, use the PHP-FPM library. You can install PHP-FPM support with another apt-get install command:
sudo apt-get install php8.1-fpm -y
In this instance, we have installed version 8.1 of the PHP and PHP-FPM packages.
A common mistake is to install the PHP, not PHP-FPM package. The problem with this approach is that unlike PHP-FPM, the PHP package installs the Apache HTTP server and its httpd process, which conflicts with Nginx.
Why does a basic PHP install require Apache?
PHP requires one of three dependencies to exist on a machine:
- libapache2-mod-php
- php-fpm
- php-cgi
A simple PHP install uses the libapache2-mod-php module by default, which requires installation of the full Apache HTTP server software suite. To avoid this, install either the php-cgi or the php-fpm module for Nginx.
Check if PHP-FPM is running
After the PHP-FPM setup is complete, check to see if it is running:
sudo systemctl status php8.1-fpm
● php8.1-fpm.service - PHP 8.1 FastCGI Process Manager FPM for Ubuntu
  Loaded: loaded (/lib/systemd/system/php8.1-fpm.service)
  Active: active (php-fpm running)
Add PHP support to Nginx
With Nginx and PHP-FPM installed, you must edit the default Nginx config file. This allow the PHP FastCGI Process Manager to handle requests that have a .php extension.
The default Nginx file can be opened with any text editor. This command will open it with Nano:
sudo nano /etc/nginx/sites-available/default
Make the following changes to the Nginx config to support PHP and PHP-FPM on the server:
- Add index.php to the index list.
- Uncomment the PHP scripts to FastCGI entry block.
- Uncomment the line to include snippets/fastcgi-php.conf.
- Uncomment the line to enable the fastcgi_pass and the php8.1-fpm. sock.
- Uncomment the section to deny all access to Apache .htaccess files.
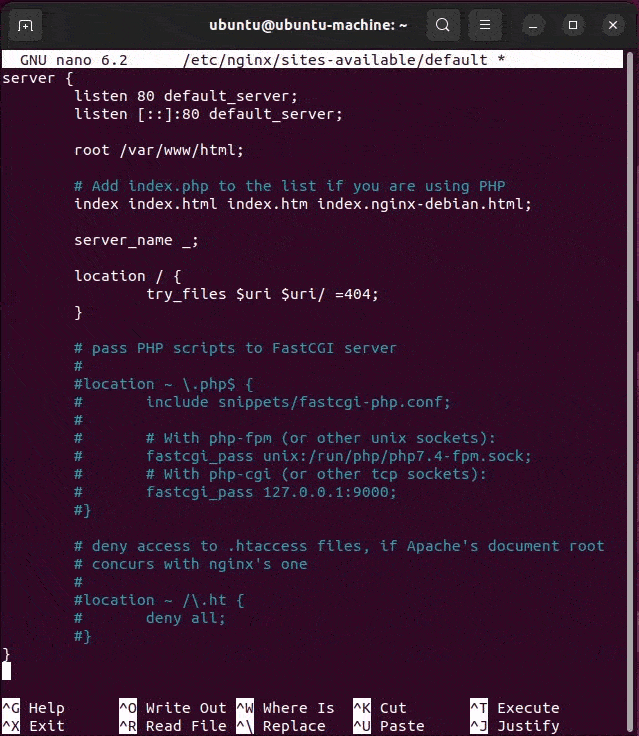
To configure PHP, Nginx and FTP (fastCGI), you must update the Nginx config file.
Enable PHP in Nginx’s config file
The server section of the Nginx, PHP and PHP-FPM config file will look like this when completed. Changes are highlighted in bold:
server {
  # Example PHP Nginx FPM config file
  listen 80 default_server;
  listen [::]:80 default_server;
  root /var/www/html;

  # Add index.php to setup Nginx, PHP & PHP-FPM config
  index index.php index.html index.htm index.nginx-debian.html;

  server_name _;

  location / {
    try_files $uri $uri/ =404;
  }

  # pass PHP scripts on Nginx to FastCGI (PHP-FPM) server
  location ~ \.php$ {
    include snippets/fastcgi-php.conf;

    # Nginx php-fpm sock config:
    fastcgi_pass unix:/run/php/php8.1-fpm.sock;
    # Nginx php-cgi config :
    # Nginx PHP fastcgi_pass 127.0.0.1:9000;
  }

  # deny access to Apache .htaccess on Nginx with PHP,
  # if Apache and Nginx document roots concur
  location ~ /\.ht {
    deny all;
  }
} # End of PHP FPM Nginx config example
How to validate an Nginx config file
The following command validates the updated Nginx config file to ensure the edits do not create any syntax errors:
sudo nginx -t
nginx php config: the configuration file /etc/nginx/nginx.conf syntax is ok
nginx php-fpm config: configuration file /etc/nginx/nginx.conf test is successful
To enable the Nginx PHP fastCGI setup, restart the server:
sudo systemctl restart nginx
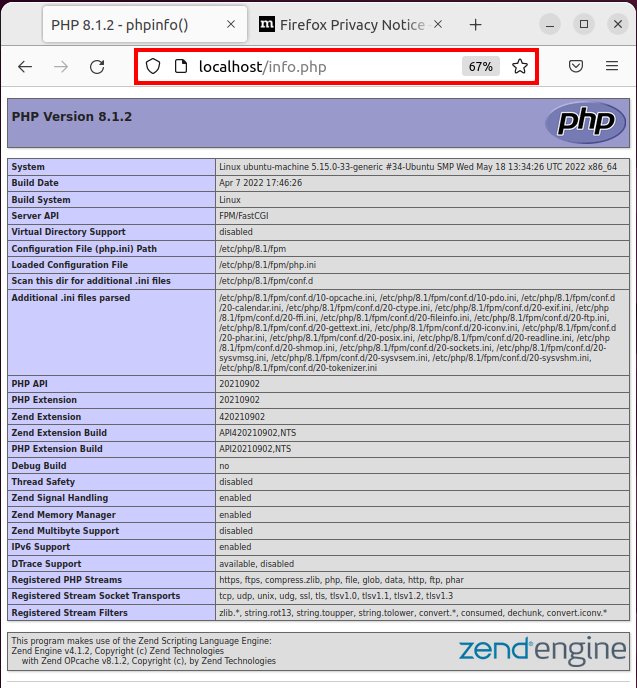
Create a PHP page in Nginx
After the restart, PHP is fully enabled on Nginx. To prove this, create a PHP file in Nginx’s /var/www/html folder and test to ensure the page renders properly on the server.
You may have to change permissions to the folder with a CHMOD command in order to create a file in it:
sudo chmod -R 777 /var/www/html
Then add a new PHP file to Nginx’s web hosting directory. The easiest way to do so is with a quick echo command:
echo "<?php phpinfo(); ?>" >> /var/www/html/info.php
This creates the most basic PHP file outside of a “Hello World” example you could create. If you dislike the echo command, use an editor to create a file named info.php in the /var/www/html folder with the following content:
<?php
  phpinfo();
?>
Test the Nginx, PHP integration
With the configuration of Nginx, PHP and the PHP-FPM module complete, and a new file named info.php added to the web server, simply open a browser to http://localhost/info.php to test the setup. The PHP info page, attesting to the fact that the install on Nginx of PHP 8.1, will appear.
When PHP, FPM and Nginx are fully configured, the server will be able to render PHP pages.
Commands to setup PHP and Nginx in Ubuntu
Let’s quickly review this PHP and Nginx tutorial. These are all of the commands that we used to enable the fastCGI process manager for PHP in Nginx:
-
sudo apt-get update -y
-
sudo apt-get upgrade -y
-
sudo apt-get install nginx -y
-
sudo systemctl status nginx
-
sudo apt-get install php8.1-fpm -y
-
sudo systemctl status php8.1-fpm
-
sudo nano /etc/nginx/sites-available/default
-
sudo nginx -t
-
sudo systemctl restart nginx
-
sudo chmod -R 777 /var/www/html
-
echo "<?php phpinfo(); ?>" >> /var/www/html/info.php
And that’s how easy it is to setup and configure fastCGI (FTP), Nginx and PHP support on your web server.
 Cameron McKenzie is an AWS Certified AI Practitioner, Machine Learning Engineer, Solutions Architect and author of many popular books in the software development and Cloud Computing space. His growing YouTube channel training devs in Java, Spring, AI and ML has well over 30,000 subscribers.