How to install Git on Windows

How to install Git on Windows 11
There are plenty of things to love about Git. One of them is its simple and straightforward installation, especially on Windows.
There are no prerequisites to install Git, except a moderately up-to-date operating system and 325MB of free disk space. In this example, we’ll install the latest version of Git on Windows 11, although the steps to install it on Windows 10 are pretty much the same.
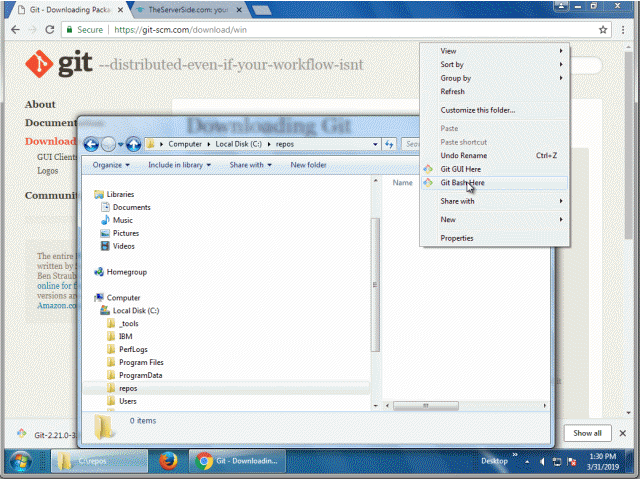
To perform a quick, trouble-free installation of Git on Windows, simply download the installation file from git-scm.com/downloads and run it.
How to customize your Git install
There are numerous possible options to configure when you install Git on Windows, but if you accept all of the defaults you’ll stay out of trouble.
However, if you want to customize your installation of Git on Windows for maximum utility, make these two changes:
- Use main as the default branch name instead of master.
- Choose Notepad++ or even Windows Notepad as the default editor.
There has been a move away from use of the term master in the world of software development. The default branch created in a new GitHub repository is now main, not master. Use main as Git’s default branch name and you’ll be in line with industry standards.
| Git, GitHub & GitHub Copilot Certification Made Easy |
|---|
| Want to get certified on the most popular AI, ML & DevOps technologies of the day? These five resources will help you get GitHub certified in a hurry.
Get certified in the latest AI, ML and DevOps technologies. Advance your career today. |
Furthermore, the default text editor for Git commits and Git merges is VIM, which can be intimidating and difficult to use. Choose a text editor you are more familiar to smooth the Git learning path over time.
Steps to install Git on Windows
Here are the per-screen steps to follow when you install Git on Windows:
1. Download the executable Git file from git-scm.com/downloads.
2. Run the installation file with Administrator rights.
3. Choose an appropriate installation location such as C:\_tools\git.
4. Install the default components, including Git GUI Here and Git Bash Here.
5. Choose your preferred Git default editor. We recommend Notepad++.
6. Add Git to the Windows PATH.
7. Accept the default line ending conversion for Unix and Windows compatibility.
8. Chose the extra option to enable system caching.
9. Click Finish to complete the install.
10. Choose to open a Git Bash shell and start using Git!
Test the Windows Git install
To test the veracity of your Windows Git install, issue the five basic Git commands every developer should know. Those basic Git commands are as follows:
- init
- add
- config
- status
- commit
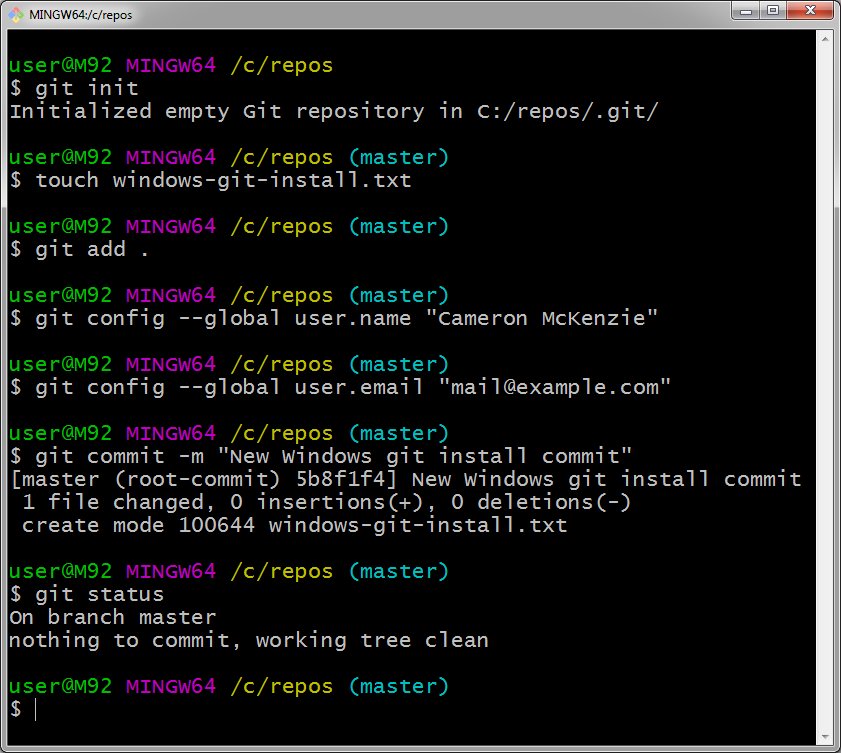
Before you run Git init, first create a new folder named repos off the C:\ drive:
windows@install-git MINGW64 /c/repos
$ git init
Initialized empty Git repository in C:/repos/.git/
In the newly created folder, add a file named windows-git-install.txt:
windows@install-git MINGW64 /c/repos
$ touch windows-git-install.txt
Then add the file to the Git index:
windows@install-git MINGW64 /c/repos
$ git add .
Configure the Git user’s email address and username:
windows@install-git MINGW64 /c/repos
$ git config --global user.name "Cameron McKenzie"
windows@install-git MINGW64 /c/repos
$ git config --global user.email "[email protected]"
Commit the new file to the new Git repository:
windows@install-git MINGW64 /c/repos
$ git commit -m "New Windows git install commit"
[master (root-commit) 5b8f1f4] New Windows git install commit
1 file changed, 0 insertions(+), 0 deletions(-)
create mode 100644 windows-git-install.txt
And finally, check the status of the newly installed Git repo:
windows@install-git MINGW64 /c/repos
$ git status
On branch master
nothing to commit, working tree clean
How to verify a Windows Git installation.
No time to waste?⏲️
Here's a 60 second YouTube Short on how to download and install Git on Windows. 📽️
You'll thank me for the fully licensed 'Eye of the Tiger' musical accompaniment, trust me. 🥊https://t.co/bgUKES3hwc
— Cameron McKenzie | Docker | GitHub | AWS | Java (@cameronmcnz) February 27, 2024
This concludes the task to install Git on Windows 10, and ensure the DVCS tool is properly configured to manage source code and interact with SaaS-based tools such as GitHub, GitLab and BitBucket.

Cameron McKenzie is an AWS Certified AI Practitioner, Machine Learning Engineer, Solutions Architect and author of many popular books in the software development and Cloud Computing space. His growing YouTube channel training devs in Java, Spring, AI and ML has well over 30,000 subscribers.
Next Steps

The AWS Solutions Architect Book of Exam Questions by Cameron McKenzie
So what’s next? A great way to secure your employment or even open the door to new opportunities is to get certified. If you’re interested in AWS products, here are a few great resources to help you get Cloud Practitioner, Solution Architect, Machine Learning and DevOps certified from AWS:
- AWS Certified Cloud Practitioner Book of Exam Questions
- AWS Certified Developer Associate Book of Exam Questions
- AWS Certified AI Practitioner Book of Exam Questions & Answers
- AWS Certified Machine Learning Associate Book of Exam Questions
- AWS Certified DevOps Professional Book of Exam Questions
- AWS Certified Data Engineer Associate Book of Exam Questions
- AWS Certified Solutions Architect Associate Book of Exam Questions
Put your career on overdrive and get AWS certified today!