
pixel - Fotolia
Create your first Jenkins build job: A freestyle project tutorial for beginners
The Jenkins freestyle job is the foundation of Jenkins CI. In this CI tutorial, we show you how to both create a freestyle job and run it using the CI tool.

In our first Jenkins tutorial for beginners, we focused on how to install and configure Jenkins, a process that ensured a fully functional Jenkins server in operation. In this CI tutorial, we will use the admin console of that Jenkins CI instance to create a Jenkins build job. We'll keep it simple and avoid Maven or Git at this juncture. We'll just create a Jenkins freestyle job that invokes the JDK's runtime instance and prints out the version of the JRE that is currently running.
The Java community has worked exceptionally hard to create various Jenkins plug-ins that will do everything from OAuth interactions with GitHub repositories to invoking Gradle or Maven build tools. But despite the vast quantity of options available from the Jenkins plug-in download page, the reality is that a good number of tasks a continuous integration server performs are simply calls to shell scripts or batch files. In fact, many Jenkins build jobs don't use any plug-ins at all. The freestyle Jenkins build job we create in this CI tutorial will fall into that category.
Create a Jenkins freestyle job
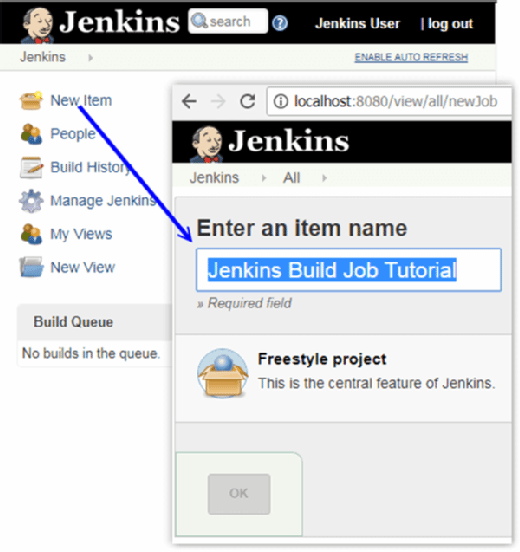
The first step to create a Jenkins build job is to click the New Item link in the top left-hand corner of the admin console. It might be more intuitive if the link was coined New Job, but unfortunately, that's not the case.
In the first page of the wizard that appears, provide a name -- Jenkins Build Job Tutorial -- and then click on the option to create a Freestyle project. Finally, click the OK button.
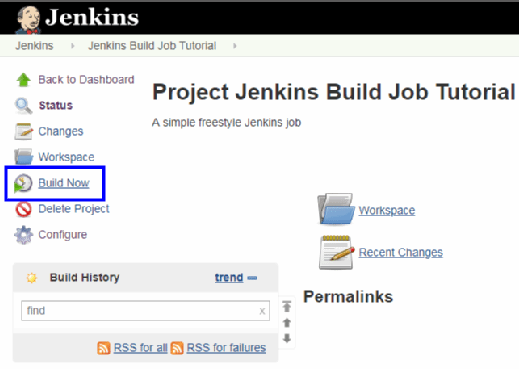
After clicking OK, the configuration page for the freestyle Jenkins job will appear. Notice there are a number of options to configure, including build triggers, source code management options, concurrency, Jenkins build job steps and post-build actions. For this Jenkins build job, we will change the description to "A simple freestyle Jenkins job." Then, click the button towards the bottom of the configuration page that says "Add build step." A drop-down list will appear, so select the first option named Execute Windows batch command.
A new section appears on the page that allows the developer to add any batch commands they wish to have run as part of the Jenkins freestyle job. In this case, we will simply run a batch command asking which Java Runtime Environment (JRE) version is in use, along with a request to print out the directory listing. The directory listing will be interesting because it will tell us exactly where the Jenkins build job is running on the Windows file system.
The command to add looks as follows:
java -version
dir
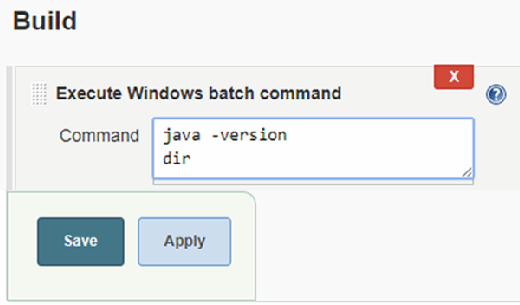
When you've successfully entered the commands into the Jenkins freestyle job's build step, click Save. This will commit your changes and take you back to the Jenkins admin console. Clicking Apply will commit your changes but also keep you on your Jenkins build job configuration page. Save will take you to your job's information landing page.
Run the Jenkins build job
At this point in this CI tutorial, it's time to see the freestlye Jenkins job in action. To do so, simply click on the Build Now option.
When the build runs, a new entry will appear in the Build History box identified with the number one. Click on the drop-down box next to the number to view the console output. You will see the results of running the java -version command, as well as the directory listing command.
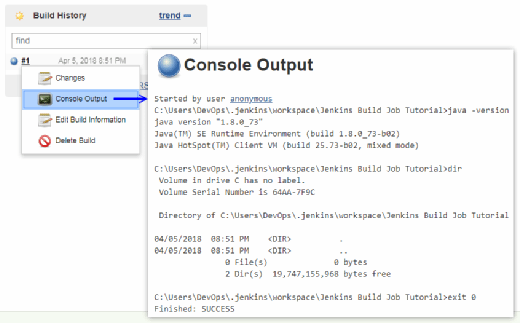
As you can see, the CI tutorial uses JRE version 1.8. This just happens to be the minimum system requirement for running Jenkins 2.54. The current version of Jenkins works fine on the latest Java 10 distribution, and using newer Java Development Kit releases is highly recommended.
The Jenkins build job workspace location
Referring again to the console output, it's noteworthy that the Jenkins freestyle job project ran from a workspace located under the .jenkins directory of the logged-in user. This .jenkins folder is where the CI tool places all configuration information, along with any temporary or transient data it needs when running Jenkins build jobs.
That is all you need to do. If you followed the previous Jenkins CI tutorial for beginners, you saw how easy it is to install Jenkins and get the popular CI tool up and running. And if you followed this CI tutorial through to completion, you saw how easy it is to create and run a Jenkins freestlye job. This job was pretty simple and straightforward, but if you understand these basic concepts, it is a simple and incremental addition to your current knowledge to add in Maven, Gradle or GitHub support.
TheServerSide Jenkins guide
Part 1 -- Jenkins step-by-step tutorial for beginners
Part 2 -- Create a freestyle Jenkins build job
Part 3 -- Build with the Jenkins environment variables list
Part 4 -- Fix Jenkins plugin SSL certificate exceptions
Part 5 -- Who wins the Jenkins vs. Maven debate?
Dig Deeper on DevOps-driven, cloud-native app development
-
![]()
Jenkins interview questions and answers PDF download for experienced CI/CD engineers
By: Cameron McKenzie
-
![]()
Jenkins Git environment variables list: A working shell script by example
By: Cameron McKenzie
-
![]()
Jenkins GitHub Webhook build trigger by example
By: Cameron McKenzie
-
![]()
How to install Jenkins on Ubuntu 20.04 by example
By: Cameron McKenzie