When DevOps evangelists talk about the final product of a continuous delivery pipeline, they usually describe some process in which an enterprise application is deployed to an embedded server, packaged in a Docker container and deployed into the cloud. But seasoned software developers know that the daily grind is much less involved.
For the vast majority of software, the final target of deployment isn't a WebSphere Liberty server or a Docker container. Instead, it's usually a Sonatype Nexus or JFrog Artifactory Maven repository, where the deployment artifact can be easily referenced by other projects.
In this JFrog Artifactory tutorial, we will demonstrate the simple and straightforward process of how to set up an Artifactory Maven repository and conclude by deploying a JAR file.
How to set up Artifactory
JFrog provides both an open source and a paid support version of the Artifactory Maven repository software. The open license version will be the focus of this Artifactory tutorial.
The software is easily obtained from the JFrog site, with the downloaded package weighing in at a little over 95 MB in size. The Artifactory installation step is as simple as extracting the contents of the downloaded ZIP file to a folder of your choice. I extracted the downloaded archive to a folder named _artifactory and moved the folder to the root of the C:\ drive. Voila! The installation is complete.
JFrog Artifactory installation prerequisites
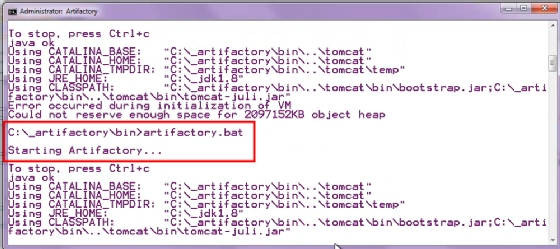
We should note that the Artifactory installation requires a local Java Development Kit (JDK) installation, as the web interface runs on an embedded Tomcat server. But as long as you've installed JDK locally and the JAVA_HOME and JRE_HOMEenvironment variables are set properly, you can start the JFrog Artifactory Maven repository by moving to the bin folder and invoking the artifactory.bat file.
Once you've installed JDK, you can start the JFrog Artifactory Maven repository.
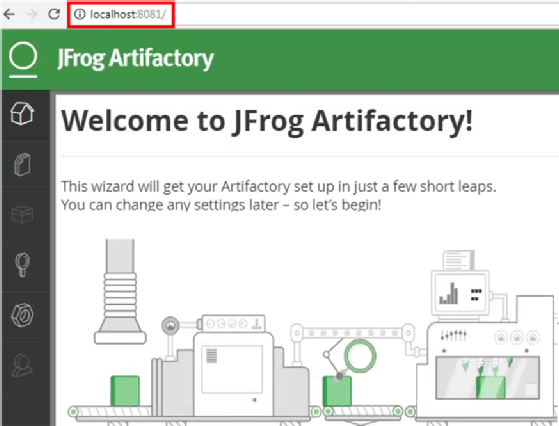
The JFrog Artifactory command center is a handsome, if not excessively green, web-based UI that you can initially access on port 8081 of your local machine. If you type localhost:8081 in a web browser, it will bring up the Artifactory Maven repository's administrative console and welcome page.
Here is that handsome Artifactory Maven repository administrative console.
Default Artifactory username and password
There is plenty to explore as an unauthenticated user, but to configure the tool, you need to log in with the default Artifactory username and password of admin and password.
Once authenticated, the task to perform is to set up a Maven repository of your own. Choose the Quick Setup option in the drop-down list, which can be found in the top right corner. Then, choose to create a Maven repository.
Notice that there are different types of Artifactory repositories that you can create, including Gradle, Ivy, Chef, Npm and Puppet. For this Artifactory tutorial, we will focus exclusively on creating a Maven repo. Simply select Maven from the Create Repositories listing, and click Create in the lower right corner.
The process executes for a few minutes. When completed, you will notice that the tool has created one Maven repository named libs-snapshot-local and another named libs-release-local.
Deployment to the Artifactory Maven repository
The primary reason organizations set up an Artifactory repository is to host deployment artifacts, such as JAR files.
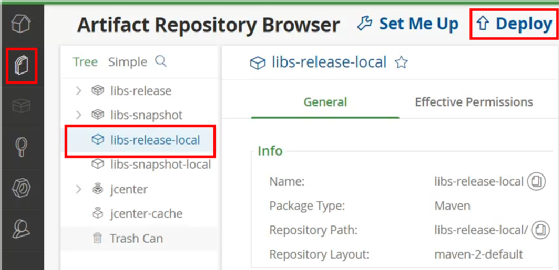
The primary reason organizations set up an Artifactory repository is to host deployment artifacts, such as JAR files. As such, an effective way to test the veracity of the Artifactory installation is to deploy a release-ready JAR file to it.
, open the Artifactory Repository Browser, which is the second link on the left menu, and choose the Maven repository named libs-release-local. A Deploy link will appear in the top right corner of the webpage. Simply click this Deploy link, and then drag and drop any existing JAR files onto the deployment screen that appears.
Test the installation, and deploy a JAR to the Artifactory repository.
You can manually enter any metadata pertaining to the JAR file into the deployment screen, although any JAR with a Maven POM file will have all metadata fields prepopulated by the tool. When you have selected all the JAR files you want to deploy, click the Finish button and the Artifactory Maven repository will upload your JAR file into the repo.
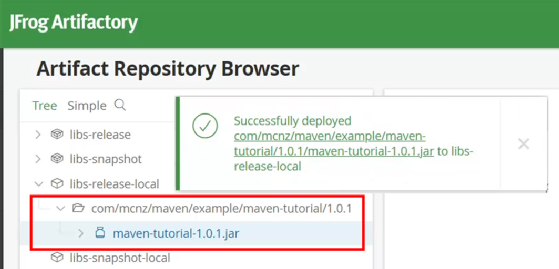
For this example, I deployed a simple JAR file named maven-tutorial-1.0.1.jar, which was built from a Java project named Mavenspiration, hosted on my GitHub. After deployment of the maven-tutorial-1.0.1.jar file, a success message appears, along with a reference to the JAR file in the Artifactory Repository Browser.
When you get this message, you've successfully deployed to the Artifactory repository.
And that's how easy it is to set up an Artifactory Maven repository and subsequently deploy a JAR file.
Artifactory deployment methods
Of course, this Artifactory tutorial simply used the UI to perform the file upload. There are a variety of other ways to deploy an artifact to the Artifactory repository that are more automated and more DevOps friendly, including through the use of RESTful APIs, the Maven Artifactory plugin and even through Jenkins integration. This includes an API-based approach. You can perform a Maven deployment or even use the JFrog Artifactory Jenkins plug-in and connect to the Maven repository after a continuous integration pipeline completes. We will take a look at those approaches in subsequent Artifactory tutorials, but for now, successfully installing the tool and performing a JAR deployment should be considered a learning victory.