Nexus repository manager tutorial: Get started with the OSS Maven tool

If you’re doing software development, you’re more than likely deploying to a local Apache Maven repository. The Nexus repository manager tends to be one of the more popular options, and with both and open source version (Nexus OSS) and one that comes with paid support (Nexus Pro), there really aren’t any articulable barriers to adoption.
In this Nexus repository manager tutorial, we’ll demonstrate how to download Nexus, install Nexus, start the Nexus administrative console and even upload a Java JAR file into the Nexus releases repository. A video accompanies this Nexus repository tutorial to fill in any gaps this article leaves unfilled. This tutorial focuses on the OSS Nexus repository – version 2.14 to be exact. Both Nexus OSS and Nexus Pro have version 3 releases available, but those will be discussed in a subsequent Nexus repository manager tutorial.
Nexus repository manager tutorial
So what are the steps a Maven user needs to follow to get started with the Nexus repository’s OSS version? The first thing you need to do is download Nexus. Sonatype’s repo-manager page allows you to download Nexus OSS v2 as a zip file for windows machines, and as a tar file for *nix based Nexus installs. This Nexus repository tutorial will cover a Windows based installation.
When extracted, the Nexus download reveals a nexus-2.14.9-01 folder which contains a bin directory. It’s from within that bin directory that the command exists that can be used to start the Nexus repository manager. Run the following command from a DOS prompt to start Nexus.
C:\tutorial\nexus-2\bin\ nexus console start
Once the Nexus repository manager has started, the administrative console can be accesses by pointing a web browser to the following address:
http://localhost:8081/nexus
I actually like the fact that the Nexus OSS repository starts on port 8081 and not 8080. It’s like the tool understands that there’s probably a Tomcat server or a Jenkins CI server running on port 8080, so it does a single digit increment to avoid any conflicts. That’s just common decency if you ask me. It should also be noted that you need the /nexus context root. Nexus doesn’t install itself to the root of the embedded Derby application server.
Default Nexus OSS username and password
The default username and password for the Nexus Maven repository is: admin:admin123. When the Nexus repository manager’s administrative console loads, log in with these credentials.
The whole point of having a local Maven repository like Nexus OSS is to able to upload your own deployment artifacts to it. To do so, select the Nexus releases repository on the Repositories listing page and click on the Artifact Upload tab.
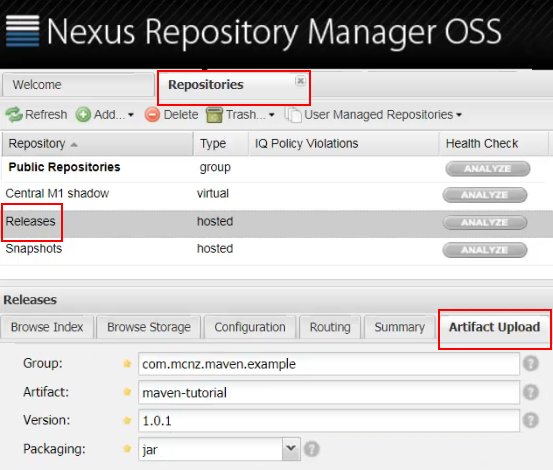
First load of the Nexus repository manager admin console.
The first thing you need to do is provide the Maven group, artifact, version and packaging attributes for the deployment artifact you are about to upload. After doing so, use the Select Artifacts to Upload button to browse to the JAR file of interest. Click Add Artifact and then click the Upload Artifacts option, and the resource is uploaded to the local Maven repo provided by Nexus OSS.
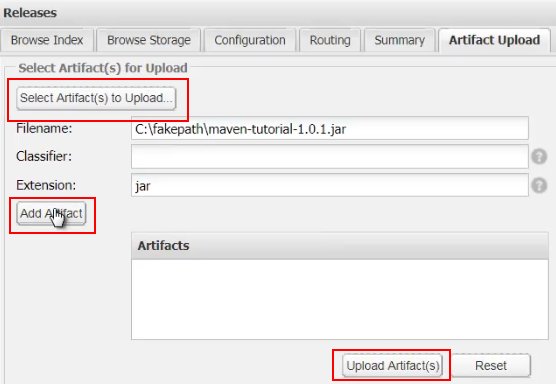
Adding the Nexus repository tutorial’s JAR artifact to Maven
Completing the Nexus repository tutorial
When the upload completes, click on the Browse Index tab to view the fruits of all of the labor put into following this Nexus repository manager tutorial.
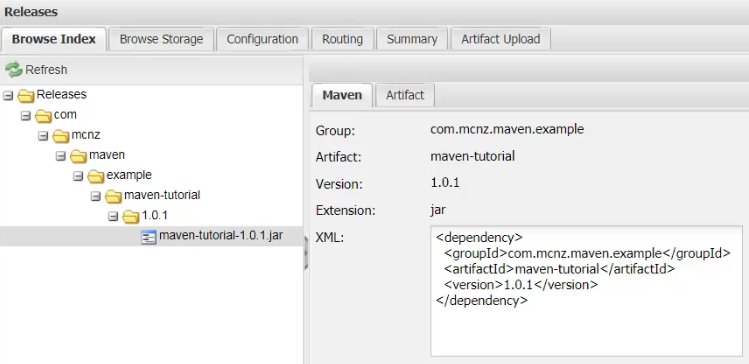
Final result of the Maven Nexus repository tutorial.
And that’s all there is to it. Of course, there are more advanced options to upload a JAR file to your local Maven repo. There’s a REST API, there’s a Jenkins Nexus integration plugin that can be used to pull directly from Git, and of course it can all be kicked off by editing a POM and running a deploy goal in a Maven build job. All of those will be covered in subsequent Nexus repository tutorials. But when you’re just getting started with Nexus, installing the product and uploading an artifact is a great place to start.
 Cameron McKenzie is an AWS Certified AI Practitioner, Machine Learning Engineer, Solutions Architect and author of many popular books in the software development and Cloud Computing space. His growing YouTube channel training devs in Java, Spring, AI and ML has well over 30,000 subscribers.