Step-by-step Jenkins Tomcat deploy of a WAR file
The final stage of a continuous integration pipeline is often the deployment of a packaged WAR file to an application server, such as WebSphere Liberty, WildFly, Jetty or Apache Tomcat. In this Jenkins Tomcat deploy tutorial, we will take you through the various steps required to get a Jenkins pipeline to deploy to Tomcat after a build with a WAR file.
Jenkins Tomcat deploy prerequisites
The following pieces of software are required to follow this example of a Jenkins deployment of a WAR file to Tomcat:
- a Java web application that Jenkins can deploy to Tomcat;
- a Git source code management tool installation;
- a Java 8 or newer installation of the JDK;
- a build tool -- this tutorial uses Maven, but any build tool, such as Ivy, ANT or Gradle, that can package a Java application into a WAR file will do; and
- a Jenkins CI tool installation.
A WAR file for Jenkins to deploy
If you need a web application for Jenkins to deploy to Tomcat, feel free to clone my rock-paper-scissors Java web app from GitHub:
git clone https://github.com/cameronmcnz/rock-paper-scissors.git
cd rock*
git checkout patch-1
Pay special attention to the last command, where you will switch to the patch-1 branch. The master branch creates a JAR file, with Tomcat embedded within. But what we need is the patch-1 branch, which creates a WAR file that can be deployed to Tomcat by Jenkins.
Step 1: Add to Tomcat a user with deployment rights
For a successful Jenkins Tomcat deploy of a WAR file, you must add a new user to Tomcat with manager-script rights. You can do this with an edit of the tomcat-users.xml file, which can be found in Tomcat's conf directory.
<!-- User to deploy WAR file from Jenkins to Tomcat -->
<user username="war-deployer" password="jenkins-tomcat-deploy"
roles="manager-script" />
After you edit the tomcat-users.xml file, it's a good idea to bounce the Tomcat server to confirm the changes have taken effect.
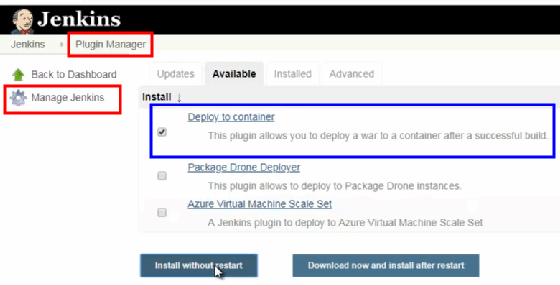
Step 2: Add the 'Deploy WAR/EAR to a container Jenkins' plugin
Out of the box, there are no built-in features that perform a Jenkins WAR file deployment to Tomcat. That means a Jenkins Tomcat deploy plugin must be installed in the CI tool to make a deployment happen.
The most popular Jenkins Tomcat deployment plugin is named Deploy to container, which can be installed through the Plugin Manager tab under the "Manage Jenkins" section of the tool.
Step 3: The Jenkins build job
With the Jenkins Tomcat deployment plugin installed, it's time to create a new Jenkins build job that can build an application and deploy a packaged WAR file to Tomcat.
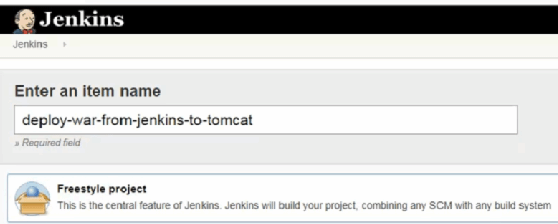
Step 3A: Create a Jenkins freestyle project
The Jenkins build job we need to create will be named deploy-war-from-jenkins-to-tomcat, and it will be a freestyle project type.
Step 3B: Configure standard build job properties
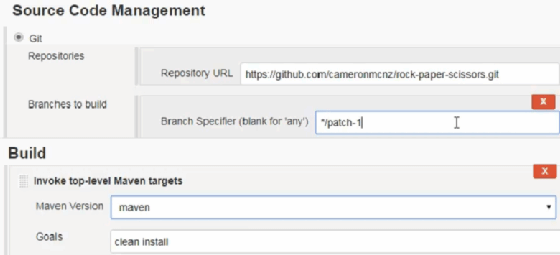
The Jenkins build job will be configured with the following properties:
JDK: java8
Git Repository URL: https://github.com/cameronmcnz/rock-paper-scissors.git
Git branch specifier: */patch-1
Maven Goals: clean install
Step 3C: The Jenkins Tomcat deploy plugin post-build action
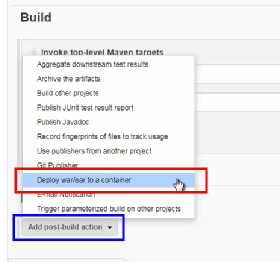
After a build, the final step of a Jenkins pipeline deploy to Tomcat is to use the Deploy to container plugin in a post-build action.
Three of the four settings used by the Deploy WAR/EAR to a container plugin can be typed in directly:
WAR/EAR files: **/*.war
Context path: rps
Containers: Tomcat 8.x
Tomcat URL: http://localhost:8080
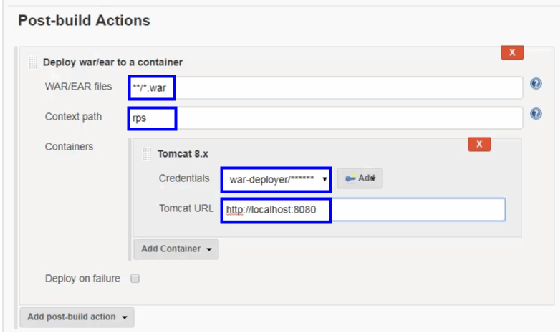
To configure the credentials, you must click the Add button next to the empty entry field and create a new Jenkins credentials object:
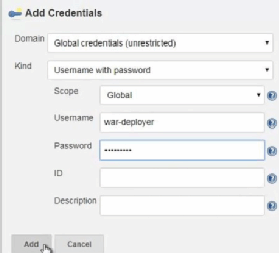
The username and password need to match what was entered into the tomcat-users.xml file in an earlier step:
Username: war-deployer
Password: jenkins-tomcat-deploy
Step 3D: Run the Jenkins build job
Now that you have specified all of the configurations, the Jenkins build job can be saved and run.
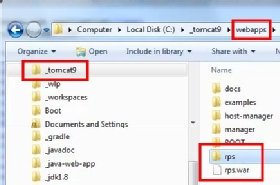
When the build job finishes, the Jenkins Tomcat deploy of a WAR file will have also completed, and a file named rps.war will be visible in the webapps directory of Tomcat.
Step 4: Test the deployed WAR file
With the WAR file deployed, test the application by running Tomcat and pointing your browser to the following URL:
http://localhost:8080/rps/index.html
Jenkins Tomcat WAR deployment summary
To recap, here is a summary of the steps required to perform a Jenkins Tomcat WAR file deployment:
- Add a user with WAR deployment rights to the tomcat-users.xml.
- Add the Deploy to container Jenkins Tomcat plugin.
- Create a Jenkins build job with a Deploy to container post-build action.
- Run the Jenkins build job.
- Test to ensure the Jenkins deployment of the WAR file to Tomcat was successful.
And that's how easy it is to get Jenkins to deploy WAR files to Tomcat.