
A popular tutorial on how to create REST web services with Eclipse and the TomEE Plus application server regrettably caused some confusion. A number of readers tried to deploy the application to a standard Tomcat installation, not the enhanced TomEE+ edition. Since the basic Tomcat server does not support JAX-RS, a straightforward deployment of a JAX-RS based application will fail. But, that doesn't mean you can't create JAX-RS web services in Eclipse and run them on Tomcat.
This tutorial demonstrates how to develop a JAX-RS RESTful web service with Eclipse and subsequently deploy it to Tomcat.
To complete this tutorial, you will need:
- All of the JAR files required to support the Jersey implementation of JAX-RS.
- Eclipse Photon v18-12 installed
- JDK version 8 installed with JAVA_HOME configured
- Tomcat 9 installed with CATALINA_HOME configured
JAX-RS REST web services with Eclipse
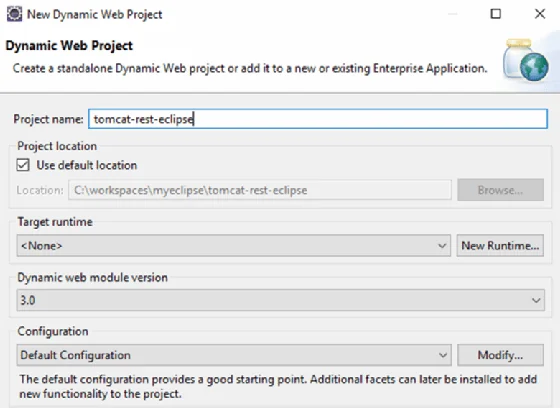
The first thing I'll do is create a new dynamic web project in Eclipse named tomcat-rest-eclipse.
TheServerSide
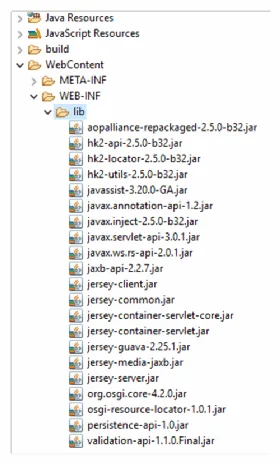
I'll then unzip the jaxrs-ri-2.25.1.zip file and copy every single JAR file contained in the \api, \ext and \lib directories of that download into the WEB-INF\lib directory of the dynamic web application. This now enables my tomcat-rest-eclipse application.
TheServerSide
The RESTful application's goal is to track the score of a rock-paper-scissors game. The first class to create is named Score, and has three static variables named WIN, LOSSES and TIES:
package com.mcnz.rest.tomcat.eclipse;
public class Score {
public static int WINS, LOSSES, TIES;
}
The first iteration of the web service will record the number of wins, losses and ties. This will be coded into the new ScoreService class:
package com.mcnz.rest.tomcat.eclipse;
import javax.ws.rs.*;
@Path("/")
public class ScoreService {
@GET
@Path("/score/wins")
@Produces("text/plain")
public int getWins() {
return Score.WINS;
}
@GET
@Path("/score/losses")
@Produces("text/plain")
public int getLosses() {
return Score.LOSSES;
}
@GET
@Path("/score/ties")
@Produces("text/plain")
public int getTies() {
return Score.TIES;
}
}
Jersey JAX-RS ResourceConfig
Finally, we will create the ScoreApplication class, which acts as a hook between our RESTful application and the web container. This ScoreApplication class extends ResourceConfig and is decorated with an @ApplicationPath annotation. Note that when the Tomcat server starts up, it will examine this ScoreApplication class and look for JAX-RS annotated classes inside any of the packages listed in the class' constructor. You will notice that the package listed contains our ScoreService class:
package com.mcnz.rest.tomcat.eclipse;
import javax.ws.rs.ApplicationPath;
import org.glassfish.jersey.server.ResourceConfig;
@ApplicationPath("/")
public class ScoreApplication extends ResourceConfig {
public ScoreApplication() {
packages("com.mcnz.rest.tomcat.eclipse");
}
}
The above class directly references the Jersey implementation, not the JAX-RS API, and many purists don't like that. There is an alternate, JAX-RS way to accomplish the same goal that uses the @ApplicationPath annotation and extends the JAX-RS Application class. Which approach you take shouldn't make any difference.
For me, the Jersey implementation easier to read, and I find it works more consistently. If I ever get a 404: The origin server did not find a current representation for the target resource error with the JAX-RS application, I can resolve that if I use Jersey's ResourceConfig.
Test JAX-RS REST services with Tomcat
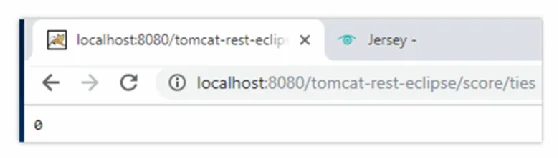
With these three classes coded and the Jersey libraries added to the \lib directory of the tomcat-rest-eclipse project, you can run the application on the Tomcat server and invoke their RESTful web services with a browser. Don't get too excited though, as right now they will only return a zero for the count. But if you do get a zero, everything worked, and you are ready to dig deeper into the JAX-RS API.
localhost:8080/eclipse-tomcat-rest/score/wins
localhost:8080/eclipse-tomcat-rest/score/losses
localhost:8080/eclipse-tomcat-rest/score/ties
RESTful JAX-RS POST methods
To make the output a little more interesting, add new methods to the ScoreService class that increment the score through a POST invocation:
@POST
@Path("/score/wins")
@Produces("text/plain")
public int increaseWins() {
return Score.WINS++;
}
@POST
@Path("/score/ties")
@Produces("text/plain")
public int increaseTies() {
return Score.WINS++;
}
@POST
@Path("/score/losses")
@Produces("text/plain")
public int increaseLosses() {
return Score.LOSSES++;
}
If you want to get adventurous, you can add RESTful GET and PUT methods for the /score mapping that return all three values associated with the score as a JSON string. In this example, we use a String.format call, but normally you would just return a JavaBean, or in this case, the Score class. Sadly, that only works with instance variables, not static variables, so our example is a little more verbose than it normally would be.
@GET
@Path("/score")
@Produces("application/json")
public String getScore() {
String pattern = "{ \"wins\":\"%s\", \"losses\":\"%s\", \"ties\": \"%s\"}";
return String.format(pattern, Score.WINS, Score.LOSSES, Score.TIES);
}
// localhost:8080/restful-java/score?wins=2%losses=3@ties=15
@PUT
@Path("/score")
@Produces("application/json")
public String update(@QueryParam("wins") int wins,
@QueryParam("losses") int losses,
@QueryParam("ties") int ties) {
Score.WINS = wins;
Score.TIES = ties;
Score.LOSSES = losses;
String pattern = "{ \"wins\":\"%s\", \"losses\":\"%s\", \"ties\": \"%s\"}";
return String.format(pattern, Score.WINS, Score.LOSSES, Score.TIES);
}
TheServerSide
Redeploy your application, and invoke your web service through PUT, POST and GET invocations. You can accomplish GET though the browser, but POST and PUT will need a browser plugin such as PostMan, or the popular UNIX utility curl. Here's a curl to increase the wins and view the results:
$ curl -X POST "https://localhost:8080/score/wins"
$ curl -X POST "https://localhost:8080/score/wins"
$ curl -X POST "https://localhost:8080/score/ties"
$ curl -X GET "https://localhost:8080/score/"
The JSON generated from the last of these RESTful web service calls is:
{ "wins":"2", "losses":"0", "ties": "1"}
You can even use curl to invoke a RESTful PUT and set the values to Gretzky, Lindros and Lemieux.
$ curl -X PUT "https://localhost:8080/score?wins=99&losses=88&ties=66"
Here is the JSON that Tomcat returns from this RESTful PUT call:
{ "wins":"99", "losses":"88", "ties": "66"}
And that's it. That's all you need to do to create and deploy JAX-RS REST web services in Eclipse with Tomcat.
JAX-RS with TomEE+ and Eclipse
This article was inspired largely by a previous article that created a JAX-RS web service with Eclipse and TomEE+. Unfortunately, a number of readers used Tomcat, not TomEE and ran into some issues.
For those who want to further their understanding of REST-based development and design, we also recommend these articles:
- RESTful APIs tutorial: Learn key web service design principles
- RESTful parameters antipattern considerations for queries, paths
- Where are the REST alternatives for real-time applications?
- Step-by-step Spring Boot RESTful web services example in Java using STS
- Step-by-step SOAP web services example in Java using Eclipse