Step-by-step Spring Boot RESTful web services example in Java using STS
In a previous article about important RESTful principles and how to create a beautiful RESTful API, I used the example of a web service that kept track of an ongoing, global score for an online rock-paper-scissors application. In this step-by-step Spring Boot RESTful web services example, we'll implement that scenario using the Spring Web APIs and the Eclipse based SpringSource Tool Suite (STS) as the IDE.
Review of the RESTful API
The RESTful score service will provide the following functions:
RESTful clients can find out the current number of wins, losses and ties through a GET request to the following URL:
www.mcnz.com/rps/score | GET
This invocation will return a JSON string in the following format:
{ "wins":"5", "losses":"3", "ties": "0"}
RESTful clients can update the score by invocating the same URL through a PUT invocation while also passing query parameters. Again, the program will return a JSON-based representation of the score after the update. A better design would be to use JSON as the payload, but query parameters are used here for the sake of simplicity.
www.mcnz.com/rps/score?wins=1&losses=2&ties=3 | PUT
With the RESTful API, the user cannot directly set the number of wins, losses or ties. The client can only use a POST invocation to increment values one at a time. This is not an idempotent function, so it is handled through a POST. In this case, a simple number is returned to the program as opposed to a JSON string.
You can use a simple GET invocation on the appropriate resource locator to obtain the number of wins, losses or ties:
www.mcnz.com/rps/score/wins | GET

www.mcnz.com/rps/score/ties | GET

www.mcnz.com/rps/score/losses | GET
This step-by-step Spring Boot RESTful web services example in Java has very few prerequisites, but it does assume that you have the SpringSource Tool Suite (STS) installed. If that's the case, you are ready to jump on the fast track to developing RESTful web services with Spring.
Step 1. Create the RESTful Spring Boot project
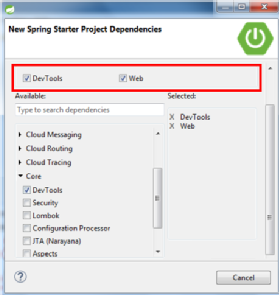
The first step in this exercise is to create a new Spring Boot project named restful-spring-example that uses both the Web and DevTools features. This is accomplished by kicking off the Spring Starter Project wizard in Eclipse. Select the Spring Web and DevTools options and click Finish on the Spring Boot project wizard.
Step 2: Create the Java classes
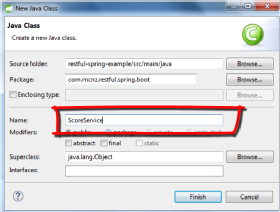
The next step is to open the restful-spring-example project and create two classes: Score.java and ScoreService.java.
Right click on the com.mcnz.restful.spring.boot package and choose to create a new class named Score. The Score class is used to keep track of the global number of wins, losses and ties that occur in the online rock-paper-scissors game. The Score class will maintain the number of wins, losses and ties as static variables of type int. State should never be held within a RESTful web service, so this class represents the externalization of state.
package com.mcnz.restful.spring.boot;

public class Score {
  public static int WINS, LOSSES, TIES;
}
After you code the Score class, create a second Java component named ScoreService. We'll use the ScoreService class to provide access to -- and the ability to manipulate -- the Score. The first iteration of the class used in this Spring Boot web service example will have getter methods that return the number of wins, losses and ties, along with update methods that can increment the number of wins, losses and ties by one.
Here is the first iteration of the ScoreService class before we decorate it with RESTful annotations and subsequently configure it as a Spring Boot web service.
package com.mcnz.restful.spring.boot;
/* Spring Boot web service example class */
public class ScoreService {

   public String updateScore(int wins, int losses, int  ties) {
      Score.WINS = wins;
      Score.TIES = ties;
      Score.LOSSES = losses;
      /* to be updated to return JSON */
      return this.toString();
   }

   public int increaseWins()   { return ++Score.WINS;   }
   public int increaseTies()   { return ++Score.TIES;   }
   public int increaseLosses() { return ++Score.LOSSES; }

   public int getWins()   { return Score.WINS;   }
   public int getTies()   { return Score.TIES;   }
   public int getLosses() { return Score.LOSSES; }
}

/* End of Spring Boot web service example class. */
Step 3: Annotate the Spring Boot example class
With the first iteration of the ScoreService component coded, the next step is to transform it into a Spring Boot RESTful web service by decorating the class declaration with the @RestController annotation. The @RestController annotation informs the Spring Boot framework that the class contains methods that will be invoked through a web-based resource URL.
@RestController
public class ScoreService { … }
Step 4: Annotate RESTful Spring methods
Step four is to add @RequestMapping annotations to methods. These annotations define the HTTP method used along with the structure of the resource URLs that will be used to invoke them. In the previous tutorial about how to create beautiful RESTful APIs, we established that we would invoke the update methods through a POST, and all getter methods sensibly through a GET invocation. The URLs are all resource based, so use of the URL path is /score/wins to get information about the number of wins and the path /score/ties to increase the number of ties.
Fully decorated with Spring Boot RESTful web service annotations, the next iteration of the ScoreService class looks as follows:
/* Spring Boot web service example class */
@RestController
public class ScoreService {

  @RequestMapping(value="/score", method=RequestMethod.PUT, )
  public String updateScore(int wins, int losses, int ties) {
     Score.WINS = wins;
     Score.TIES = ties;
     Score.LOSSES = losses;
     return this.toString(); /* to be updated to return JSON */
   }
   @RequestMapping(value="/score/wins", method=RequestMethod.POST)
   public int increaseWins()   { return ++Score.WINS;   }

   @RequestMapping(value="/score/ties", method=RequestMethod.POST)
   public int increaseTies()   { return ++Score.TIES;   }

   @RequestMapping(value="/score/losses", method=RequestMethod.POST)
   public int increaseLosses() { return ++Score.LOSSES; }

   @RequestMapping(value="/score/wins", method=RequestMethod.GET)
   public int getWins()   { return Score.WINS;   }

   @RequestMapping(value="/score/ties", method=RequestMethod.GET)
   public int getTies()   { return Score.TIES;   }

   @RequestMapping(value="/score/losses", method=RequestMethod.GET)
   public int getLosses() { return Score.LOSSES; }
}
/* End of Spring Boot web service example class */
Step 5: Generate RESTful JSON responses
This step-by-step Spring Boot RESTful web services example needs to generate a JSON-based response for the client. There are excellent frameworks like Jackson and GSON, which you should use in larger projects, but for this simple RESTful web services example, we will simply employ some Java String manipulation to generate the JSON.
The getScore() method needs to return a JSON string formatted in the following manner:
{ "wins":"5", "losses":"3", "ties": "0"}
Here is how the un-annotated getScore() method looks when coded to return a JSON string:
public String getScore() {
  String pattern =
     "{ \"wins\":\"%s\", \"losses\":\"%s\", \"ties\": \"%s\"}";
  return String.format(pattern,Score.WINS, Score.LOSSES, Score.TIES);
}
Note that you'll use this same pattern match and String format approach again to return a JSON-based representation of the score in the updateScore method.
Since the getScore() method now returns JSON, you need to add a new produces attribute to the @RequestMapping annotation. The fully annotated getScore() method that indicates that JSON will be returned to the calling program looks as follows:
@RequestMapping(value="/score",
            method=RequestMethod.GET,
                  produces=MediaType.APPLICATION_JSON_VALUE)
public String getScore() {
  String pattern =
       "{ \"wins\":\"%s\", \"losses\":\"%s\", \"ties\": \"%s\"}";
  return String.format(pattern,  Score.WINS, Score.LOSSES, Score.TIES);
}
In order to generate JSON, the updateScore method follows a similar pattern of updated annotations and String manipulation within the code:
@RequestMapping(value="/score",
    method=RequestMethod.PUT,
       produces=MediaType.APPLICATION_JSON_VALUE)

public String updateScore(int wins, int losses, int ties) {
  Score.WINS = wins;
  Score.TIES = ties;
  Score.LOSSES = losses;
 String pattern =
     "{ \"wins\":\"%s\", \"losses\":\"%s\", \"ties\": \"%s\"}";
  return String.format(pattern,Score.WINS, Score.LOSSES, Score.TIES);
}
QueryParam to method signature mapping
To update the ScoreService, the client will use the /score path while it passes query parameters to represent the number of wins, losses and ties. For example, a request to update the number of wins to 99, ties to 88 and losses to 7 would look like this:
http://www.mcnz.com/score?wins=99&ties=88&losses=7
As long as the updateScore method has method parameters that match the names of the query parameters, the Spring Boot web services framework will assign the queryParam values to the correspondingly named method signature parameter.
http://www.mcnz.com/score?wins=99&ties=88&losses=7

public String updateScore(int wins, int losses, int ties) { … }
The updateScore method will take the values passed into the method and assign them to the corresponding properties of the ScoreService class. An updated JSON string will be sent to the client indicating the new, updated value of the score. You'll use the same process used to generate JSON in the getScore()method here. The full method implementation is as follows:
@RequestMapping(value="/score",
     method=RequestMethod.PUT,
        produces=MediaType.APPLICATION_JSON_VALUE)

public String updateScore(int wins, int losses, int ties) {
  Score.WINS = wins;
  Score.TIES = ties;
  Score.LOSSES = losses;
  String pattern =
     "{ \"wins\":\"%s\", \"losses\":\"%s\", \"ties\": \"%s\"}";
  return String.format(pattern, Score.WINS, Score.LOSSES, Score.TIES);
}
With the updateScore method coded, the step-by-step Spring Boot RESTful web services example is code complete, and the only steps left are to test and deploy.
Step 6: Run the Spring Boot RESTful web service
To run the application, simply right click on the restful-spring-example project and choose Run As → Spring Boot App and Maven will package the application and deploy it to the STS server. When the console window indicates the Tomcat-based server has finished starting, open a browser window and go to localhost:8080/score/wins. A value of zero will appear.
Step 7: Test the RESTful Spring Boot service
To test the increaseWins method, run the following two CURL command in a Bash shell:
$ curl -X POST "http://localhost:8080/score/wins"
$ curl -X GET "http://localhost:8080/score/"
The output of the second command is:
{ "wins":"1", "losses":"0", "ties": "0"}
Now trigger a PUT invocation, with query parameters being used to carry the payload:
$ curl -X PUT "http://localhost:8080/score?wins=31&losses=11&ties=22"
This results in an output of:
{ "wins":"31", "losses":"11", "ties": "22"}
And that's it, a complete, step-by-step Spring Boot RESTful web services example that creates a fully functional Spring Boot application.
How to improve the RESTful Spring example
Now there is plenty of room for improvement and expansion when it comes to this step-by-step Spring Boot RESTful web services example.
Obviously, using the static variables in the Score class is a poor way to manage state, so at the very least we should offload the job of state management to a JavaBean with an ObjectOutputStream. And neither a JavaBeans or RESTful web service should be responsible for data persistence, so there will be opportunities to integrate Hibernate, JPA and Spring Boot web services. We could also invoke the Spring Boot RESTful web service example through a Spring MVC app or a Spring RestTemplate instead of CURL, and of course, it would be nice to package this app in an executable JAR file with an embedded Tomcat or embedded WebSphere Liberty server and deploy it as a microservice. But all of those things would complicate the example and distract from the core purpose, which is to demonstrate just how easy it is to develop a RESTful Spring web service using the Spring Boot framework.
These aforementioned issues will be addressed in subsequent tutorials. The source code for this step-by-step Spring Boot RESTful web services example can be found on GitHub.