Get started with Spring Boot 3 tutorial

It shouldn’t take you more than five minutes to get your first Spring Boot application running if you’ve installed the Eclipse based Spring Tool Suite (STS) IDE and meet the following minimum requirements:
- A Java 17 installation.
- Gradle 7.5 or Maven 3.5.
The Eclipse based STS IDE isn’t a requirement for Spring Boot development, but it is highly recommended. Its step-by-step wizards make the creation of your first Spring Boot application significantly easier. Plus, it’s free. It’s what we’ll use in this tutorial.
How to get started with Spring Boot 3
With the prerequisites met, and STS installed, simply perform the following steps to create your first RESTful web service with Spring Boot:
- Choose the Create new Spring Starter Project wizard in STS.
- Fill out the Maven or Gradle coordinates for your project.
- Add the Spring Web dependency.
- Use the @RestController annotation to add web service support.
- Use the @GetMapping annotation to handle a web-based request.
- Build the Spring Boot application with Apache Maven or Gradle.
- Run and test your first Spring Boot 3 application.
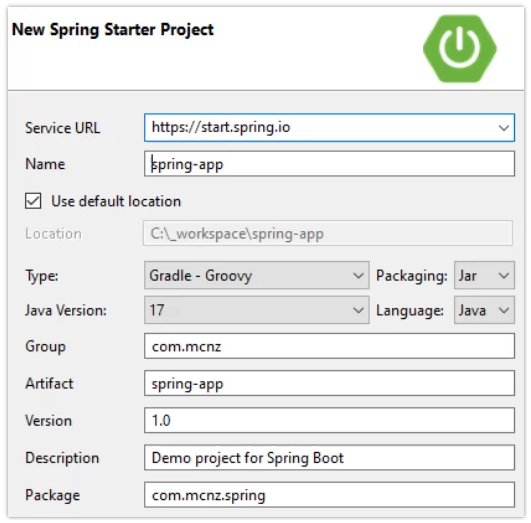
Spring Boot starter wizard
When you open the Eclipse-based Spring Tool Suite for the first time, you are presented with a variety of links, one of which provides the option to Create a new Spring Starter Project. Click this option to bring up the first page of the Spring Boot project starter wizard.
The first page of the STS Spring Boot starter wizard forces you to answer a number of important questions about the cloud-native app you plan to build, such as:
- Will you use Gradle or Maven as a build tool?
- Will you code your first Spring Boot app in Java or Kotlin?
- Which release of Java will you use?
- Will your first Spring Boot app be packaged as a WAR or a JAR file?
A simple Spring Boot configuration
The safe answers chosen for this Spring Boot tutorial are as follows:
- Build tool: Gradle
- JDK version: 17
- Language: Java
- Packaging: JAR
The starter wizard also asks you to name the artifact and version. I want to deploy a JAR file named spring-app-1.0.jar, so I entered:
- Version number: 1.0
- Artifact name: spring-app
When you are happy with the way your first Spring Boot 3 application is configured in the first page of the wizard, click Next to add dependencies.
The toughest part of creating your first Spring Boot app is filling out the STS starter wizard.
Spring Boot dependencies page
The second page of the Spring Boot creation wizard asks you to include any dependencies.
The one dependency we will add is for Spring Web support. This enables our first Spring Boot app to handle web-based request-response cycles.
Click Finish after you select the Spring Web dependency, and explore the Eclipse project that you’ve created.
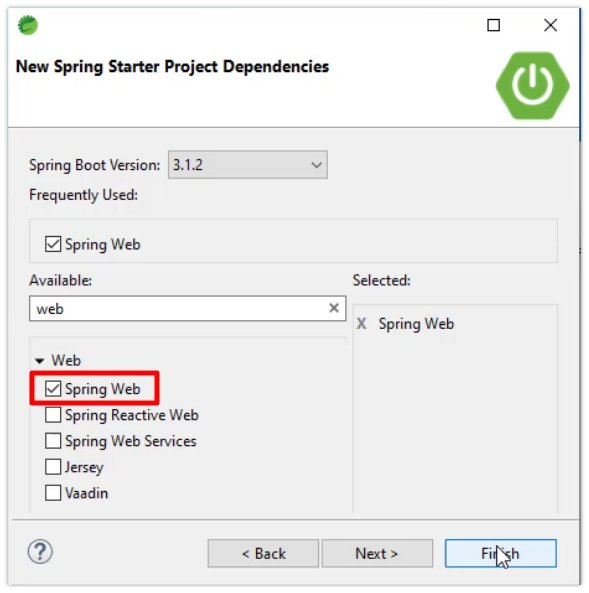
Add the Spring Web dependency to enable RESTful APIs.
The Spring Boot project in Eclipse
A new Eclipse project named spring-app will appear in your workspace with a single class named SpringAppApplication.java. This file’s class declaration is decorated with the @SpringBootApplication annotation.

The Spring Tool Suite creates an Eclipse project with a single Java class.
Every Spring Boot app must contain a Java class with the @SpringBootApplication annotation on it. This annotation makes a Spring Boot app a Spring Boot app.
The class bearing the @SpringBootApplication annotation must also contain a main method with a call to the static run method of the class.
@SpringBootApplication
public class SpringAppApplication{
  public static void main(String[] args) {
    SpringApplication.run(SpringAppApplication.class, args);
  }
}
This is all boilerplate code that must exist in every Spring boot app. Don’t fret about it too much. Just take comfort in the fact that it’s there.
Create a Spring Boot web service
To turn this simple class into a RESTful web service, add a @RestController annotation above the @SpringBootApplication.
Then create a simple method that returns a String that says “Hello Spring World!”
It’s also a good idea to add a println statement that indicates the method has been entered.
Decorate that method with the @GetMapping(“/hello”) annotation, and your first Spring Boot application is done.
@RestConroller
@SpringBootApplication
public class SpringAppApplication{
  public static void main(String[] args) {
    SpringApplication.run(SpringAppApplication.class, args);
  }

  @GetMapping("/hello")
  public String sayHello() {
    System.out.println("I am in the Spring Boot app!");
    return "Hello Spring World!";
  }
}
Run your first Spring Boot app
The coding is done, and your first Spring Boot app is ready to test.
Simply right-click on the SpringAppApplication.java file and select Run As -> Java Application.
Spring will fire up a Tomcat server that hosts your RESTful web application on port 8080.
Just navigate to localhost:8080/hello in any browser and you’ll see the text, “Hello Spring World!” displayed on the webpage.

A RESTful web service written in Spring Boot 3 displays a Hello World message.
When you inspect your first Spring Boot 3 app’s log files, you’ll see the println statements are recorded.
And that’s how easy it is to write your first Spring Boot application using version 3 of this popular Java-based framework.

Cameron McKenzie is an AWS Certified AI Practitioner, Machine Learning Engineer, Solutions Architect and author of many popular books in the software development and Cloud Computing space. His growing YouTube channel training devs in Java, Spring, AI and ML has well over 30,000 subscribers.