Use the Jenkins OAuth plug-in to securely pull from GitHub
The easiest way to securely push code to your remote GitHub repository from your continuous integration server is to use the Jenkins OAuth plug-in. This tutorial shows you how.

This tutorial is intended to show you just how easy it is to get started with the Jenkins OAuth plug-in. Starting from the very basics -- how to download the application WAR file and pull code from GitHub -- this Jenkins tutorial will demonstrate how to register a Jenkins OAuth application on GitHub, where to download the Jenkins OAuth plug-in and how to use Jenkins OAuth credentials to securely push and pull code to and from GitHub.
Get up to speed with Git and Git integration tools
New to Git and distributed version control? Here are some Git and GitHub examples and Jenkins-Git integration tutorials designed to help you master the popular source code versioning tool.
- See how you would do on these Git and GitHub interview questions
- The five basic Git commands beginners need to master
- Undo a commit and manipulate commit history with this git reset --hard example
- Learn to git revert a commit with the bash shell
- Use the git cherry-pick command across Git branches
- Change the Git editor to Notepad++
- Where the Windows Git configuration files are stored
- Make continuous integration part of your DevOps journey with this Jenkins CI tutorial
Step 1: Download the Jenkins WAR using wget
If you do not already have an instance of Jenkins running on your local machine, you will need to download and install the Jenkins product. There are several ways to do this. One way is to simply download the jenkins.war file and install it into an existing servlet engine, like WebSphere Liberty or WildFly. However, the jenkins.war file also comes with an embedded servlet runtime, so the WAR can be run independent of an existing servlet engine. Using the embedded runtime is how we will use Jenkins in this tutorial. The jenkins.war file can be downloaded either by going to the Jenkins website or issuing the following wget command from a shell screen or disk OS prompt.
| wget http://mirrors.jenkins.io/war-stable/latest/jenkins.war |
Step 2: Start Jenkins
| java -jar jenkins.war |
After starting Jenkins, the standard output (stdout) console will display an admin password for logging into the tool. Take note of this password; you'll need it for the next step.
| Jenkins initial setup is required. An admin user has been created and a password generated. |
Step 3: Log in to the Jenkins admin console
Open the Jenkins admin console at http:(your Jenkins server):8080, and log in with the admin user and your stdout password.
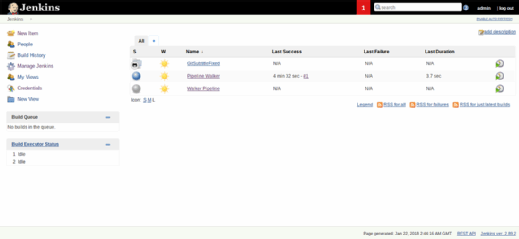
The screen above is the main screen. Each of these items are projects -- i.e., a set of instructions to do something. In this case, we will download Java code from Github and compile it.
Step 4: Install the Jenkins OAuth plug-in
GitHub is used by many organizations as a source code repository. The easiest way to securely authenticate with GitHub through Jenkins is to use the Jenkins OAuth plug-in for GitHub.
To install the plug-in, go to the Manage Plug-ins page of the Jenkins admin console. Click on Available, and filter for Git. Then, select GitHub Authentication Plug-in.
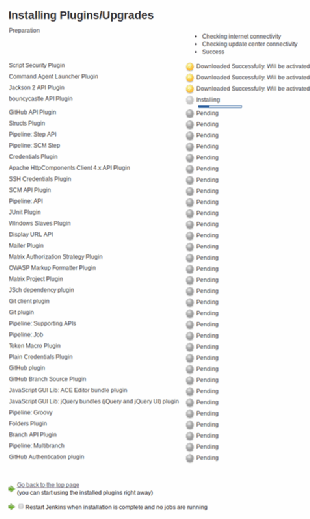
Click at the bottom of the screen to install the Jenkins OAuth plug-in. Restart Jenkins when the installation is complete.
The screen will look as follows as it downloads and installs the various components it needs:
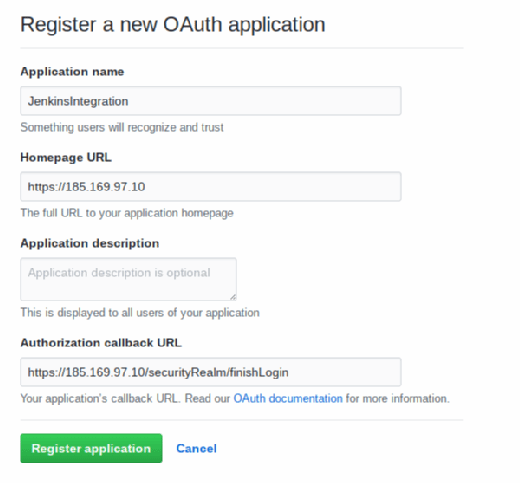
Step 5: Register the Jenkins OAuth application on GitHub
Navigate to the following URL to register a new OAuth application on GitHub. If you are not already logged into GitHub with an active account, accessing this page will ask you to log in or register. After doing so, the option to register a new OAuth application becomes available.
This step does not create a new code repository. Instead, this exists for creating authentication credentials. These credentials will be used as a repository for CI tool communication and will help simplify security between your DevOps tools.
The screen is shown below. Note the callback URL and homepage items:
| Application name |
Put any name, like JenkinsIntegration. |
| Homepage URL |
This does not really mean where to pull the code from. We will do that in a subsequent step. In the meantime, use this value: https://github.com/werowe/SubtitleFixer |
| Authorization callback URL |
https://(your Jenkins server)/securityRealm/finishLogin |
Once submitted, GitHub will provide an application number. Save this.
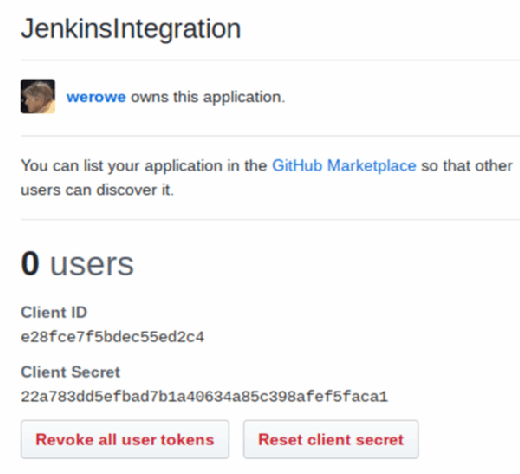
These are the credentials to save:
| Client ID |
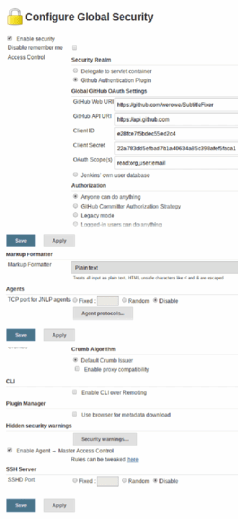
Step 6: Configure OAuth security in Jenkins
From the Jenkins admin console, navigate to the Configure Global Security page.
Fill out the screen as shown below, and put in your own credentials and Jenkins server IP. If you need some Java code, use this repository. For now, you can select the authorization anyone can do anything. For a production system, you would want to set that up to pull user IDs from Lightweight Directory Access Protocol, such as Active Directory or another source.
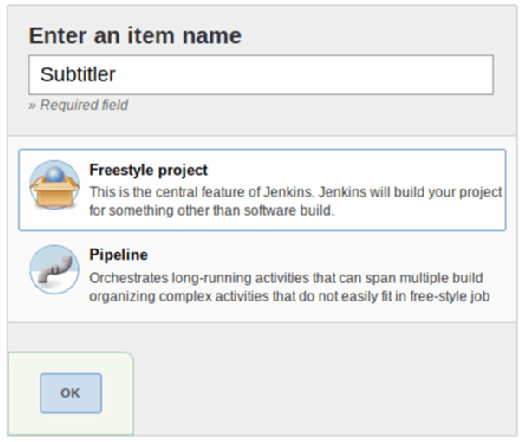
Step 7: Create a Jenkins job
Now, from the Jenkins main screen, select New Item, and create a Freestyle project:
Fill out the screen as shown above. This tells it to poll the github project every 15 minutes looking for changes. Then, we execute the simple shell command javac SubtitleFixed.java to compile the source code. In a more complex example, you would use Maven, Ant, sbt for Scala or another command, depending on which language you use and which DevOps tools you have at your disposal. You can also have multiple commands, such as building a JAR file and running unit test code.
Step 8: Run the Jenkins job
Save that, and then, click Build Now to pull down the source code and compile it. Then, click Status, and click the down arrow next to Last Successful Build. Select Console Output. It should look as follows and say Success at the end:
| Started by user admin |
And that's it! That demonstrates how easy it is to secure communications between the local build tool and the remote source code repository by using the Jenkins OAuth plug-in for GitHub.
Dig Deeper on DevOps-driven, cloud-native app development
-
![]()
Jenkins interview questions and answers PDF download for experienced CI/CD engineers
By: Cameron McKenzie
-
![]()
Jenkins Git environment variables list: A working shell script by example
By: Cameron McKenzie
-
![]()
Jenkins GitHub Integration for CI/CD Pipelines example
By: Cameron McKenzie
-
![]()
'403: No valid crumb' Jenkins GitHub webhook error fix
By: Cameron McKenzie