Java Mission Control 8 Eclipse plugin install example

Java Mission Control is a powerful tool for those who need to profile and troubleshoot the JDK. But the Java Mission Control plugin currently available through the Eclipse Marketplace is the old Oracle product, and without a commercial license to use it, you can’t use the Java Flight Recorder to gather JVM metrics, which pretty much renders Java Mission Control useless.
However, since the original release of the Eclipse Java Mission Control plugin, Oracle has open sourced these powerful Java profiling and performance monitoring tools. That’s the good news. The bad news is you’ll have to manually build and install the open source Eclipse plugins for Java Mission Control (JMC) and Java Flight Recorder (JFR).
Furthermore, most of the online instructions explaining how to build JFR and JMC were written when the source code was hosted on Mercurial, not GitHub, which can make the process somewhat confusing for those who aren’t particularly comfortable building software in the first place.
In this Java Mission Control tutorial, we’ll help minimize this confusion and show you how to install the plugins needed to kick off the Java Flight Recorder within Eclipse.
JMC and JFR in Eclipse prerequisites
The prerequisites to follow this tutorial include:
- Installation of the JDK 11 or newer
- Installation of the Eclipse IDE
- Installation of the Apache Maven build tool
- Installation of Git and Notepad++
Java Mission Control in Eclipse build
The first step in the effort to build the Java Mission Control Eclipse plugin is to perform a git clone on the JMC GitHub repository.
C:\tutorial\> git clone https://github.com/openjdk/jmc.git
C:\tutorial\> cd jmc
C:\tutorial\jmc>
The cloned Java Mission Control GitHub repo contains a subfolder named /relent/third-party which contains third-party JAR files that must be built and then hosted on a local repository spun up on an embedded Jetty app server. The commands to do this are as follows:
C:\tutorial\jmc\> cd relent\third-party
C:\tutorial\jmc\relent\third-party> mvn p2:site
C:\tutorial\jmc\relent\third-party> mvn jetty:run
Leave the command window that runs Jetty open, lest the third-party Maven repo will be taken offline.
Java Mission Control core
The core of the Java Mission Control tool must now be built. We’ll issue a Maven command to compile, test and package from the \core subdirectory of the cloned Java Mission Control GitHub repo:
C:\tutorial\jmc\core> mvn clean install
Note that the above command is run from the \core subfolder. The next command, which will package up the Java Mission Control Eclipse plugin, as a JAR file, is run from the root folder created from the clone of the GitHub repo:
C:\tutorial\jmc> mvn package
When you’ve completed all of these build operations are complete, the JAR file containing the Java Mission Control Eclipse plugin will be buried in the following folder location:
C:\tutorial\jmc\application\org.openjdk.jmc.updatesite.ide\target\
The file name of the Java Mission Control plugin to be installed in Eclipse will be:
org.openjdk.jmc.updatesite.ide-8.0.0-SNAPSHOT.jar
Install the Java Mission Control/Flight Recorder Eclipse plugin
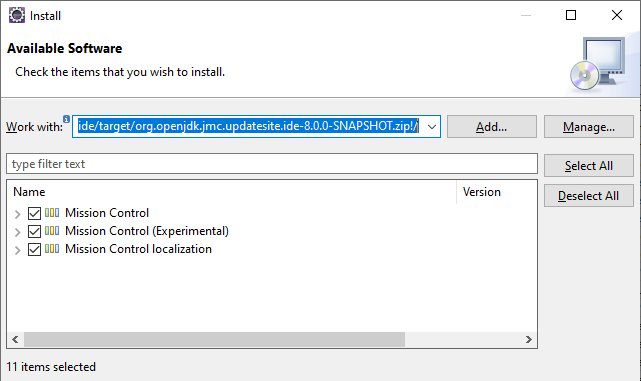
To install the JMC/JFR plugin, simply go to the Help –> Install New Software link from the main menu and then select Add… Archive. Locate the Java Mission Control Eclipse plugin JAR file and enable all of the options presented. Upon a reboot of Eclipse, Java Mission Control and Flight Recorder functionality will be enabled within the IDE.
The latest Java Mission Control Eclipse plugin is not currently available through the Marketplace.
Java Mission Control Eclipse install steps
In review, the steps to install Java Flight Recorder and the Java Mission Control 8 Eclipse plugin are:
- Clone the OpenJDK’s JMC GitHub repository
- Build the third-party libraries
- Host the third-party libraries on a Jetty powered, local Maven repo
- Build the Java Mission Control core libraries
- Package the Java Mission Control products as JAR files
- Install the Java Mission Control plugin in Eclipse
- Reboot Eclipse and start using JMC and JFR
With the plugin installed and Java Mission Control running, you can begin using the Java Flight Recorder on your running Java applications and gain valuable insights into how you can optimize your code and improve the performance of your Java applications.
 Cameron McKenzie is an AWS Certified AI Practitioner, Machine Learning Engineer, Solutions Architect and author of many popular books in the software development and Cloud Computing space. His growing YouTube channel training devs in Java, Spring, AI and ML has well over 30,000 subscribers.