RESTful Web services made easy
Learn the basics about RESTful web services in this quick tip. You can create a RESTful Web service using nothing more than the JDK, a simple text editor and Tomcat 7.
Many Java professionals are interested in learning the basics about RESTful Web services, but they often find tutorials that are overly complicated. In this quick tip, we’re going right back to the basics by demonstrating how easy it is to create a RESTful Web service using nothing more than the JDK, a simple text editor like Notepad and an installation of Tomcat 7.
First off, here’s just a little bit about RESTful Web services. They are intended to be used in the same manner that the HTTP protocol over which they run was designed. The HTTP protocol provides four basic methods: GET, POST, PUT and DELETE. In our case, we’re just going to focus on the GET method, and leave the other members of this barbershop quartet for later
Modern web service development in Java
Looking for a more modern approach to web service development? Here are some of the latest REST tutorials and SOAP web services examples that we’ve published on TheServerSide.
- The RESTful APIs tutorial: The ins and outs of effective RESTful web services
- A step-by-step RESTful web services example with Spring Boot
- Modern SOAP web services development in Java with Eclipse
- How to build SOAP components using WSDL and a top-down web services approach
- The simple bottom-up web service approach to creating SOAP based SOA components
- What is JAX-WS? What is REST?
- SOAP vs REST: Which one to choose?
I highly recommend these articles as a compliment to this slightly older tutorial. In fact, reading through these articles on modern SOAP and RESTful web service development, it's amazing to see just how far software development in Java has come.
Invoking a RESTful Web service
For the first iteration of our RESTful Web service implementation, we are going to have a single URL that only responds to a GET invocation. It will be accessed by the following URL:
http://localhost:8080/restful/resources/helloworld
Shooting the URL at you right up front is rather ambitious; but it’s good to take a look how the URL is composed because when we start creating the service, you will see how the various parts of the URL—namely, the context root restful, the mapping of the RESTful resource container resources, and the name of the service itself—all manifest themselves in either the code or the XML configuration files.
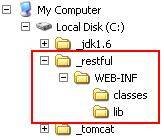
The requisite web application folder structure
As you would expect from its name, a Java based RESTful Web service needs to be deployed to a Java EE compliant Servlet Container, and as such the service itself must comply with the folder structure that is required by the Servlet and JSP API. Basically, that means that below the root of application, we need a WEB-INF folder, and that folder needs a deployment descriptor, a lib folder to contain any of the various JAR files that are required at runtime, and a classes folder under WEB-INF in which all of the compiled Java code will be contained:
+\(root folder)
++WEB-INF\
++++classes\
++++lib\
For this particular application, the root folder will be named _restful, which will be placed smack dab under the root of C:\.
With the required folder structure set up, it’s time to start populating the WEB-INF, classes and lib folders with the pertinent resources. Let’s start off by populating the lib directory.
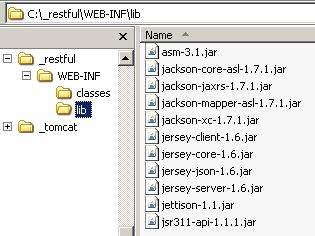
Obtaining Jersey: the JSR-311 reference implementation
Implementing RESTful web services isn’t about ‘rolling your own’ implementation. JSR-311 is the API specification for implementing RESTful services, and we can leverage this JSR by grabbing an implementation of the spec. An open source implementation of JSR-311 is Jersey, and it can be downloaded at jersey.java.net.
There are a few files available for download at jersey.java.net. The one you want is the zip file containing “the Jersey jars, core dependencies and JavaDoc.” The file I downloaded was named jersey-archive-1.6.zip and was an affordable 5.7 megabytes in size. When extracted to the hard drive, it provided a sweet little lib folder with all sorts of delicious jar files inside of it.

The various jar files in the lib folder of the Jersey download need to be copied into the WEB-INF\lib folder of the Web application we are currently developing, taking care of the runtime and compile time dependencies of the Web application.
Creating the Java based resource
For the implementing, Java-based component, we are simply going to write a class named HelloWorldResource in the com.mcnz.ws package, that has a single method named getMessage() which returns the String ‘Rest Never Sleeps.’ The method itself is rather uninteresting, but what is interesting are the various annotations that decorate the code.
As you code this class, note that it must be placed under the classes directory of the WEB-INF folder, and under a folder structure that maps to the package name com.mcnz.ws.
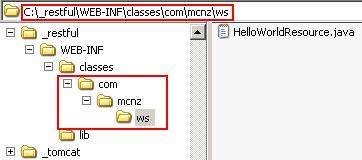
Here’s the code. Save it in a file named HelloWorldResource.java under the directory specified above.
The implementing class
package com.mcnz.ws;
import javax.ws.rs.*;
@Path("helloworld")
public class HelloWorldResource {
@GET
@Produces("text/plain")
public String getMessage() {
return "Rest Never Sleeps";
}
}
As was mentioned before, this service is only going to respond to HTTP GET invocations, and accordingly, you can see that the getMessage() method is decorated with the @GET annotation. Furthermore, a subsequent @Produces annotation indicates that the method will simply be returning plain text ("text/plain") as the MIME type. When someone gets our Web service through the specified URL, the text String “Rest Never Sleeps” will be returned.
Right up front, it was stated that the following URL would be used to invoke this service:
http://localhost:8080/restful/resources/helloworld
Notice how the @Path("helloworld") annotation maps directly to the name of the resource specified at the end of the URL.
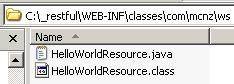
With the Java file saved, compile the code using the following command.
C:\> c:\_jdk1.6\bin\javac -classpath "C:\_restful\WEB-INF\lib\*"
C:\_restful\WEB-INF\classes\com\mcnz\ws\*.java
When completed, the folder containing the .java file should be accompanied by a .class file as well.
Configuring Jersey in the deployment descriptor
With the required jar files thrown into the WEB-INF\lib directory, and the HelloWorldResource.java file coded and compiled, the last step before deployment is to edit the deployment descriptor to let the Servlet container know that a Jersey implementation will be handling RESTful Web service invocations. So, create a file named web.xml, place it directly inside of the WEB-INF folder, and code it up like so:
<?xml version="1.0" encoding="UTF-8"?>
<web-app
xmlns="http://java.sun.com/xml/ns/javaee" version="3.0"
xmlns:xsi="https://www.w3.org/2001/XMLSchema-instance"
xsi:schemaLocation="http://java.sun.com/xml/ns/javaee
http://java.sun.com/xml/ns/javaee/web-app_3_0.xsd">
<servlet>
<servlet-name>RestfulContainer</servlet-name>
<servlet-class>com.sun.jersey.spi.container.servlet.ServletContainer</servlet-class>
<init-param>
<param-name>com.sun.jersey.config.property.packages</param-name>
<param-value>com.mcnz.ws</param-value>
</init-param>
<load-on-startup>1</load-on-startup>
</servlet>
<servlet-mapping>
<servlet-name>RestfulContainer</servlet-name>
<url-pattern>/resources/*</url-pattern>
</servlet-mapping>
</web-app>
There are really two items of note in this web.xml file. First is the fact that a Servlet is being configured to handle RESTful invocations. The Servlet bears the name ServletContainer and is part of the Jersey libraries that were downloaded from Sun and placed into the Web application's \lib directory.
The other important thing to notice is the url-pattern in the Servlet mapping named /resources/*. Notice how the URL-pattern, resources, maps to the part of the URL that comes directly before the name of the resource (helloworld), and after the name of the web application’s context root (restful).
http://localhost:8080/restful/resources/helloworld
Now, with the web.xml coded and saved, it’s time to package up the application as a war file and deploy it to Tomcat. As a last and final check, your development environment should have the following resources in the following folder structure:
+ \ ( root folder C:\_restful )
++ WEB-INF\
++++ web.xml
++++ lib\
++++++ asm-3.1.jar
++++++ jackson-core-asl-1.7.1.jar
++++++ jackson-jaxrs-1.7.1.jar
++++++ jackson-mapper-asl-1.7.1.jar
++++++ jackson-xc-1.7.1.jar
++++++ jersey-client-1.6.jar
++++++ jersey-core-1.6.jar
++++++ jersey-json-1.6.jar
++++++ jersey-server-1.6.jar
++++++ jettison-1.1.jar
++++++ jsr311-api-1.1.1.jar
++++ classes\
++++++ com\mcnz\ws\HelloWorldResource.class
++++++ com\mcnz\ws\HelloWorldResource.java
Get up to speed on Git and GitHub
New to Git and distributed version control? Here are some Git examples and Jenkins-Git integration tutorials designed to help you master the popular source code versioning tool.
- The five basic Git commands beginners need to master
- Undo a commit and manipulate commit history with this git reset --hard example
- Learn to git revert a commit with the bash shell
- Use the git cherry-pick command across Git branches
- Change the Git editor to Notepad++
- Where the Windows Git configuration files are stored
- Make CI and CD easier with Jenkins Git integration with GitHub
- Add Jenkins Git environment variables to your builds
- Make continuous integration part of your DevOps journey with this Jenkins CI tutorial
Deployment and testing
The following command, which as you can see is being run from the _restful directory, will take all of the resources contained within the _restful folder and package those resources up as a deployable war file. This command actually places the war file in the webapps folder of the Tomcat 7 installation. If you have Tomcat installed in a different location, you’ll need to edit the command accordingly.
C:\_restful> %JAVA_HOME%\bin\jar -cvf
C:\_tomcat\webapps\restful.war *.*
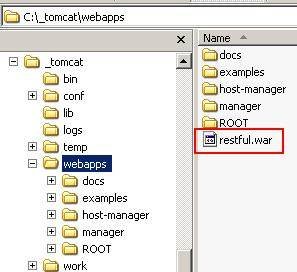
With the war file placed in the webapps directory, the only thing left to do is to start Tomcat and invoke the service.
The following command will start Tomcat, assuming the servlet engine has been installed in the _tomcat directory:
C:\_tomcat\bin> startup
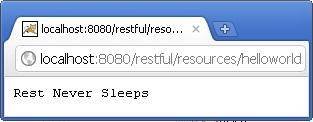
Once Tomcat is started, since typing a URL into a web browser triggers an HTTP GET invocation, the RESTful Web service can be invoked through a browser using the following URL:
http://localhost:8080/restful/resources/helloworld
(Notice that the context root, restful, maps to the name of the war file, restful.war.)
And here’s what the Chrome browser looks like after invoking the service:
Summary
And that’s it! That’s how easy it is to configure a basic development environment for RESTful Web services development, and to code an extremely simple RESTful web service that responds to basic GET invocations.
Stay tuned for more tips that move beyond the GET invocation and demonstrate the use of the HTTP POST, PUT and DELETE methods.