Jenkins Git integration: GitHub pull request via the Git plugin
This Jenkins Git integration tutorial demonstrates how to create a freestyle build job that performs a Jenkins GitHub pull request. It's an example of the Jenkins Git plug-in in action.

Jenkins Git integration is essential when creating software builds. After all, the whole point of a continuous integration server is to poll the source code repository for commits and, if it detects any, to then trigger a build, package and deploy process. This Jenkins Git integration tutorial demonstrates exactly how collaboration between these two tools happens and how you can use the Jenkins Git plug-in to pull and perform build steps with source code from GitHub.
The Jenkins git plug-in
The key to Jenkins Git integration is the Git plug-in. One can easily install the Jenkins Git plug-in through the Jenkins administrative console, and once properly configured, it gives all Jenkins build jobs the option to pull content from a Git-compatible source code repository.
New to Git and distributed version control? Here are some Git examples and Jenkins-Git integration tutorials designed to help you master the popular source code versioning tool.
- The five basic Git commands beginners need to master
- Undo a commit and manipulate commit history with this git reset --hard example
- Learn to git revert a commit with the bash shell
- Use the git cherry-pick command across Git branches
- Change the Git editor to Notepad++
- Where the Windows Git configuration files are stored
- Make continuous integration part of your DevOps journey with this Jenkins CI tutorial
In this Jenkins Git integration tutorial, we'll use the Git plug-in to download source code for a Rock-Paper-Scissors application and then generate Javadoc on the downloaded Java code.
How Jenkins Git integration works
When you create a build job, the Jenkins Git plug-in provides the option to specify Git as the source code repository. To select this option, you'll need a URL pointing to a Git-compliant repository, the name of the Git branch with which to connect and, if the source code repository is private, Git credentials as well.
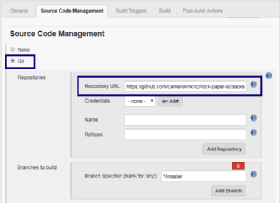
To start the Jenkins Git integration, you need to configure this section of the build job. When the build runs, the Jenkins Git plug-in will perform a GitHub pull request, a process that clones the remote repository and saves all of its associated files in the appropriate Jenkins workspace. It is from within that workspace that the build job performs all compilation, unit tests, cyclomatic complexity analysis, artifact packaging, Maven goals and any other activities associated with the Jenkins build job. In the case of this Jenkins Git tutorial, all it needs to do is generate Javadoc.
The Jenkins Git integration example
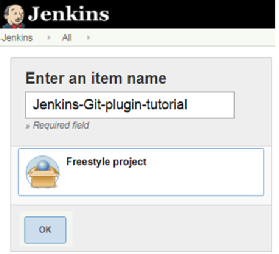
The first step in this Jenkins Git tutorial is to create a new freestyle project named Jenkins-Git-plugin-tutorial.
After you create the Jenkins freestyle project, the configuration page for the build job appears. Scroll down until the Source Code Management section appears.
Configure Source Code Management
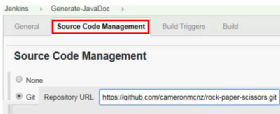
In the Source Code Management section, click on the Git radio button. This opens the Jenkins Git integration editor. Specify the following as the Repository URL: github.com/cameronmcnz/rock-paper-scissors.git.
This is a public repository, so you won't need GitHub credentials. You can leave the branch with the default value of master.
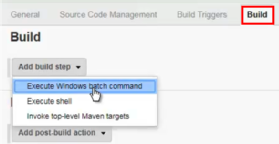
Add a Jenkins build step
After the repository is cloned, this Jenkins Git tutorial will use the javadoc.exe utility to generate Javadoc for the downloaded source files.
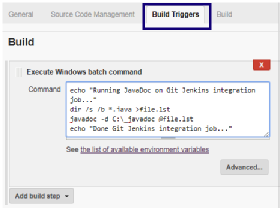
To do so, go to the Build section of the editor, and click on the Add build step drop-down box. Choose the Execute Windows batch option, and enter the following command:
echo "Running JavaDoc on Git Jenkins integration job..."
dir /s /b *.java >file.lst
javadoc -d C:\_javadoc @file.lst
echo "Done Git Jenkins integration job..."
If you perform this action on a Unix-based machine, the shell script to accomplish this feat is as follows:
find . -type f -name "*.java" | xargs javadoc -d outputdir
You can find a comprehensive explanation of the commands used here to generate Javadoc at Stack Overflow.
Run the Jenkins Git build job
After you enter the command, save the changes, and run the build.
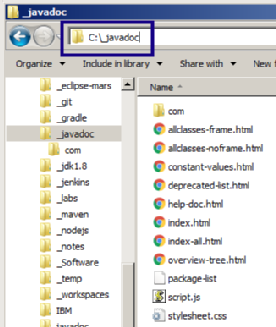
After the build runs, a new folder will be created off the C:\ drive named _javadoc. This folder will contain a number of HTML files that represent the generated Javadoc for the application. When you see this folder, you know the Jenkins Git integration build job was configured correctly and that the Jenkins freestyle job ran successfully.
And that's all there is to Jenkins Git integration. Simply install the Jenkins Git plug-in, create a new build job, configure the source code management section to point to your repository and then program any final build steps. When the job runs, a Jenkins GitHub pull request will occur, the steps outlined in the build section will be performed and the job will run successfully.
Dig Deeper on DevOps-driven, cloud-native app development
-
![]()
Jenkins Git environment variables list: A working shell script by example
By: Cameron McKenzie
-
![]()
Jenkins GitHub Webhook build trigger by example
By: Cameron McKenzie
-
![]()
How to run Jenkins builds on Docker example
By: Cameron McKenzie
-
![]()
How to use Jenkins with Ant to build your Java apps
By: Cameron McKenzie